|
Background
|
|
The Cape Colony was the first region of southern Africa to come under British control, in 1806, and it was important for the whole southern coast to be safe for ships travelling between England and India. From 1838 the British sought control of Natal from the Boers and annexed the district in 1845. Although the Boers were a problem for the British, it was widely accepted by all inhabitants of the whole region that, from past experience, the real danger was from the Zulus.
|
|
The Rise of the Zulus
|
|
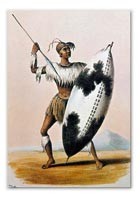
The native tribes of Southern Africa are generally believed to have migrated down the eastern side of the continent, in the mid 18th century, to establish grazing land for their cattle and escape the Arab slave traders. There were inevitable quarrels between tribes for land and disputes were often settled at pre-arranged points where ritual combat would take place involving single combat and organised throwing of spears. Around 1787 Shaka was born, the illegitimate son of Chief Senzangakhona of the amaZulus. Shaka was somewhat of an outcast but gained some respect among the Mthethwa people. He gained a reputation for military prowess and trained his men in tactics of his own devising, and the use of a stabbing spear to replace the throwing type. He eventually returned to his own people and was made king of the Zulu nation.
Shaka's Reign of Terror
Around 1816 King Shaka began his military conquests against neighbouring tribes. He ruled by fear, and moulded his regiments into unstoppable fighting machines. Boys were trained to ignore pain and obey their leaders implicitly. Regiments were formed by age groups and the warriors had to earn the right to marry. Usually only the middle-aged men were allowed to marry after many years service in their regiment. Shaka's cruel punishments ensured that his warriors prefered to face the enemy than the consequences of retreat.
Boers v Zulus
A despot like Shaka was not likely to see old age. He was killed by his half-brother Dingaan in 1828 and the military conquests ceased. Dingaan was a self-indulgent man who was, at first, more peaceful than Shaka, but could not be trusted. It was during his reign that the Boers made their Great Trek north from the Cape Colony. The main reason for this was a difference of opinion about how to treat the non-whites. The Boers had a long tradition of using slaves which they were reluctant relinquish, while the British had, since the latter part of the 18th century, been persuaded that slavery should be abolished. One group of Boers, under Piet Retief, approached Dingaan in 1838 with a request for permission to settle on Zulu land. He agreed, on the condition that they find and return some cattle stolen by Basutos. Retief and 60 Boers did as they were asked and returned with the cattle, but once inside Dingaan's kraal they were massacred. This, of course, incensed the Boers who, together with British settlers in Durban, advanced on the Zulus to exact revenge. But they too were wiped out and the Zulus were free to take over white controlled Durban. The remaining settlers managed to escape by ship but the town was sacked. A leader of the Boers Andreas Pretorius led another expedition against the Zulus at the end of 1828 and was successful.
Mpande
When Dingaan's half brother, Mpande fled to Natal with 17.000 followers, the Boers seized the opportunity to replace Dingaan with a more friendly Zulu king. It Was Dingaan's turn to flee when the Boers, with Mpande, invaded Zululand. King Mpande ruled from 1840 and proved to be a peaceful ruler. However, the conflict now shifted to Boer versus the British, and in 1845, after a struggle, Natal was formally annexed as a district of Cape Colony. The Boers began to move out, and a treaty was made with Mpande. In 1847 and again in 1850 there were the 7th and 8th Cape Frontier Wars to quell Xhosa uprisings, and in 1852 the Boers set up their own republic in the Transvaal. The Orange Free State was established by the Boers in 1854. Natal at this time was populated by 3,000 British settlers and 150,000 natives who had been driven out of their lands by the Zulus.
Cetshwayo
Mpande had two sons by different mothers, Cetshwayo and Mbulazi. Both boys attracted followers and the two groups became sworn enemies. Things came to a head in 1856 when Cetshwayo's followers defeated Mbulazi's at a bloody battle on the Tugela. To help him in his quest for power, Cetshwayo offered friendship to the Boers and the British. Sir Theophilus Shepstone, the Natal Secretary for Native Affairs, thought it prudent to recognise him as the heir to the Zulu throne. When Mpande died in 1873, Shepstone attended Cetshwayo's coronation, giving the Great White Queen's seal of approval, but also extracting promises of good conduct for the future. Cetshwayo listened, but with the throne now secure and the Zulus acknowledging his kingship he had no intention of ruling his people under the dictates of an outsider.
|
|
The British Plan for Confederation
|
|
South Africa had always been the poor relation in the British Empire, used as a stopping-off place en route to India, the Jewel in the Imperial Crown. But in 1868 diamonds and gold were discovered and this engendered a greater respect for the colony. The British Government decided that at last they could get a return on all those years of trouble and expense. The problem was that the region was a patchwork of Boer republics, black kingdoms and British colonies. The Secretary of State for the Colonies, Lord Carnarvon took it upon himself to link these entities into a Confederation. To this end he appointed Sir Henry Bartle Frere to the position of Governor of Cape Colony, tasked with implementing the Confederation policy. Transvaal had already come under British jurisdiction thanks to the work of Sir Theophilus Shepstone, and it was plainly obvious to Frere that Zululand had to be conquered.
|
|
The Boer-Zulu Border Dispute
|
|
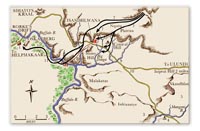
The Boer republic of Transvaal had been established to give the Afrikaners their own land away from British interference. But some of them had remained within the Natal borders, settling in the remote northwest, around Blood River (Ncome River). They were cattle owners and were attracted to the good grazing on the grassy uplands to the east, in Zululand. Mpande was king at that time and they sought his permission to use the area for their cattle. He was prepared to maintain good relations with the Boers and allowed them to move in. But there were no clearly defined bounderies so the Boers edged their way further and further into Zululand. When Cetshwayo came to the throne he wanted the Boers out of his country so the area (see Map), which stretched from Rorke's Drift in the south to the Transvaal border in the north, became disputed territory. The Boers claimed that Mpande had given them the land and Cetshwayo claimed that it was merely a loan and that he wanted it back. The British, at first, gave their support to the Zulus in the argument, but when the Transvaal came under British control, they felt that it would be better to placate the potentially hostile Boer population by supporting their claim. This dismayed Cetshwayo and provided another reason for the British to confront the Zulus.
Bartle Frere's Reasons for Provoking the Zulus
1. The Zulu Kingdom was an anachronism. They did not fit in with the new order of stable economic progress.
2. A show of military might would demonstrate what would happen if the Boers or natives opposed it.
3. A victory would increase confidence in the British administration.
4. The Zulus were probably encouraging other groups to fight the British. Frere thought it was they who caused the 9th Cape Frontier War.
5. The Zulus were a threat to Natal's national security. He encouraged the idea that Cetshwayo was planning to invade Natal and massacre the population.
6. Black people were needed to work in the diamond fields. The Zulu spirit needed to be broken.
7. The border dispute between the Boers and Zulus needed to be settled.
|
|
The Boundary Commission 1878
|
|
Sir Henry Bulwer, the Lieutenant-Governor of Natal, was less than keen on the idea of provoking a war with the Zulus. He thought that if it failed, Natal would be over-run by the victorious Zulu army and all would be lost. And even if the British invasion was successful it would poison race relations for years to come. Bulwer wanted to proceed with caution so he proposed that a Commission be set up to take evidence from the Boers and the Zulus and decide who was at fault in their dispute. Frere approved the setting up of this Commission because he was confident that it would provide confirmation of his views. The Commission set up to resolve the border dispute consisted of three members. One was Lieutenant-Colonel Anthony Durnford RE who was later killed at Isandhlwana. The other two members were John Wesley Shepstone, brother of Sir Theophilus, and M H Gallway, Natal's Attorney-General. They convened at Rorke's Drift in March 1878 and listened to the claims from both parties.
The Boers were represented by Henrique Shepstone, another brother of Sir Theophilus, who was Secretary of Native Affairs in the Transvaal. Also Gert Rudolph, the Landdrost of Utrecht, and Petrus Lefras Uys a prominent farmer in the disputed area.
The Zulus were represented by Chief Sihayo whose tribe lived near Rorke's Drift, and two of Cetshwayo's officials, Gebula and Mundula. The king also sent Sintwangu, a servant who was instructed to provide a confidential report on the proceedings, for royal ears only.
The Commission was escorted by 20 men of the Natal Mounted Police and was careful to appear as impartial as possible, so that when the Transvaal group tried to sit next to the Commissioners, they were moved away. The process lasted a month, with a large amount of evidence being scrutinized, both written and oral. Much of the Boer evidence was suspect, and the final outcome was that the Commission found in favour of the Zulus. However they stipulated that some of the more predominently Boer populated areas should be allowed to remain in Boer possession. This was good news for the Zulus. Bartle Frere, on the other hand, was not at all pleased, so it was a relief for him when another excuse for war presented itself.
|
|
Sihayo's Wives
|
|
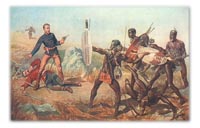
Sihayo, chief of the Qungebe, one of the Zulu tribes, was a supporter of Cetshwayo and the brother of Mfokanaza who was a favourite of king Mpande. He was a progressive Zulu who liked to dress in European clothes and dine at table with the missionaries. While he was away in Ulundi, his sons discovered that two of his wives had absconded and were over the border, in Natal. One of them was staying in the homestead of Mswagele a border policeman, so Sihayo's three sons, together with his brother and a force of 30 armed and mounted men and a large following of foot soldiers, crossed the Buffalo River at Rorke's Drift in broad daylight on 28th July 1878. They caught the wife and dragged her back over the border where they knocked her teeth out and either clubbed her or strangled her to death. The following day they repeated the same process for the second wife. These events shocked the colonists in Natal, and Frere's warnings about the ferocity of the Zulus seemed to be vindicated. It also had the effect of bringing Bulwer round to Frere's way of thinking.
|
|
Bartle Frere's Ultimatum
|
|
The Boundary Commission's findings were not the result that Sir Bartle Frere had anticipated so he sat on the report rather than publish it immediately. He needed time to think how he was going to present this to the Zulus without losing face. What he came up with was an ultimatum that he intended to put to the Zulus alongside the findings of the Commission. This ultimatum was a blatant provocation that could only have one outcome. The conditions imposed on Cetshwayo were:
1. Surrender of Sihayo's 3 sons and brother to be tried in the courts in Natal.
2. Payment of a fine of 500 head of cattle for the above offence and for failure to comply.
3. Payment of a fine of 100 head of cattle for the offence against Messrs Smith and Deighton.
4. Surrender of the Swazi Chief Umbilini and others to be tried in Transvaal courts.
5. Observance of promises made by Cetshwayo at his coronation.
6. That the Zulu army be disbanded and the men allowed to go home.
7. That the Zulu military system be discontinued and other military regulations be adopted, to be decided upon after consultation with the Great Council and British representatives.
8. That every man, when he comes to man's estate, be free to marry.
9. All missionaries and their converts, who until 1877 lived in Zululand, shall be allowed to return and re-occupy their stations.
10. All such missionaries shall be allowed to teach, and any Zulu, if he chooses, shall be free to listen to the teachings.
11. A British Agent shall be allowed to reside in Zululand who will see that the above provisions are carried out.
12. All disputes in which a missionary or European is concerned, shall be heard by the King in public, and in the presence of the Resident.
13. No sentence of expulsion from Zululand shall be carried out until it has been approved by the Resident.
Cetshwayo's Response
Cetshwayo had 20 days from the 11th Dec to comply with Bartle Frere's conditions. On the 18th he sent word that he would try to send the cattle and the wanted men but that the river was in flood and it may take longer. Of course, the king had no intention of giving up his impi and was hoping that there would be some negotiation if he looked as if he were at least trying to comply. But Frere was in no mood for a conversation. He wanted all conditions met within 20 days or else the British army would cross into Zululand on the 21st day and advance after the 30th day.
Reaction in London
In London the new Colonial Secretary, Sir Michael Hicks Beach, heard about the ultimatum and was appalled, but it was too late to stop the war. Hicks Beach was not in favour of his predecessor's Confederation scheme or Bartle Frere's aggressive intentions. Since it was a fait accompli there was little he could do except provide extra regiments to increase the chances of a British victory. So now the juggernaut had been set in motion.
|
|
British Forces
|
|
Sir Frederick Thesiger had brought the 9th Cape Frontier war to a successful conclusion and had inherited the title Lord Chelmsford in October 1878. Frere had already asked him to make plans for the invasion of Zululand and prepare the army. These preparations went ahead well before the ultimatum was even delivered. Chelmsford was worried that his force was under-strength. When he contemplated the troops at his disposal; he had no regular cavalry regiments, so had to rely on Natal volunteer units, and only 5 regular infantry battalions for the invasion:
1st Battalion 24th Regiment
2nd battalion 24th Regiment
2nd battalion 3rd Regiment (The Buffs)
1st Battalion 13th Light infantry
The single battalion 90th Light Infantry
There were other British Infantry regiments in South Africa. The 80th was in the Transvaal but needed to stay to keep an eye on the northern border of Zululand, and make sure the Boers did not make trouble. The 88th were in the Cape Colony with companies detached in Mauritius and St Helena. Hicks Beach, in London, although he was not in favour of the war, was prepared to send reinforcements, which arrived later:
2nd Battalion 4th Regiment (King's Own)
The single battalion 99th Regiment
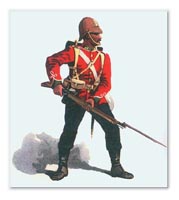
Manpower of the Regular Units
Each battalion had roughly 1,000 men, including officers, divided into 8 companies, A to H, plus the battalion HQ. They were armed with the Martini Henry rifle and a bayonet that had a 21 inch blade. If a soldier was aiming calmly the normal rate of fire was about 10 rounds a minute. The rifle had a vicious recoil which was off-putting to many of the soldiers and affected their rate of fire and accuracy. As well as these foot soldiers there were two squadrons of Mounted Infantry of 150 men each. They were made up of men from the 3rd, 13th, 24th and 80th regiments.
Other British units included 2 Royal Artillery Batteries, 6 guns and 175 men in each battery. There was also the Naval Brigade, about 200 men at first, which included Royal Marines. They had artillery and a Gatling gun. Two field companies of the Royal Engineers were available to Chelmsford, of around 200 men each.
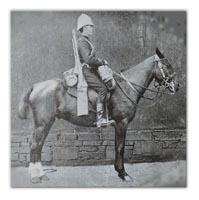
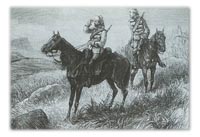
Colonial Cavalry
The mounted units of the local volunteer force were generally small, from the Natal Hussars and Buffalo Border Guard, about 30 men each, to Baker's Horse and the Frontier Light Horse who had around 200 each. They were mostly British ex-pats who served out of a sense of duty and the kudos of a military uniform and rank. They were generally good shots and skilled riders, and they knew the country. The Frontier Light Horse had fought in the 9th Cape Frontier War and were considered valuable enough to have Maj Redvers Buller of the 60th Rifles to command them. These men were all volunteers but there was a regular unit, the Cape Mounted Riflemen, raised in 1827, and a militia unit the Natal Carbineers, raised in 1855. The Natal Mounted Police were regular soldiers, recruited from Britain, and they mustered 110 men.
The Natal Native Contingent
The black population of Natal were subjected to conscription to raise enough manpower to supplement the under-strength army. There was a concern that the Zulu impi could cross into Natal while the British were advancing into Zululand so a large force was needed to guard the border. The recruitment and training of native Africans was left rather late so they were not very useful as soldiers. The white colonial NCOs were brutal to their recruits and led by fear rather than encouragement. The infantry were formed into 3 regiments, the 1st had 3 battalions, the 2nd and 3rd had two each. The battalions were 1,000 strong and mostly armed with shields and spears. They looked quite similar to the Zulu enemy apart from red cloths tied around their heads. One in ten men had a rifle but they were often out of date and the men were poorly trained. But there was no lack of motivation as these natives hated and feared the Zulus.
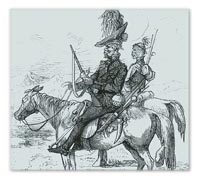
The Natal Native Horse
The local irregular cavalry were formed into 5 Troops of about 50 men each. They wore uniforms, of a sort, carried carbines and were led by competent officers. The Troops were drawn from different tribal or religious groups. Three of the Troops were of Sikali's Horse, Basutos from the foothills of the Drakensberg Mountains, the Hlubi Troop were from the tribe of that name. The last Troop, the Edendale Troop were Christians from the Wesleyan Edendale Mission, who had been raised after the Langalibelele Rebellion in November 1873.
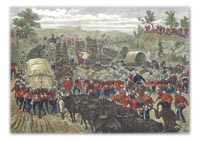
Logistics
If the assembly of adequate forces had stretched the manpower and armoury of the colony to the limit, the problems of supplying and maintaining such an army with food, water, fuel, ammunition, tentage, equipment, and above all, transportation for these commodities, presented greater difficulties. Reckoning on operations lasting between 6 weeks and 2 months, Chelmsford realised that 1,800 tons of stores would be needed to accompany the army. The most common form of transport in South Africa was the ox wagon, 18 feet long and 6 feet wide, which required between 14 and 18 animals to draw it. To keep the oxen in good working trim, 16 hours a day had to be allowed for their grazing and rest, so that on the rough dirt tracks only about 10 miles a day could be covered, even under good conditions. More often the roads were strewn with boulders, scarred by water courses or churned up by rain. Also herds of cattle had to be driven to supply the men with fresh meat. Thus a military column would stretch for miles and be an easy target for fast-moving Zulus. Chelmsford's staff were kept busy collecting the necessary transports, and with inflated prices the expense was enormous. In January 1879 they had 977 wagons, 56 carts, 10,023 oxen, 803 horses and 398 mules, with 2,000 extra natives to drive and manage them.
|
|
Lord Chelmsford's Strategy
|
|
The aim of Lord Chelmsford's army was to make Natal secure from Zulu invasion. To achieve this it was not practical to provide guards along the 200 mile border. A large Zulu impi could easily brush past a platoon of soldiers protecting one section of the border and wreak havoc in areas that were not protected. Anyway it would be almost impossible to mobilise against a fast-moving, unencumbered Zulu army. The only way to deal with the problem, as Bartle Frere had stated, was to go into Zululand with a large army, find the impi, bring it to battle and destroy it. But to take the whole army in one column would have meant that the Zulus could easily bypass them and enter Natal at some other river crossing 'while the cat's away' so to speak. Also a single column would be very slow and unwieldy. Chelmsford therefore decided to split the field force into 5 columns, which in effect ended up as 3 invading columns, entering Zululand from different points along the frontier.
No.1 Column
Entering Zululand at the Lower Drift
Commanded by Colonel C K Pearson
Naval Brigade (including Royal Marines) Two 7-pounders, two rocket tubes and a Gatling gun.
One section, 11th Battery, 7th Brigade Royal Garrison Artillery. (Two 7-pounders and one rocket trough)
2nd Field Company, Royal Engineers
2nd Battalion, 3rd (East Kent) Regiment (The Buffs)
99th (Duke of Edinburgh's) Regiment
One Troop Imperial Mounted Infantry (24th)
One Troop Natal Hussars. Captain Philip Norton
One Troop Durban Mounted Rifles. Captain William Shepstone
One Troop Alexandra Mounted Rifles. Captain W T Arbuthnot
One Troop Stanger and Victoria Mounted Rifles. Captain Charles Saner
(each Troop 40-50 strong)
No.2 Column
Entering Zululand at Middle Drift
Commanded by Lieutenant-Colonel A W Durnford RE
One Rocket Battery (three 9-pounders) Major F B Russell RA, one bombardier and 8 men from 1/24th
1st Regiment Natal Native Contingent (3 battalions)
1st Troop (NNH), Sikali's horse. Lieutenant C Raw
2nd Troop (NNH), Sikali's Horse. Lieutenant J A Roberts
3rd Troop (NNH), Sikali's Horse. Lieutenant V Vause
Hlubi Troop (NNH). Lieutenant A Henderson
Edendale Troop (NNH). Lieutenant H D Davies
(each Troop about 50 strong)
No.3 Column
Entering Zululand at Rorke's Drift
Commanded by Colonel Richard Glyn
N Battery, 5th Brigade Royal Field Artillery. Six 7-pounders and 2 rocket troughs. Brevet Major S Smith and Lt H T Curling (70 men)
5th Field Coy RE (3 men)
1st Battalion 24th (A C E F and H Companies) Brevet Colonel H B Pulleine
2nd battalion 24th ( A C D E F G and H Companies) Lt-Col H J Degacher
One Squadron Imperial Mounted Infantry (2/3rd 1/13th 1/24th and 80th)
One Squadron Natal Mounted Police. Major J Dartnell
One Troop Natal Carbineers Commanded by Capt Theophilus Shepstone (26 men)
One Troop Newcastle Mounted Rifles. Capt R Bradstreet (QM + 15 men)
One Troop Buffalo Border Guard. QM D McPhail (7 men)
3rd Regiment, Natal Native Contingent. Commandant R L Lonsdale
One Company, Natal Native Pioneers
No.4 Column
Entering Zululand at Bemba's Kop
Commanded by Colonel Evelyn Wood VC
11th Battery, 7th Brigade RGA (less one section) Four 7-pounders and 2 Rocket troughs
1st Battalion 13th Prince Albert's Light Infantry
90th Light Infantry
Frontier Light Horse (4 Troops) Lieut-Col Redvers Buller
Baker's Horse (2 Troops) Capt W G Parminter
Boer Burghers (1 Troop) Piet Uys
2 Battalions, Wood's Irregulars (friendly Zulus)
No.5 Column
Remaining in Transvaal, at Luneburg
Commanded by Colonel Hugh Rowlands VC
80th (Staffordshire Volunteers) Regiment (equipped with two 6-pounders and one 4-pounder)
Cape Mounted Riflemen
Border Horse. Lt-Col Frederick Weatherley
Transvaal Rangers. Commandant Pieter Raaff
Ferreira's Horse
Schutte's Horse
Eckersley's Transvaal Native Contingent
Each of the columns was to act independently, taking it's own provisions and making decisions without referral to Lord Chelmsford. They were instructed that the aim of the field force was the destruction of the Zulu army and the capture of King Cetshwayo and to head in the general direction of Ulundi, starting on 11th January 1879. More specifically, Pearson's no.1 Column was ordered to establish a base at Eshowe and Glyn's no.3 Column was ordered to establish a base at Isipezi Hill. Wood was required to contain the Zulus in the north to prevent them from interfering with no.3 column.
Durnford's no.2 Column was broken up so that 2 battalions of the 1st Natal Native Contingent should remain at Middle Drift, the third battalion to go to Umsinga, and the Rocket Battery and Natal Native Horse were to accompany Durnford who was now attached to no.3 Column. Chelmsford also attached himself and his staff to Colonel Glyn's no.3 Column.
|
|
Sihayo's Kraal
|
|
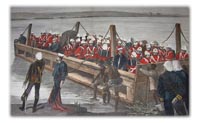
The Centre Column (no.3) began crossing the Buffalo River (Mzinyathi) at 4.30am on 11th January. The men of the 24th were ferried across on flat-bottomed ponts while the Natal Native Contingent waded across in water up to their necks. Even though it was summer the temperature was very cold before sunrise and the unclothed natives were frozen. The order to walk into the cold fast-flowing river was not welcome and it is little wonder that some of them drowned. Once across it was found that the track ahead was in need of some work from the pioneers. But in order to ensure the safety of the road-workers a nearby Zulu Kraal had to be neutralised. The chief of this kraal was Sihayo, whose wives were the ones who had absconded, with far-reaching consequences. Sihayo was also involved in the Boundary Commission inquiry. The task of capturing the kraal was given to the 1st Battalion 3rd NNC commanded by Commandant George Hamilton-Browne. He described the action vividly in his book 'A Lost Legionary in South Africa'
Lord Chelmsford instructed Browne that they were not to fire unless they were fired upon, also that women and children should not be harmed The NNC formed a line in front of the hill that led up to the kraal. When shots were fired at them they charged but the only ones that went forward were a company of 100 Zulus, fighting for the British after having been exiled from Zululand. The remaining natives were inclined to run away and had to be bullied back to the fight by their roughneck NCOs. The exiled Zulus had a score to settle with Sihayo's men who had played a central part in killing their comrades in an unfair fight some years earlier. A fierce hand to hand fight now took place. After some time, the enemy Zulus had retreated to the top of a difficult 60 foot cliff and were firing down on Browne's men. At that stage the runaway natives were brought back to the battle at the point of bayonets held by men of the 24th who were commanded by Wilson Black. The native contribution was negligible because those with rifles simply fired them in the air to use up their ammunition. It was also found that 32 of their number had been killed in the action and Browne was of the opinion that they were all victims of friendly fire. There was little chance of dislodging the enemy up on the rocky cliff but the flanking companies were on their way round, and amongst them was another company of exiled Zulus. They forced the surrender of Sihayo's men and the battle was over.
|
|
The Camp at Isandhlwana
|
|
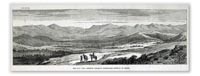
The men were set to work on improving the road for the wagons to proceed. This took some days, and the army then marched on in the direction of Isipezi Hill where a semi permanent camp was intended. The progress of the column was slow so it became necessary to establish an intermediate camp, and the ground to the east of Isandhlwana mountain seemed to fit the bill. It had a water supply and there was space for the wagons as well as for separate unit areas. The tents were erected on the 20th Jan.
Before the start of the operation Lord Chelmsford had given very precise instructions on all aspects of the campaign and emphasized the need for good defences around the perimeter of any camp, however temporary. And so it was generally assumed that the camp would be laid out so that the wagons could be formed into a laager and defences prepared, such as thorn bushes heaped up and broken bottles scattered where the Zulus would be most likely to attack. There were plenty of large rocks which could have been built up into defensive walls. Colonel Glyn proposed to do all this, but Lord Chelmsford forbade it. His reasoning was based on the fact that he wanted the wagons to be unloaded and sent back empty to Rorke's Drift to load up with more supplies and return to the camp. He was convinced, also, that the main Zulu impi was not in that area, and that the main focus for the building of defences should be at the intended camp on the Mangeni River.
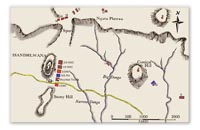
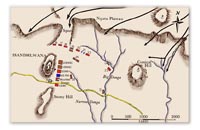
The Isandhlwana camp was laid out in a line running north-south, half a mile long with most of the wagons placed in the nek between the mountain and the Stony Hill. However, the safety of the camp was not to be completely disregarded since infantry piquets were deployed a half mile away by day and a quarter of a mile by night. Mounted vedettes were sent far out to the edge of the plateau.
Whatever Chelmsford's reasons for failing to fortify the camp, in the light of subsequent events it is hard to justify his negligence. If there was general agreement with his views amongst the officers it might be more understandable but it seems that he was alone in his attitude. Hamilton (Maori) Browne's autobiography 'A Lost Legionary in South Africa' was written and published in 1911 so he had the benefit of 30 years hindsight. But in the book he says: "I was talking to some of my best officers when [Lonsdale] joined us and his first words were, 'My God , Maori, what do you think of this camp?' I replied, 'Someone is mad.' The colonial officers were loud and long in complaint, and Duncombe (a captain in Browne's battalion) said, 'Do the staff think we are going to meet an army of school-girls? Why in the name of all that is holy do we not laager?' ....[Colonel Glyn] did not seem to be in good spirits, but said nothing about the camp, and on my remarking it looked very pretty though rather extended, he looked hard at me, shook his head and said, 'Very'."
|
|
The Column Splits in Two
|
|
Chelmsford's force had supplies to last two months so he was under pressure to achieve victory by then. On the 21st Jan they had been in the field for 10 days and achieved very little, so Major Dartnell of the Natal Mounted Police was sent to reconnoitre the area to the southeast, 10 miles away, with 80 of his own men, 47 volunteers and 1,600 of the Natal Native Contingent under Commandant Rupert Lonsdale. Lonsdale had recently recovered from a bad bout of sunstroke. In the late afternoon this force encountered 2,000 Zulus and a skirmish ensued. Dartnell was forced to withdraw and call on reinforcements. They bivouaced for the night of 21st/22nd and waited until 6.30am when Chelmsford and Glyn arrived with 6 companies of 2/24th, N/5th RA (4 guns), 84 men of the MI, and a company of Pioneers.
|
|
British at Battle of Isandhlwana
|
|
The camp at Isandhlwana was left in the charge of Brevet Lieut-Col Henry Pulleine, CO of 1/24th. Under his command were:
7 Staff officers and 13 men
N Battery 5th Brigade RA - 2 officers and 70 men
1/24th HQ and 5 companies - A C E F and H - 15 officers and 402 men
2/24th G Company - 5 officers and 170 men,
90th Regiment - 6 men attached to 1/24th
Army Service Corps - 3 men
Army Hospital Corps - 10 men
One squadron of Mounted Infantry - 28 men
Natal Mounted Police - 34 men
Natal Carbineers - 2 officers and 26 men
Newcastle Mounted Rifles - 2 officers and 15 men
Buffalo Border Guard - one QM and 7 men
1/3rd NNC - 12 officers, 30 European NCOs and 170 natives
2/3rd NNC - 9 officers, 30 European NCOs and 170 natives
1 Company Natal Native Pioneers - 10 men
Before leaving the camp Lord Chelmsford had sent a message to Colonel Durnford who was at Rorke's Drift, having moved his no.2 Column up from Middle Drift. He was to march his men as quickly as possible to Isandhlwana to reinforce Pulleine's units. In Durnford's column, also present at the battle, were:
3 Staff Officers and one NCO RE
Rocket Battery RA One officer, one bombardier and 8 men of 1/24th
Natal Native Horse 5 Troops - 5 officers and 260 men
1/1st NNC 2 companies, D and E 6 officers, 10 European NCOs and 240 men
|
|
Zulu Impi at Battle of Isandhlwana
|
|
In the Journal of the Society for Army Historical Research (Vol XLIII no.176, Dec 1965) the writer F W D Jackson gives a list of Zulu regiments that were at Isandhlwana. He gleaned the list from 3 sources; one from Mehlokazulu who was the son of Chief Sihayo, The second from Sihlahla, and the third from the Army List. The names of the regiments usually appear in all three lists but the numbers of men in each regiment vary, so the following list gives an average figure for each unit:
Ngobamakosi 6,230 (raised by Cetshwayo, all aged 24)
Umbonambi 1,750 (raised by Mpande, all aged 32)
Nodwengu 1,500
Umcityu or Ukandempemvu 5,300
Mpunga 750
Nokenke 1,500 (aged 30)
Tulwana 2,500 (raised by Mpande, all aged 45)
Ndlondlo 1,000 (raised by Mpande, all aged 43)
Indluyengwe 1,500 (raised by Mpande, all aged 28)
Udloko or Qikazi 1,800 (raised by Mpande, all aged 40)
Isanqu 600 (men over 50 yrs old)
Total Zulu Impi by this reckoning is 24,430 men. The ages of the men and the king that raised them were taken from a list in Appendix B in Michael Barthorp's book of the Zulu War (1987). Three of the regiments do not appear on Barthorp's list.
|
|
The Morning of the 22nd Jan 1879
|
|
The first report of Zulus advancing on the camp was at 8am on the 22nd when a trooper galloped down the spur from the plateau to say that a large force was approaching from the northeast. This report prompted Colonel Pulleine to send a message to Chelmsford which he received at 9.30. This was the first of several urgent messages that were ignored by his lordship. A second message received by Pulleine reported that the force had divided into 3 columns, 2 going northeast and one going northwest. The camp was on the alert after the first message but all was still quiet at 10 am when Colonel Durnford rode into camp with 5 Troops of NNH. His artillery and wagons were moving more slowly some way behind. Durnford was the more senior officer and was technically in command of the British force at the camp, but he was soon on the move and directed his Troops of Horse, 2 of them having to go up on the plateau with Capt Barry's 5 Company 2/3NNC in support. Durnford and Pulleine had lunch together until there was a report of 500 Zulus to the northeast, moving east. Durnford went with the Hlubi and Edendale Troops, the rocket battery and D company of 1st NNC to investigate.
|
|
The Zulu Attack on Isandhlwana
|
|
The main Zulu Impi, waiting for the propitious lunar moment in the valley to the northeast, were disturbed by Lieut Charles Raw's Troop of Native Horse and spilled out onto the Plateau to give chase. Raw was a survivor of the battle but Roberts, the commander of the other Troop that fled from the horde, was killed later that day. These 100 native troopers fired their carbines as they galloped away and gave warning to the men of the 24th at the top of the spur as they came down to the camp. Cavaye's E Coy remained in place to fire on the right horn of the Zulu impi. Lt F J D Scott of the Carbineers on Conical Hill saw the mass of Zulus pouring over the edge of the Plateau but stayed there until Durnford pulled his men back to the big donga, and then joined them.
Captain T Shepstone of the Natal Carbineers had collected two of his men who were on vedette duty on the Plateau, and galloped into camp at 12.15 to alert Pulliene. A message was sent to Chelmsford reporting heavy firing to the left (north) of the camp but it took two and a half hours to reach him. Mostyn's F Company was sent up the spur to assist Cavaye's men but it was an unwise move, and they soon had to retire down to the base of the spur. The main line of defence extended over 1,000 yards from the base of the spur as the Zulus appeared on the edge of the Plateau. As the left horn swarmed down onto the plain the first casualties were the Rocket Battery and D Coy 1/1NNC posted to the east of the conical hill. Durnford had managed to pull the rest of his men back to the big donga where they slowed down the advance of the Zulu left horn, made up of the youthful Ngobamakosi regiment. Major Smith RA temporarily brought one of his guns round to support Durnford and the Zulus were halted with grapeshot.
The steady fire of the 24th caused the Zulu centre to slow down so that the warriors took to lying down 400 yards from the British front line. Those Zulus who had rifles managed to find their target occasionally, but British casualties were light at this stage. The Zulu tactics, as ever, sought to encircle their enemy with its horns, and as long as these were kept in check to was possible for some of the British and native allies to escape through the nek and head towards the Buffalo River. However, the defensive line was too far out and supplying ammunition became difficult. Durnford's NNH soon ran out of bullets altogether and 2 Troop leaders were sent back to fetch more. But they couldn't find their wagons so had to ask QM Pullen of 1/24th to supply them. Pullen's refusal was probably a defining moment in the battle because it meant that the Ngobamakosi were now able to continue their movement round towards the south of the camp.
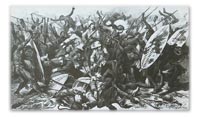
The NNH were forced to retire towards the camp and the right flank was now exposed. Lieut Pope's G Coy 2/24th was on the right but he moved south to the track leaving a big gap between him and Wardell's H Coy. Colonel Pulleine was aware of the problem and sounded the 'Retire'. This encouraged the Zulus to rush forward. The last chance to get away was fast coming to an end, and those men who had access to a horse took the opportunity to race out through the nek. Everyone else knew that the end was near and their only hope was for a quick death. As the soldiers fell back on the camp the Zulus were upon them and they had to form into small squares to protect each other's backs as they fired the last of their ammunition and resorted to the bayonet. Those that died that day were mostly the men of the 24th Regiment. The artillerymen attempted to get away with the guns, the Native Horse and Mounted Infantry escaped on their horses and gave covering fire to others as they fled to the river. The Native Contingent escaped on foot but had to fight pursuing Zulus who chased them to the other side of the river.
In the camp the last stands were fought at the north and south ends of Isandhlwana Mountain. Durnford and Pulleine died on the southern slope with men of the 24th, Natal Police and Natal Carbineers. Younghusband's C Company fought at the north end and one of their number climbed to a cave up on the slopes. The rest made a mad charge into the Zulu mass and were cut to pieces. The man in the cave managed to hold out until evening, probably the last man to die.
|
|
The Fugitives
|
|
The British/Colonial forces suffered 1,300 deaths. There were 78 fugitives who escaped the carnage at Isandhlwana and survived:
Durnford's no.2 Column
Lieutenant W F D Cochrane, 32nd Regiment (staff)
Mr Hamer (civilian transport officer)
Rocket Battery, 4 men - Bombardier G Gough RA, Privates H Grant (1/24th), W Johnson (1/24th), J Trainer (1/24th)
Captain W Barton NNH
Lieutenant Charles Raw NNH
Lieutenant V Vause NNH
Lieutenant A Henderson NNH
Lieutenant H D Davies NNH
Captain C Nourse NNC
Captain W H Stafford NNC
Captain D M Smythe NNC
Lieutenant W Erskine NNC
Colonel Glyn's no.3 Column
Captain E Essex, 75th Regiment (staff)
Captain A C Gardner, 14th Hussars (staff)
Lieutenant L H Smith-Dorrien, 95th Regiment (transport)
Mr J A Brickhill (civilian interpreter)
Lieutenant H T Curling RA
9 men of N Battery, 5th Brigade RA
Bandsman Bickley, 1/24th
Bandsman Wilson, 1/24th
11 men of no.1 Sqn Mounted Infantry - Sergeant P Naughton (2/3rd), Corporal J McCan (1/24th), Privates E Evans (2/3rd), J Edwards (2/3rd), J Gascoigne (2/3rd), D Whelan (1/13th), S Wassall (80th), T Westwood (80th), H Davis (1/24th), W Parry (1/24th), J Power (1/24th)
Natal Mounted Police, 9 men - Trumpeter Stevens, Troopers Sparks, Hayes, Collier, Kincaid, Eaton, Shannon, Doig, Dorhill
Natal Carbineers, 7 men - Troopers Muirhead, Fletcher, Edwards, Barker, Grainger, Tarboton, Sidthorpe
Newcastle Mounted Rifles, 7 men - Trumpeter Horne, TroopersBurne, Moodie, Walsh, Brown, Berning, Parsons
Buffalo Border Guard, QM McPhail and 4 men - Troopers Lennox, Adams, Adams, Stretch
Lieutenant J Adendorff NNC
Lieutenant W R C Higginson NNC
Lieutenant T Vaines NNC
Sergeant-Major Williams NNC and 2 NCOs
Lieutenant G F Andrews, Natal Native Pioneers
Conductor Foley
Smith-Dorrien's Story
The most famous of these survivors was Horace Smith-Dorrien who became a general in World War 1. He wrote an account of the battle, and his escape. He talked about Lieutenants Melvill and Coghill who famously escaped with the Queen's Colour of the 1st Battalion 24th, but were killed by Zulus. His account adds to the controversy over the award of the Victoria Cross to these officers:
"...I jumped on my broken-kneed pony which had had no rest for 30 hours, and followed it, to find on topping the nek a scene of confusion I shall never forget, for some 4,000 Zulus had come in behind [Isandhlwana Mountain] and were busy with shield and assegai. Into this mass I rode, revolver in hand, right through the Zulus, but they completely ignored me. I heard afterwards that they had been told by their King Cetshwayo that black coats were civilians and were not worth killing. I had a blue patrol jacket on, and it is noticable that the only 5 officers who escaped - Essex, Cochrane, Gardner, Curling and myself - had blue coats. The Zulus throughout my escape seemed to be set on killing natives who had sided with us, either as fighting levies or transport drivers.
"After getting through the mass of Zulus busy slaying, I followed the line of fugitives. The outer horns of the Zulu army had been directed to meet at about a mile to the southeast of the camp, and they were still some distance apart when the retreat commenced. It was this gap which fixed the line of the retreat.
"Again I rode through unheeded, and shortly after was passed by Lieutenant Coghill wearing a blue patrol and cord breeches, and riding a red roan horse. We had just exchanged remarks about the terrible disaster, and we passed on towards Fugitive's Drift. A little farther on I caught up Lt Curling and spoke to him, pointing out to him that the Zulus were all round and urging him to push on, which he did. My own broken-kneed transport pony was done to a turn and incapable of rapid progress.
"The ground was terribly bad going, all rocks and boulders, and it was about 3 or 4 miles from camp to Fugitive's Drift. When approaching this drift, and at least half a mile behind Coghill, Lieutenant Melvill, in a red coat and with a cased Colour across the front of his saddle, passed me going to the drift. I reported afterwards that the Colour was broken; but as the pole was found eventually whole, I think the casing must have been half off and hanging down. It will thus be seen that Coghill and Melvill did not escape together with the Colour. How Coghill came to be in the camp I do not know, as Colonel Glyn, whose orderly officer he was, was out with Lord Chelmsford's column.
"I then came to Fugitive's Drift, the descent to which was almost a precipice. I found there a man in a red coat badly assegaied in the arm, unable to move. He was, I believe, a mounted infantryman of the 24th, named Macdonald, but of his name I cannot be sure. I managed to make a tourniquet with a handkerchief to stop the bleeding, and got him halfway down, when a shout from behind said, 'Get on man, the Zulus are on top of you.' I turned round and saw Major Smith RA who was commanding the section of guns, as white as a sheet and bleeding profusely. In a second we were surrounded and assegais accounted for poor Smith, my wounded MI man, and my horse.
"With the help of my revolver and a wild jump down the rocks, I found myself in the Buffalo River, which was in flood and 80 yards broad. I was carried away, but luckily got hold of the tail of a loose horse, which towed me across to the other bank, but I was too exhausted to stick to him. Up this bank were swarming friendly natives, but I only saw one European, a Colonial and Acting Commissariat Officer named Hamer, lying there unable to move. I managed to catch a loose horse, and put him on it, and he escaped. The Zulus were pouring in a very heavy fire from the opposite bank, and dropped several friendly natives as we climbed to the top.
"No sooner had I achieved this than I saw that a lot of Zulus had crossed higher up and were running to cut me off. This drove me to my left, but 20 of them still pursued for about 3 miles, and I managed to keep them off with my revolver.
"I got into Helpmakaar at sundown, having done 20 miles on foot from the river, for I almost went to Sandspruit. At Helpmakaar I found Huntley of the 10th who had been left there with a small garrison, and also Essex, Cochrane, Curling and Gardner, from the field of Isandhlwana, all busy placing the post in a state of defence. We could see that night the watchfires of the Zulus some 6 miles off, and expected them to come on and attack, but we knew later they had turned off to attack Rorke's Drift.
"I at once took command of one face of the laager, and shall never forget how pleased we weary watchers were when, shortly after midnight, Major Upcher's 2 companies of the 24th, with Heaton, Palmes, Clements, and Lloyd, came to reinforce. These two companies had started for Rorke's Drift that afternoon, but had been turned back to Helpmakaar by Major Spalding, a staff officer, as he said Rorke's Drift had been surrounded and captured, and that the two companies would share the same fate. Luckily his information proved to be wrong."
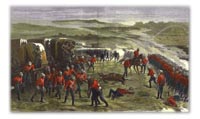
Melvill and Coghill
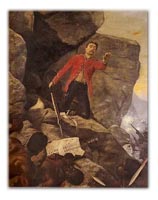
Nevill Coghill reached the river first, and spurred his horse into the fast-flowing water. When he reached the other bank he looked back and saw the mounted Teignmouth Melvill plunge in with the Colour. His horse was shot and the rider clung to a rock, calling on another officer in the river, Higginson, to help. But the Colour was swept away. Coghill saw all this and was about to ride into the river to help Melvill and Higginson. At that moment his horse was shot too, and Coghill fell into the water. He reached the rock and all three men managed to get to the Natal side of the river. Once on the other side Higginson went to find a horse as the other two were exhausted. Before he could get very far he realised that Melvill and Coghill were being attacked and he could do little to help. There is some question about who actually killed them, the suggestion being that they were finished off, not by the Zulus who had been chasing them, but by Africans on the Natal bank. The Zulus could have shouted to these men that they would suffer reprisals if the two officers were not killed.
They were killed on the day of the battle, 22nd Jan, but the bodies were not discovered until 4th Feb, by a British patrol. They were half buried in a makeshift grave, not in the condition depicted by Alphonse de Neuville's 'Last Sleep of the Brave'. The other de Neuville painting, 'Saving the Queen's Colour' is also erroneous in showing the two men riding together. As Smith-Dorrien points out, the two officers did not ride together, so Coghill's reason for leaving the battle was not to save the Colour. The VC awards were not granted straight away because there was no provision for posthumous awards at that time. When, in 1906, it was decided to give the VC to heroes who had died in the course of their brave action, the medals were sent to the families of the two officers, gazetted on 15th Jan 1907.
|
|
The Zulu Advance on Rorke's Drift, 22nd Jan
|
|
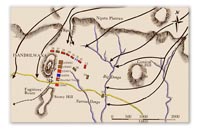
When the Zulu impi was mobilised and made its approach on the camp at Isandhlwana, the 'right horn' travelled further west along the plateau and split into two. One half curved around the west side of Isandhlwana mountain to meet up with the left horn so that the British would be encircled. The other half of the right horn was instructed to pursue the fugitives that were expected to head for the Buffalo River. These Zulus belonged to four regiments of the Undi corps, raised by King Mpande and commanded by Cetshwayo's brother Dubalamanzi:
Ndlu-yengwe 1,000, aged 28 (bachelors)
Udloko 3,000, aged 40 (married)
Uthulwane 1,000, aged 45 (married)
Ndlondlo 900, aged 43 (married)
The Ndlu-yengwe pursued the fugitives to the drift that became known as Fugitive's Drift, then crossed the river 2km upstream. The rest crossed at a point further up, almost due east of the Rorke's Drift station. It is thought that some of the men were diverted to loot other buildings on the Natal side of the river so that the force that attacked the station was between 3,500 and 4,000. There was never any plan to carry out this attack, it was really a spontaneous decision on the part of Prince Dubalamanzi who disobeyed his brother's orders not to cross into Natal.
The Defenders
When No.3 Column entered Zululand on the 11th Jan, B company of 2nd Battalion 24th Regiment remained at Rorke's Drift to defend the stores and the hospital. There were also officers and men of other units and about 30 patients in the hospital.
B Coy 2/24th, Lt Bromhead and 112 men
1/24th, Sgt Wilson and 9 men
N Battery, 5th Bde, Royal Artillery, 4 men
5th Field Coy RE, Lt Chard and 1 man
2/33rd Buffs, Sgt Milne
90th, Corp Graham
Commissariat and Transport Dept, 3 men
Army Service Corps, 1 man
Army Medical Dept, Surgeon Reynolds and 1 man
Army Hospital Corps, 3 men
Chaplain Smith
Natal Mounted Police, 3 men
Natal Native Contingent, Lt Adendorff and 6 men
Civilian, Mr Daniells
This makes a total of 152 men of whom 30 were sick or wounded in the hospital, although Some of the sick were able to contribute to the defence.
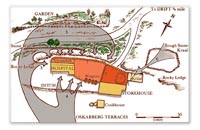
The Attack on Rorke's Drift, 22nd - 23rd Jan 1879
At 2.30pm on 22nd Jan, Lieutenant John Chard RE was working on the ponts at the drift (ford) which was about half a mile from the station where the stores and hospital were situated. Two colonial officers, Adendorff and Vane of the NNC, rode over the drift and reported that the camp at Isandhlwana had been over-run by Zulus and that 4,000 warriors were advancing on Rorke's Drift. After a brief discussion with Lieutenant Gonville Bromhead, the commander of B Company, and Assistant Commissary James Dalton they prepared the post for a defensive action. The store had a large supply of mealie corn which was used as feed for the animals and was also cooked by the native troops. Heavy mealie sacks were used to build a wall around the compound so that the storehouse and hospital could be defended.
Private Hitch was posted on the roof of the storehouse to keep look-out, and Chaplain Smith, with Surgeon Reynolds went up the Oskarberg kop behind the post. The defenders were temporarily reinforced by Lieutenant Vause and his no.3 Troop of Natal Native Horse (50 men) and 100 native infantry under Captain Stephenson. They helped build the defences, but as soon as the Zulus came into view at 4.30pm they ran off in the direction of Helpmakaar. When Chard realised how depleted his force was, 120 men plus 30 wounded, he ordered a wall of biscuit boxes to be built from the end of the storehouse across the open area to the north wall. This provided a smaller area to fall back on but the immediate vicinity of the hospital had to be defended as long as possible.
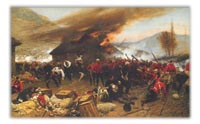
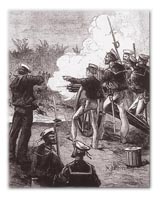
The Ndlu-wenge were the first Zulu regiment to attack. They came around the south side of the Oskarberg and fired at Hitch on the roof, the first shots of the battle, and raced towards the wall between the hospital and the storehouse. Some of the Zulus who were armed with antiquated rifles took up places in the caves on the Shiyane terrace to fire down on the station. The men defending the south wall maintained a steady fire at close range with their Martini Henry rifles and every bullet hit a charging Zulu. They ran crouching low but there was no cover for them so they worked their way around the west side of the hospital and were joined by the remainder of the Zulu force that had also approached from behind the Oskarberg, attacking the garrison on the north side of the hospital.
Inside the perimeter Chard and Bromhead assisted by Dalton, all armed themselves with rifles and bayonets and moved constantly up and down the line, encouraging the men and adding their own fire at any point where casualties caused a gap. Numbers of men along the north wall were hit in the back by fire from the Zulus on the Oskarberg 200 metres behind the station. The first withdrawal was from the front of the hospital to a wall of mealie bags at the east end of the building. This put pressure on the men inside defending the patients. They had to hack holes in the walls of the small rooms to extract the patients whilst engaging in desperate hand-to-hand fighting with warriors who had found a way inside.
At 6pm the hospital's thatched roof was on fire and the evacuation of the building was in progress. The defenders of the hospital were Privates Henry Hook, 'Old King' Cole, Joseph William, John Williams, Robert Jones, and William Jones. Of these 6, Cole and Joseph Williams were killed and the others won the VC for fighting a horrifying rearguard action. Seven of the patients were killed but 22 were saved. Chard ordered everyone to retreat behind the wall of biscuit boxes and put the wounded inside a high-walled redoubt that had been built by Assistant Commissary Dunne, and others, in front of the storehouse. Private Dunbar of the 24th had performed some good shooting to pick off some of the Zulu marksmen on the Shiyane but now that they were behind the cover of the storehouse, these marksmen were no longer a problem. As darkness fell at about 7pm the fighting was still fierce with soldiers and Zulus in close-up fighting with assegais and bayonets. Normally Zulus did not fight at night but the flames from the hospital lit up the scene vividly so there was no let-up.
The last Zulu attack was concentrated at the darkest part of the perimeter, where the well-built stone kraal formed the northeast corner. The defenders had to pull back from the outer wall of this kraal, to an inner wall. But the outer wall was too high for the Zulus to get over so they were held off. Everyone was very thirsty so a brave few leapt over the biscuit box wall to retrieve the wheeled water-barrel that was left near the hospital. At around midnight the assaults slackened and over the next few hours there was a 'war-dance' and shouts of 'uSuthu!' so that the men were in constant fear of a renewal of the battle. They were in a state of shock, and very tired, but there was no sleep. Their rifles had become so hot that cloth or animal skin had to be wrapped around the stock to be able to fire them.
The dawn light showed many dead warriors lying around the station and at 7am the surviving Zulus gathered at the west end of the Oskarberg looking as if they might have one more onslaught, but they turned and went home. The Zulus were mostly middle-aged men and they were also very tired, hungry and thirsty. The casualties in the garrison were 15 killed, 2 mortally wounded and 7 badly wounded. They counted around 350 dead Zulus in the vicinity but many more were found later, and those that were wounded were not likely to have effective medical care. At around 8am the garrison was relieved by the Chelmsford's force which had spent the night at Isandhlwana and set off before dawn. Russell's Mounted Infantry were the first on the scene and were a very welcome sight for the defenders.
Eleven men were awarded the Victoria Cross in this action. This reflected the way in which news of the Defence of Rorke's Drift was received by the Queen, her government, and the general public. The disaster at Isandhlwana plunged the nation into a great depression but Rorke's Drift lifted their spirits. It also raised morale in Natal. If the Zulus had over-run Rorke's Drift they would have thought themselves invincible and wreaked havoc in the colony.
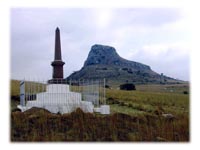
A memorial stands on the battlefield of Isandhlwana to pay tribute to the men of the 24th Regiment who died on 22nd Jan 1879 both at the battle there and at Rorke's Drift.
|
|
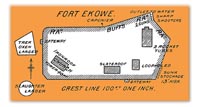
Number 1 Column's Advance into Zululand
|
|
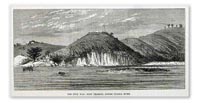
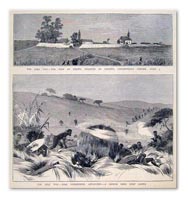
Colonel Charles Pearson's no.1 Column began crossing the Lower Drift of the Tugela near Fort Pearson on 12th Jan, and work started on a corresponding fort to guard the Zululand bank, called Fort Tenedos after the naval ship whose crew formed part of the column. It took 5 days to ferry across 5,000 men, 384 ox wagons, 3,400 baggage animals and 600 civilian wagoners and drivers. The road ahead was muddy and impeded by steep bank dongas which would have slowed the progress of his column so Pearson split it into two divisions, setting off on the 18th and 19th Jan.
Battle of Inyezane, 22nd Jan 1879
Pearson led the 1st Division and proceeded towards Eshowe. They made camp on 21st Jan, 4 miles south of the Inyezane River. He had 4 companies of the 2nd Buffs, 150 mounted men, 1st Btn 2NNC, a field Company of Engineers, part of the Naval Brigade with two 7-pounders, rockets and a Gatling gun, and RA with another two 7-pounders. At first light on the 22nd they crossed the river and encountered a steep ridge with 3 spurs running up to it. Some Zulus appeared on the ridge and a company of NNC were sent up the centre spur to deal with them. They pursued them into a ravine and up onto the right-hand spur. As the NNC were re-forming, having been dispersed in the pursuit, a mass of Zulus appeared over the crest of the ridge. This was the left horn of a 6,000 strong impi. The Native Contingent fled leaving their officers and NCOs to the Zulus.
There was a small knoll halfway up the centre spur and a kraal on the left near the top of the ridge. The artillery guns and 2 companies of the Buffs were sent up to the knoll to fire on the Zulus on the right-hand spur causing them to retire uphill. The mounted troops under Major Barrow chased after them up the spur and the artillery directed its fire on the kraal which had been occupied by the centre column of Zulus. The sailors and Buffs ran up the centre spur with the Gatling to capture the Kraal, and the Gatling was brought to bear on the Zulus from the crest of the ridge. Once this was achieved the Zulu impi was in disarray and they retreated. The action had cost 10 men killed and 16 wounded while the Zulus lost at least 350 warriors. This battle took place on the same day as Isandhlwana and Rorke's Drift, 100 miles away.
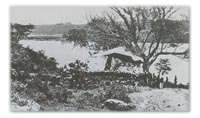
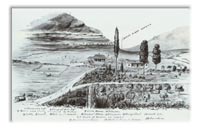
Eshowe, 23rd Jan - 3rd April
On 23rd Jan Pearson's division completed their march to Eshowe. The 2nd division, commanded by Colonel Wellman of the 99th Regiment, arrived on 24th. Eshowe was a small community set up by a missionary, consisting of a church, a house and a school. Fortifications were built around it and a trench around the outside. Pearson received two messages telling him that Fort Tenedos had beaten off an attack, and that Durnford's column had been wiped out. It was almost a week later that he heard from Chelmsford about Isandhlwana, and that he must take whatever action he thought necessary to preserve the lives of his men. Pearson was worried about supplies, and the wet weather had turned the place into a bog. It was unhealthy and stressful to stay there but withdrawal to the Tugela was too risky. Spirits were raised when supply wagons arrived from the Lower Drift escorted by 5 companies of the 99th and NNC. There was no grazing for the oxen so 1,200 of them had to be sent back, however, they were attacked by Zulus and 900 of them were captured, leaving only 300 for future use on the wagons. Life inside the fort was miserable for the 1,300 soldiers and sailors (and 400 wagoners) as no tents were available; they had to make do with sleeping under the wagons.
The Zulus appeared in force at some distance from the fortress but it became apparent that Pearson's column was cut off and unlikely to be relieved. There was no outright battle with the enemy but disease took it's toll and morale slumped, especially because of the lack of tobacco. The only contact with the army was at the beginning of March when a heliograph message was received telling them that a relief column would set off on 13th March. This was later postponed until 27th March. Chelmsford led the relief column and, after fighting a battle at Gingindhlovu, arrive at Eshowe on 3rd April.
The Eshowe Relief Force
Lord Chelmsford was anxious to relieve Eshowe but was waiting for reinforcements to arrive from Cape Town, and St Helena where HMS Shah diverted from its voyage to England to go to Natal. The British government was also sending out 2 cavalry regiments and 6 infantry battalions after receiving the news of Isandhlwana, but these would not arrive in time for the Eshowe relief. However the 5,670 strong force was organised in 2 divisions, the 1st Divison set off on 27th March the 2nd a day later:
Advance Division commanded by Lt-Col Law RA
Naval Brigade, 350 men (two 9-pounders, four 24-pounder rocket tubes and 2 Gatlings)
3rd Buffs, 2 companies
99th, 5 companies
91st Highlanders
4th NNC, 1 battalion
John Dunn's Scouts (150 friendly Zulus)
Mounted Infantry (60 men)
Natal Volunteer Guides (65 men)
Rear Division, commanded by Lt-Col Leigh Pemberton
3rd Battalion 60th Rifles (6 companies)
Naval Brigade, 190 men
R Marine LI, 1 company
57th West Middlesex Regiment
5th NNC, 1 battalion
Mounted Infantry (60 men)
Natal Volunteer Guides (65 men)
Battle of Gingindhlovu, 2nd April 1879
The column travelled along the coast, avoiding the route taken by Pearson. Progress was slow because each night the camp was strongly fortified with ditches and laagered wagons. Lord Chelmsford had learnt a painful lesson at Isandhlwana. On the evening of 1st April they camped on the south bank of the Inyezane River near the kraal of Gingindhlovu which had been burned by Pearson's column 10 weeks earlier. The camp was laagered into a 130 sq yd area with a trench dug 20 yards out. The infantry slept between the wagons and the trench so that they would be ready at a moment's notice. John Dunn made a reconnaissance and returned after dark to report the presence of a Zulu impi on the north bank of the river, to the northwest.
There was no night attack but at dawn the Zulus were seen moving along the other side of the river and one of the Gatling guns fired a long burst. The next sighting was when the impi had crossed the river behind Umisi Hill and rushed at the laager in buffalo horns formation. They surrounded the camp but there was no cover and the Martini Henry rifles had a good field of fire. The Zulus had made a bad mistake in attempting to attack the British in their strong defensive position. Chelmsford had at last got it right. Zulus were falling thick and fast under the massed rifle volleys, Gatling guns and rocket fire. This lasted 20 minutes before the enemy fled, pursued by Major Barrow's mounted men. 700 Zulus were killed in the fight around the camp and 300 more killed in the pursuit. The casualties on the British side were 2 officers and 5 privates killed, as well as 5 men of the NNC. There were 48 men wounded.
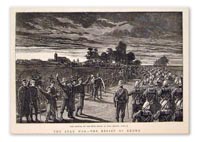
Relief and Evacuation of Eshowe
The camp was dismantled and the two divisions took the road to Eshowe up on the plateau, arriving on the morning of the 3rd April. The defenders welcomed them with open arms and provisions were shared, some of the men having their first smoke in months. But it was decided that the fortified mission was no longer needed and the defences were dismantled. Pearson's men started back on the 4th April. Before returning to Natal, Chelmsford sent all the mounted troops to the homestead of Dubalamanzi, at Esulwini, to exact revenge for the attack on Rorke's Drift. They set fire to his huts many of which exploded as they were used to store ammunition and explosives. Dubalamanzi, himself was seen but not captured. As they marched back they could see smoke rising from Eshowe high on the plateau; the Zulus had set fire to the evacuated mission. On the road home the Rear Division was ordered to stay at a point 16 miles from Lower Drift, near the coast, to built a new fort, to be called Fort Chelmsford.
|
|
|

|
| Area of Operations in Zululand
|
| Places
|
Natal
Zululand
|
| Significant Individuals
|
British
Zulu
|
| British Regular Units
|
Naval Brigade
Royal Marines
1st King's Dragoon Guards
17th Lancers
5th Brigade Royal Artillery
7th Brigade Royal Artillery
Royal Engineers
3rd (East Kent) Regiment (The Buffs)
4th (King's Own Royal) Regiment
13th Prince Albert's Light Infantry
21st Royal Scots Fusiliers
24th (2nd Warwickshire) Regiment
57th (West Middlesex) Regiment
58th (Rutlandshire) Regiment
60th King's Royal Rifle Corps
80th (Staffordshire Volunteers) Regiment
88th (Connaught Rangers) Regiment
90th (Perthshire Volunteers) Lt Infantry
91st (Argyllshire) Highlanders
94th Regiment
99th (Duke of Edinburgh's) Regiment
Imperial Mounted Infantry
Commisasariat & Transport Department
Army Service Corps
Army Hospital Staff
Army Hospital Corps
Ordnance Store Branch and Corps
|
| Colonial Units
|
1st Rgt, Natal Native Contingent (3 Btns)
2nd Rgt, Natal Native Contingent (2 Btns)
3rd Rgt, Natal Native Contingent (2 Btns)
Natal Native Pioneer Corps
Natal Mounted Police
Natal Native Horse
Natal Carbineers
Natal Hussars
Newcastle Mounted Rifles
Buffalo Border Guard
Frontier Light Horse
Durban Mounted Rifles
Baker's Horse
Transvaal Rangers
Eckersley's Transvaal Native Contingent
Ferreira's Horse
Kaffrarian Vanguard (Germans)
Alexandra Mounted Rifles
Stanger Mounted Rifles
Victoria Mounted Rifles
Lonsdale's Mounted Rifles
Cape Mounted Riflemen
Schutte's Corps
|
| Audio
|
Zulu Battles
Saul David describes some of the less famous Zulu War battles (BBC)
|
| Films
|
Zulu
Stanley Baker and Michael Caine star in this famous recreation of the battle at Rorke's Drift
Zulu Dawn
Burt Lancaster and Peter O'Toole star in this film about the British defeat at Isandhlwana
|
| Links
|
Contemporary Visit
David Buckerfield revisits the battlefields of the Anglo-Zulu War.
|
Ulundi
David Buckerfield has taken pictures of the memorial and inscriptions of the battlefield of Ulundi
|
|
Suggested Reading
|
The Story of the Zulu Campaign
Ashe, W. Cape Town, 1989
The Terrible Night at Rorke's Drift: The Zulu War, 1879
Bancroft, J. 1988
The Zulu War: A Pictorial History
Barthorp, M. Poole, 1980
The Last Zulu King: The Life and Death of Cetshwayo
Binns, C. London, 1989
A History of the Zulu and Neighbouring Tribes
Bryant, A. Cape Town, 1964
The Zulu War
Clammer, D. Newton Abbot, 1973
The Invasion of Zululand 1879
Clarke, S. Jo'burg, 1979
Zululand at War 1879
Clarke, S. Jo'burg, 1984
The Glamour and Tragedy of the Zulu War
Clements, W. London, 1936
History of the Zulu War and its Origin
Colenso, F. & Durnford, E. London, 1880
Zulu Battle Piece: Isandhlwana
Coupland, R. London, 1948
The Road to Isandhlwana
Drooglever, R. London, 1992
The Anglo-Zulu War: New Perspectives
Dumminy, A. & Ballard, C. 1981
Eyewitness in Zululand: The Campaign Reminiscences of Col Dunne
Dunne, W. London, 1989
The Red Soldiers: Letters from the Zulu War 1879
Emery, F. London, 1977
Zululand and the Zulus
Farrer, J. London, 1879
Captain Carey's Blunder: The Death of the Prince Imperial
Featherstone, D. London, 1973
Lord Chelmsford and the Zulu War
French, G. London, 1939
The Zulu War: Isandhlwana and Rorke's Drift
Furneaux, R. London, 1963
The Story of the Zulus
Gibson, J. London, 1911
Rorke's Drift: A Victorian Epic
Glover, M. London, 1975
The Road to Isandlwana
Gon, P. 1979
The Destruction of the Zulu Kingdom: The Civil War in Zululand 1879 - 84
Guy, J. London, 1979
Cetywayo and his White Neighbours
Haggard, Rider
The Zulu War Journal of Colonel Henry Harford
ed Child, D
The Noble 24th - Biographical Records of the 24th Regiment in the Zulu War and the South African Campaigns 1877-1879
by Norman Holme (Savannah Publications 2000)
Hill of the Sphinx – The Battle of Isandlwana
by F W D Jackson (Westerners Publications 2002)
Brave Men's Blood: The Epic of the Zulu War
Knight, Ian
British Forces in Zululand 1879
Knight, Ian
Nothing Remains but to Fight: The Defence of Rorke's Drift
Knight, Ian
Queen Victoria's Enemies
Knight, Ian
The Zulus
Knight, Ian
Zulu: Isandlwana and Rorke's Drift
Knight, Ian
By the Orders of the Great White Queen: Campaigning in Zululand through the eyes of the British Soldier
Knight, Ian
Fearful Hard Times: The Siege and Relief of Eshowe
Knight, Ian and Castle, Ian
The Zulu War Then and Now
Knight, Ian and Castle, Ian
The Zulu War: Twilight of a Warrior Nation
Knight, Ian and Castle, Ian
The Battle of Ulundi
Laband
Fight us in the Open: The Anglo-Zulu War through Zulu Eyes
Laband
Kingdom in Crisis: The Zulu Response to the British Invasion of 1879
Laband
Lord Chelmsford's Zululand Campaign
Laband
Isandlwana
Laband and Matthews
The Buffalo Border 1879: The Anglo-Zulu War in Northern Natal
Laband and Thompson
Field Guide to the War in Zululand and the Defence of Natal
Laband and Thompson
Kingdom and Colony at War
Laband and Thompson
The Zulu War 1879
Lloyd
Zulu Conquered, The March of the Red Soldiers 1828-1884
Lock, Ron
Zulu Victory: The Epic of Isandlwana and the Cover-up
by Ron Lock and Peter Quantrill (Greenhill 2002)
The Zulu War
McBride
The South African Campaign of 1879
Mackinnon
The History of the Battles and Adventures of the British, Boers and the Zulus
Moodie
The Washing of the Spears
Morris
In Zululand with the British throughout the War of 1879
Newman
Shaka Zulu: The Rise of the Zulu Empire
Ritter
Like Wolves on the Fold: The Defence of Rorke’s Drift
by Mike Snook (Greenhill 2006)
Narrative of the Field Operations Connected with the Zulu War
War Office
Uniforms and Weapons of the Zulu War
Wilkinson-Latham
History of the Zulu War
Wilmot
They Fell Like Stones: Battles and Casualties of the Zulu War
Young
|
|