|
Geography
|
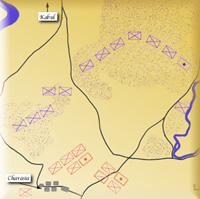
At 1000 hours, Roberts moved the majority of his force northwards toward Kabul. He did not have enough transport to move his entire force, so he left Macpherson with a rearguard force at Safed Sang. The transport would be sent back to collect the force and stores later that day. Indeed, Roberts force only advanced six miles to the village of Charasia which lay just south of the last major geographical obstacle before Kabul. Between Charasia and Kabul lay a crescent range of hills stretching from east to west at heights ranging from 220 to 500 metres high. There were actually two road that continued on to Kabul. The road to the West was a much longer route, the road to the East was much more direct, but lay along a valley floor that was dominated by the hills overlooking it. Indeed the actual entrance to the defile was itself dominated by an isolated hill that separated the road from the river. It would be very easy to defend and inordinately difficult to force your way through these natural defences. However, at this point Roberts was not expecting any armed resistance from the Afghans. Besides, his shortage of transport meant that he had to send back his wagons to collect Macpherson's force before it got dark. So, Roberts camped his force on the flat ground around the village of Charasia with a view to seizing the eastern pass early the next morning.
|
|
The Hills are Alive
|
|
At dawn on the 6th of October, cavalry patrols were sent out. As was a work party of the 23rd Pioneers and 92nd Highlanders who were supposed to prepare the valley road for use by the carts, wagons and guns. These forces quickly came scurrying back to report that they could see Afghans along the ridges of the hilltops. They also reported seeing artillery pieces. This meant that they were a determined force who were going to try to prevent the British force from reaching its destination. The final figure of Afghan forces present is difficult to fully establish, but it seems as if there were probably 13 regular regiments of infantry, 20 field guns and several thousands of tribesmen. And they were sitting in excellent defensive positions. Roberts, meanwhile, was sitting with only two-thirds of his force on the flat ground beneath the imposing hills. He had to act fast and he also had to assume that Macpherson's force would not be able to arrive in time to help him. The situation did not look at all good.
|
|
The Plan
|
|
Roberts decided to split his forces into an attack group, a holding group and a reserve. The plan was to attack the Afghans on the West of the range and roll them up along the hilltop ridges. Meanwhile a smaller force would be sent to hold the Afghans at the East of the range and prevent them from sweeping down from the hills in a rush to aid their forces in the West. A small reserve would be kept under Roberts control in Charasia itself.
The main attack force would be commanded by Baker. He had at his disposal the 72nd Highlanders, the 5th Gurkhas, half of the 5th Punjab Infantry, half of the 23rd Pioneers, two mountain guns, three field guns and two gatling guns. The holding force was commanded by Major George White. He had four companies of the 92nd, half of the 23rd Pioneers, 3 field guns and some cavalry. These two forces were attacking a force that greatly outnumbered them.
|
|
The Attack is Launched
|
|
At 1130 Baker launched his 72nd Highlanders onto the centre and right sections of the Western Afghan forces. Fierce resistance from the Afghans held up the Highlanders. The Gurkhas and two companies of the 5th Punjabis were sent in to reinforce the uphill attack. This helped to swing the balance towards the British attack and by 1400 hours they had managed to clear the first ridge. The timing was crucial as the Afghans had begun to send reinforcements. Had they arrived in time, the outcome of the battle may have been very different.
Meanwhile on the eastern flank White had advanced his force forward to try and dislodge the Afghans sitting south of the gorge. Artillery was used in an attempt to dislodge the Afghans, but it became clear that the cover was just too good. The only way to dislodge the Afghans was by launching an infantry attack at them. White personally led two companies of the 92nd up the steep, rocky hillside. Fortunately, the rocks provided cover for both sides. The Scots were able to use this cover to get up amongst the Afghan positions. Unnerved by the presence of the British troops, the Afghans soon abondoned this position and retreated to the north of the ravine. Despite still being massively outnumbered on this flank, White could see that the western flank could do with some help. He therefore split his 92nd Infantry and sent two companies to aid Baker in his attack on the west.
Back on the western flank, Baker had quickly sent his troops on to assault the Afghan positions some 600 metres in front of them on a second ridgeline. They advanced in a series of short rushes reinforced by a company of the 23rd Pioneers. The fighting was intense and hung in the balance until that is, the two companies of the 92nd sent by White arrived on the flank of the Afghans. This completely unnerved the Afghans and they retreated north and eastwards, with Baker's men hot in pursuit. By 1545 Baker had taken the entire western flank and central positions of the Afghans. He was ready to launch a flank attack on the remaining Afghans. Just as White was also pressing home an attack back at the gorge. He had sent forward his cavalry to take possession of the mouth of the gorge. Apart from capturing six Afghan guns, the combined threats of White and Baker saw the Afghans disperse and disappear back into the mountains. By 1700 hours the British had taken possession of the entire position.
|
|
|
|
| Battle Maps
|
| Commanding Officer
|
|
Frederick Sleigh Roberts
|
| Imperial Forces Involved
|
|
Cavalry Brigade
Brig Gen Dunham Massey
12th Cavalry
14th Lancers
25th Cavalry
Royal Artillery
Brig Gen B. L. Gordon
Two Horse Batteries
Two Mountain Batteries
First Infantry Brigade
Brig Gen Herbert Macpherson
67th Hampshires
92nd Gordon Highlanders
28th Punjabis
Second Infantry Brigade
Brig Gen T. D. Baker
72nd Seaforth Highlanders
23rd Pioneers
3rd Sikhs
5th Punjab Infantry
5th Gurkhas
|
| Afghan Forces Involved
|
|
13 Regular Regiments of Infantry
20 Artillery Pieces
Several Thousand Tribesmen
|
| Timeline
|
| 5th Oct 10:00
|
Roberts leaves Safed Sang. Macpherson's 2nd Brigade is rearguard force.
|
|
5th Oct 14:00
|
Roberts arrives at Charasiah. Sees no opposition and sets up camp in the lowlands surrounding the village.
|
|
5th Oct Dusk
|
A few Afghans aree spotted in the hills overlooking the village.
|
|
6th Oct Dawn
|
Cavalry patrols despatched to reconnoitre the area. 23rd Pioneers and a wing of 92nd Highlanders sent to prepare road for wheeled transport. They find that their way is blocked by a huge Afghan army.
|
|
6th Oct 11:30
|
72nd Highlanders launch attack on Right wing. Joined by 5th Gurkhas and 5th Punjab Infantry.
|
|
6th Oct 14:00
|
72nd successful in taking position just as Afghan reinforcements begin to arrive. 72nd is then joined by the 23rd to begin attack on second Afghan position. 92nd attacks Afghans south of Gorge.
|
|
6th Oct 15:45
|
Bakers forces are joined by two companies of 92nd. Together they clear the second ridge. Afghans begin to retread. They are pursued by British.
|
|
6th Oct 17:00
|
Afghan force disintegrates and retreats
|
|
| Medal
|
|
Awarded
|
|
Bibliography
|
Barthorp, Michael
The North-West Frontier -
British India and Afghanistan
1839-1947
(Blandford Press 1982)
|
Forbes, Archibald,
The Afghan Wars 1839-42 and 1878-80
(Darf 1987)
|
Hanna, Col. HB,
The Second Afghan War
|
Hopkirk, Peter
The Great Game
|
James, Lawrence,
Raj - The Making and Unmaking of British India
(Little,
Brown & Co 1997)
The Rise and Fall of the British Empire
(1994)
|
Menenzes, SL,
Fidelity and Honour:
The Indian Army from the 17th to the 21st
Century
(1993)
|
Moreman, TR,
The British & Indian Armies on the North-West Frontier
1849-1914
(Journal of Imperial & Commonwealth History No. 20, 1992)
|
Parry, DH,
Britain's Roll of Honour -
The Victoria Cross, Its Heroes and
their Valour
(1906)
|
Robson, Brian,
The Road to Kabul - The Second Afghan War 1878-81
(Arms &
Armour Press, 1986)
|
Shadbolt, SH,
The Afghan Campaigns of 1878-80
|
|