|
Formation
|
The 17th/21st Lancers was formed by the joining of two renowned and distinguished regiments. The need for this amalgamation was partly because of the new and financially difficult times, but also due to the need to scale back the armed forces after The Great War had finally run its course. Rather than disband some of these old regiments, as was initially proposed, it was decided that by combining them into a single regiment some of the history and identity of both predecessor regiments might be preserved. Initially, the internal organisation of the regiment revealed just how strong this identity could become. The C squadron was styled as C (21st Lancer) Squadron and they still wore the old 21st Lancer badge. This practice continued until 1929 when a single identity for each regiment was deemed necessary. The history and length of pedigree of the 17th made its death's head badge the natural choice for the newly styled regiment.
|
|
Technology
|
|
The Great War had revealed how far warfare had advanced in terms of technology and tactics. The role and value of cavalry in this kind of warfare was thrown in to serious doubt. The fact that the 17th Lancers had sat for most of the war at the rear of the trenches waiting for the breakthrough that never came was not lost on the officers and troopers of this new regiment. However, with peace came financially stringent and difficult times for the armed forces. The government had neither the will nor the cash to invest in a first class army. Therefore, the cavalry went back to training on horse back and carrying their lances and swords. The only concession to modern warfare was the attachment of a troop of machine gunners of four Vickers guns to the Headquarters Squadron. Other than this, the regiment was trained to fight an almost identical style of warfare as that of the Nineteenth Century.
Despite financial pressures, it was clear that some kind of change of role for the cavalry regiments was all but inevitable. A committee recommended in 1926 that the cavalry regiments be mechanized in stages: first transport, then the machine guns and finally the frontline troops. Yet the financial position of the country was to get significantly worse before it got better. Mechanization was pushed back and back as the depression took hold of the country. It was only the increasing rise in political pressure on mainland Europe that turned the idea of mechanization from being an aspiration to an absolute necessity. The 17th/21st Lancers were in Meerut, India when they were informed that they would be losing their horses once and for all. In 1938 they paraded on horses for the last time.
Tank training facilities in India were less than ideal at this time. Most of the so-called tanks had no guns, no internal intercoms, and the driver couldn't actually see where he was going. However, the regiment persevered and devised new and altered its older cavalry tactics to suit the new tactical and strategic considerations. The officers and men of the regiment demonstrated the flair and elan of the cavalry regiments of old. Unfortunately, their German counterparts had had a number of years head start in coming to terms with the latest that technology could offer on to the battle field.
|
|
World War II
|
|
At the outbreak of the war, the 17th/21st Lancers were based at Colchester. As they had just returned from India, they had not yet been issued with tanks or indeed transport of any kind. It was therefore not in a position to be sent to France as part of the forces that were to try and hold back the Germans. The regiment had to hobble together what equipment it could (four old medium tanks and machine gun mounted pick up trucks) and wander around South and East England as a mobile reserve in the event of an invasion.
From September of 1940 the regiment was brigaded together with the 16th/5th Lancers and the 2nd Lothians and Border Horse in the 26th Armoured Brigade as part of the 6th Armoured Division. This liaison was to prove fruitful and the regiment remained in this formation for the entire duration of the war. The unit was initially supplied with Matilda and Valentine tanks. With these tanks, the regiment trained for the next two years in the new tactics and techniques that were being formed as an antidote to the conspicuous German success with tank warfare. The outdated and slow Matildas were replaced by Crusaders. This was not to be too happy a conversion as the upgraded speed was at the cost of reliability and vulnerability.
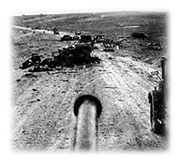
The years of training were put to the test in 1942 as the regiment was sent to Algeria as part of Operation Torch. The plan was to brush aside the Vichy French forces of that country and head to Tunisia as quickly as possible. The French did indeed collapse quickly and the force was able to advance east from Algiers towards Tunisia. However, the Germans were able to react quickly. Their supply lines had been cut considerably by withdrawing to Tunisia and they held a decisive advantage in the air.
The regiment came into action for the first time on November 24th as they overran a position held by Italian troops. However, a counterattack by the Germans the next day revealed how poorly armed the British were when compared to the 75mm and 88mm guns of the Germans. The quantity of allied troops had placed them within spitting distance of the prize of Tunis, but German technical and air superiority denied the allies their objectives. The war in Tunisia was about to bog down in to more classically defined front lines.
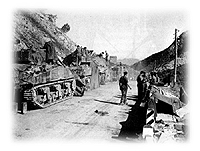
The first item on the regiment's wish list was quickly fulfilled. They were to be rearmed with the Sherman tanks. Their reliabilty, ease of use and decent sized guns more than compensated for their relatively weak armour. At the time, the conversion was whole-heartedly welcomed by all in the regiment, but it was not carried out quickly enough. The regiment was still armed with Crusaders and Valentines as the Germans took the initiative by trying to break out at a place called Kasserine Pass. The thrust was aimed at the Americans who were unaccustomed to blitzkrieg tactics. And sure enough, they were thrown in to complete chaos. The whole southern front was crumbling and all the administrative and supply areas of the allies were being thrown wide open to the tanks of the Germans.
 |
|
|
The 26th Armoured Brigade were the nearest forces available that could help to stem the German advances. They were duly despatched to thicken the defensive forces still in the area. The regiment was in action at Thala, where the tanks of the Germans still outmatched their own tanks. They fought bravely and withdrew from ridge to ridge begrudgingly. The regiment was reduced to just 12 tanks before they disengaged. However, the Germans continued their attacks the next day and during the next night they captured a hill overlooking the remainder of the British brigade. The regiment was forced to counterattack, losing even more of its rapidly diminishing supply of tanks. All the next morning they sat waiting for the inevitable attack that would finish them off. However, the Germans did not fully realise the desperate position of the allies and failed to make the killer blow. The allies began receiving reinforcements and the Germans had lost their chance for good.
This time rearmament was a necessity and the regiment duly got its Shermans. These were put to use at Djebel Rohrab as the Allies tried once again to go on to the offensive. At a pass near here the regiment came under furious fire as they were ordered through a mine fielded valley held on both sides by the Germans. American support was found to be lacking and the regiment suffered horrific casualties before achieving their objectives. The Germans were making their withdrawal from Tunisia an exacting one and they had not finished yet. As the regiment approached Tunis, they came under fearful artillery, air and tank fire at Djebel Bou Kournine. They were reduced to a strength of just 19 tanks in this tank versus tank engagement. However, the Germans knew that their time was ticking down in North Africa. Preparations were being made to withdraw key personnel and equipment from the theatre. They had lost many of their best tanks at Djebel Bou Kournine and were now playing a purely defensive game. However, even this was not to go their way. At Hamman Lif, a narrow strip of 800 yards of minefielded sand between the mountains and the sea, a force of 88s and top class German troops were expected to hold for five days. The 6th Armoured Division had smashed through it in 24 hours. This break through finished off the Germans in North Africa. Their troops began to surrender in hundreds as they realised that their war was now over.
 |
|
|
Italy was to prove a completely different theatre of operations from North Africa. Gone was the mobile warfare of wide open spaces. It was replaced by excruciatingly back breaking actions along hostile and mountainous terrain. The regiment would spend much more time supporting infantry actions as the allies came across defensive line after defensive line of the Germans. The regiment came into action for the first time at Cassino in a style of warfare that was reminiscent of the First World War. Wire, pillboxes, mines, tank turrets all combined with the natural terrain to present huge problems to the tank regiment. The Germans fought stubbornly and skillfully even when in retreat. They continued to withdraw from one excellently fortified position to an equally well prepared one. The fact that there were only three roads that travelled north to Rome that could support tanks made life even easier for the Germans. They always knew where the allies were coming from and took appropriate actions; blowing bridges, booby traps, etc, etc... The regiment did not enjoy this kind of warfare at all. Even when it looked as if things were going their way in Italy, their own generals made life difficult for them. At the Gothic line, a major breakthrough was thwarted when huge numbers of Americans were withdrawn for the invasion of Southern France.
War in the more fertile plains of Northern Italy was not much easier, as mountains gave way to ditches, canals and flood banks. More forces were withdrawn from the theatre as the generals concentrated all of their efforts on Northern Europe. The 6th Armoured Division and the Eighth army were now supposed to just tie down German forces. However, one last attempt was made to outflank and finish off significant enemy forces at Argenta Gap. The regiment captured a vital bridge before the Germans could blow it. This enabled the allies to push forces through and encircle German forces between themselves and the American Fifth army. The success of this operation was a welcome relief of the drudgery of Italian style warfare. It proved to be one of the last battles in the theatre, as the Germans capitulated in Italy on May 2nd and completely a week later.
|
|
The Cold War
|
|
Peace was not to be as universal as it was hoped that it might be. The regiment finished the war in Austria and were to remain their for a while yet. In that time, it was left to the regiment to try and bring some kind of civil order to a country full of refugees, deserters, war criminals and black marketeers. Weapons, forged documents and money, stolen property and a host of other problems confronted the regiment as they tried their best to police people who did not always want policing.
However, the fact that the regiment was posted in Britain as late as 1942 meant that the 17th/21st would be one of the last regiments to be rotated back home. In October, the regiment was sent for a cold winter in Salonika, Greece. The country was about to be overtaken by a civil war as communists vied with nationalists for the right to govern the country. A year was spent in Greece before the regiment was posted to the Suez Canal and for rearmament as an Armoured Car regiment. As such, it was then transferred to the volatile Palestine mandate. Escort, guard duties and frontier patrols kept the regiment on their toes as the guerilla war there took its continuous toll.
In 1948 the regiment was finally posted back to Britain. The unit was permanently linked to the Nottinghamshire (Sherwood Rangers) Yeomanry for training and recruiting purposes. The unit would become completely refitted with Comet tanks and were to be posted to Germany from 1951. In 1960, they were sent further afield, first to Hong Kong and then to the Middle East of Aden and Kuwait. In 1963, they were rearmed for Germany again, this time in Chieftan tanks. They were once more training for the classical set piece tank battles that were expected in any confrontation with the Warsaw Pact.
Northern Ireland was to prove one of the more taxing post-war postings. In the Northern Irish role the regiment was equipped as an armoured car regiment. However, they were often forced to turn to more traditional infantry tactics against an ever elusive enemy. The regiment was somewhat relieved to be posted back to Germany and to be equipped with the latest of British Main Battle Tanks; the Challenger. It was thus armed that the regiment learned that yet another round of regimental restructuring and reductions were essential due to new financial constraints and strategic considerations. The regiment was to be joined together with the 16th/5th Lancers to make the Queen's Royal Lancers in 1993.
|
|
| Badge
|
 |
| Name
|
|
Duke of Cambridge's Own
|
| Nickname
|
|
Death or Glory Boys
|
| Motto
|
|
Death or Glory
|
| Depot
|
| Grantham, Lincolnshire
|
| Recruiting Area
|
| Humberside, South Yorkshire and Lincolnshire
|
| Regimental Marches
|
The White Lancer (Quick)
Richardson
|
Rienzi (Slow)
Wagner
|
| Lieutenant Colonels
|
| 1923 - 1993
|
| Uniforms
|
| 1923 - 1993
|
| Soldiers
|
| 1923 - 1993
|
| Principal Campaigns and Battles
|
|
|
Second World War
|
|
Tebourba Gap
|
|
|
Bou Arada |
|
| Kasserine
|
|
Thala
|
|
Fondouk
|
|
El Kourzia
|
|
Tunis
|
|
Hammam Lif
|
|
Cassino II
|
|
|
Monte Piccolo
|
|
Capture of Perugia
|
|
Advance to Florence
|
|
Argenta Gap
|
|
Fossa Cembalina
|
|
| Predecessor Units
|
17th Light Dragoons
(1759 - 1821)
17th Lancers
(1822 - 1922)
21st Lancers
|
| Successor Units
|
| The Queen's Royal Lancers
|
|
Suggested Reading
|
17th/21st Lancers
by Ffrench Blake
|
| Regimental Museum
|
Belvoir Castle,
Grantham,
Lincolnshire
(01476 870262)
|
|