|
Raising of the Regiment 1685
|
|
The 5th Dragoon Guards was raised in the reign of James II in response to the threat to the monarch posed by the Monmouth Rebellion. There were six troops raised as follows:
Lichfield Troop. Charles, Earl of Shrewsbury
Kingston upon Thames Troop. Francis, Lord Brudenel
Chester Troop. Sir Thomas Grosvenor
Bridgenorth Troop. Roger Pope Esq.
Bristol Troop. Mr Francis Spalding
London Troop. The Hon John D'Arcy
These Troops were raised but not employed in the war against the Duke of Monmouth. However James was a keen military man and retained his newly raised regiments. The Troops were formed into a regiment of cuirassiers, ranked, at first, as 7th Horse, on 29th July 1685, with the Earl of Shrewsbury as Colonel and the Hon John D'Arcy as lieutenant-colonel. They were reviewed at Hounslow in that year and then marched to Warwickshire.
King James began to ensure that his army was led by Roman Catholic officers, so the Protestant Earl of Shrewsbury resigned his colonelcy to join William Prince of Orange in Holland. There followed two Catholic Colonels in quick succession but this did not guarantee religious correctness amongst the officers and men. After James fled the country and William became the new Protestant monarch, the regiment was given John Coy as its colonel and was named Coy's Horse for the next 8 years. From 1687 they were ranked as 6th Horse.
|
|
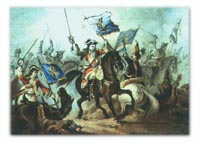
Battle of the Boyne 1st July 1690
|
|
The regiment went to Ireland in August 1689 with Marshal Duke Schomberg, campaigning against James's Catholic forces at Carrickfergus, Newry and Dundalk. In 1690 King William took over the command of the army at the battle of the Boyne where Coy's Horse were on the right wing. They were part of a column which forded the river at Slane Bridge and fought a regiment of Irish dragoons. They killed about 70 of the enemy and proceeded through cornfields and ditches until the enemy retreated towards Duleck. The British cavalry pursued the Irish and French troops causing the enemy to suffer heavy casualties. They attended the siege of Limerick, and in the winter joined an incursion into Kerry. Coy's and another regiment were in the vanguard and had contact with the enemy at Brewsterfield. They routed 160 enemy dragoons and went on to further action at Tralee.
|
|
Flanders 1694-1698
|
|
King William took his army to Flanders in 1694 to campaign against Louis XIV. They were part of the covering army at the siege of Namur and afterwards camped between Ghent and Bruges. A detachment of the regiment formed part of an ambush near Enghien which defeated a force of French cavalry during the relief of the siege of Aeth. Whilst serving in this campaign they had a change of colonel and became Arran's Horse in July 1697.
|
|
Marlborough's Campaign
|
|
After the Peace of Ryswick Arran's Horse came home and were posted to Ireland in 1700. They were destined to spend most of the 18th century there, but first there was a further period of campaigning in the Low Countries. Three Troops of the regiment, numbering 57 men per Troop, were detached for this war and sent to serve in The Duke of Marlborough's army in 1702, and in 1703 became Cadogan's Horse. The other three Troops of the regiment had remained in Ireland, but in April 1704 they came over to join their comrades for the Duke's march to the Danube. The reunited regiment arrived at Donauworth to take part in the storming of the Schellenberg on 2nd July 1704. In this battle they were exposed to enemy artillery and lost many horses. They also suffered several wounded including General Cadogan, and Major Robert Napier who later roes to Lt-General and became their colonel in 1717. The next battle was at Blenheim which was a great allied victory and Cadogan's Horse were fortunate to be part Marlborough's triumph. One officer, Lt Groubere was killed but the other casualties are not recorded.
Helixem 18th July 1705
The regiment had a better opportunity for glory at Helixem the following year. Marlborough took his army back to the Netherlands to force the lengthy lines of fortification built by the French. The area chosen was around Helixem and Neer-Hespen. The heavy cavalry were ordered forward by Marlborough but were met by Bavarian Cavalry. Initially the Bavarians proved too strong a match and at one point the Duke of Marlborough was seen to be fighting for his life, cut off from his men. This spurred the regiment to renew their efforts and they charged in with great bravery. In the struggle they captured four Bavarian standards from the elite unit they were up against, and the retreat began. The enemy cavalry fled to the rear of their lines causing many casualties amongst their own infantry. For Cadogan's Horse this was their finest hour of the century. Marlborough singled them out for praise: "Never men fought better!... They acquitted themselves with a bravery surpassing all that could be expected of them."
Wynendale 1708
The regiment fought again, with distinction, at Ramillies in 1706, and at Oudenarde in 1708 they were held in reserve but not sent in to action. Later in that year they were part of the covering army in the siege of Lille. The siege army waited to be supplied by a convoy of 600 wagons from Ostend escorted by a force under General Webb. When intelligence reached Marlborough that Webb's convoy was about to be attacked he sent Cadogan's Cuirassiers to give them aid. They arrived in time to help the escort as they were attacked in a wood at Wynendale. The impetus of their attack drove the French off and the convoy was saved. The French tried to divert Marlborough and Eugene from their siege by attacking Brussels. The regiment was sent as part of a force to harass the enemy and 1708 ended successfully with the retreat of the French from Brussels and the surrender of Lille on 9th Dec.
Malplaquet 11th Sep 1709
In the summer of 1709 Tournay was besieged on 27th June and the regiment was part of the force sent against the city. They were then sent to capture Mons but Marshal Villiers confronted Marlborough's army at Malplaquet. The French were in a good position covered by thick woods, and they had constructed effective barriers with fallen trees and entrenchments. Marlborough himself led the British and Prussian cavalry against the gendarmes who were routed but they then had to contend with the French household cavalry who drove the allies back in disorder. With a supreme effort the regiments rallied and fought back in a fierce struggle. In the end the French retreated and another great victory was achieved.
Arleux, 4th-5th Aug 1711
The French 'Ne Plus Ultra' fortifications stretched in a formidable line to cover their frontier and Marlborough decided to force his way through, with the help of Cadogan's Cuirassiers. The fort at Arleux was tricked into being abandoned and the enemy were induced to withdraw their garrison from Arras and Cambrai. Meanwhile the Duke assembled troops secretly near Douay, and these included two Troops of Cadogan's. On the night of the 4th Aug this force crept through at the causeway of Arleux. The French commander, Marshal Villiers was astounded when he heard that the British cavalry had penetrated his lines, and rushed to the area with the royal household cavalry which was surrounded and captured. Villiers himself managed to escape. The regiment remained on the continent until early 1714 when it embarked for Ireland. The colonel was now George Kellum who had been their lieutenant-colonel since 1704.
|
|
Ireland and Regimental Titles
|
|
During the 1715 Jacobite Rebellion in Scotland the supporters of the Stuart dynasty in Ireland agitated against their Hanoverian overlords so that the regiments of horse stationed there were kept busy. In 1717 they were titled 2nd Irish Horse which was their ranking on the Irish establishment, but in 1746 the Blues were taken out of the line cavalry and three regiments of Horse were changed to Dragoon Guards. At that point our regiment was the 2nd Horse in the English ranking instead of 6th. They remained 2nd Horse until 1st April 1788 when the last 3 regiments of Horse were re-named Dragoon Guards.
|
|
Regimental Strength in 1788
|
|
In 1788 the newly styled 5th Dragoon Guards had a strength established at one colonel, one lieutenant-colonel, one major, 3 captains, 6 lieutenants, 6 cornets, one adjutant, one chaplain, one surgeon, 6 Troop quartermasters, 6 sergeants, 12 corporals, 6 trumpeters, 114 mounted privates and 6 dismounted privates. They were ordered to change their uniforms from green to yellow facings and the officers to have silver instead of gold lace. This unpopular order was rescinded in March 1800 when they were allowed to resume wearing green (with gold lace).
|
|
French Revolutionary Wars
|
|
Beaumont 26th April 1794
On 18th and 19th Sep 1793 the 5th Dragoon Guards embarked at Dublin for Flanders at the beginning of the French Revolutionary Wars. Their first engagement was at Premont on 17th April 1794 but they were not called upon to charge the enemy. They were then part of the covering force during the siege of Landrecies. On the morning of 26th April the allies faced 30,000 French troops under Rene Chapuis at Beaumont, also referred to as Coteau. The British cavalry were sent against the enemy's left flank which turned to receive them. The regiment charged with great spirit and caused the French to fall back after a sharp fight. They captured Chapuis and many cannons, and pursued the enemy as far as Cambrai. Nine men and 23 horses were killed, one officer, one QM and 8 men were wounded, and 4 men and 23 horses went missing. The 5th Dragoon Guards were awarded the battle honour BEAUMONT retrospectively in 1909.
Tournay 10th May 1794
After the surrender of Landrecies the Allies took up position in front of Tournay. The French attacked and General Harcourt was sent with 16 squadrons of British cavalry and 2 squadrons of Austrian cavalry to charge the enemy. This they did with such determination that the enemy immediately retreated. The result was a complete defeat for the French and the capture of 13 cannons and 400 prisoners. Another attempt was made with a larger force of French on 17th May, which was again repulsed, but the 5th DG were not so involved. However, the tide turned against the allies so that the superior French forces pushed them back into Germany and they left for England in November 1795.
|
|
The Irish Rebellion 1796 - 1798
|
|
Arklow 9th June 1798
The regiment were sent back to Ireland in Oct 1796 where republicans, encouraged by the events in France, had taken up arms against the hated English. The first event of importance was the arrival of a French fleet in Bantry Bay on 24th Dec 1796 but a storm caused the landing to be foiled. The regiment made a forced march to counter this threat but were not needed. In 1798, however, open rebellion broke out and the 5th DG were on duty in Dublin. One squadron under brevet Lt-Col Sherlock was detached to Wicklow and Wexford. On 9th June the town of Arklow as attacked by 27,000 Catholics. They were a mob that had committed outrages throughout the area, lynching and burning Protestants. 5,000 of them were armed with firearms, the rest with pikes, and they possessed artillery. The military were made up of 1,360 infantry, militia and fencibles, and 125 cavalry (the 5DG squadron and Yeomanry). The onrush of rebels forced the cavalry back but the 5th DG made a determined charge which halted the mob's progress, and the fire from the infantry drove them back to some ditches from where they fired on the troops. Eventually the rebels came into the open and charged the soldiers but were met by close range artillery and musket fire. The slaughter was terrible and they retreated in confusion towards Gorey.
Ballycarnen June 1798
The same squadron, under Lt-Col Sherlock were instrumental in relieving the loyalists of Ballycarnen, with the aid of a small force of militia. The dragoon guards advanced against a barricade of carts formed across the road but were unable to make any impression on this defence. More infantry arrived later and with their help the rebels were routed and the dragoon guards were able to pursue them and cut them down.
Vinegar Hill 21st June 1798
The squadron were again engaged at Gorey where they had to charge the rebels once more. The more famous action at Vinegar Hill saw them in action against insurgents who had murdered many Protestants. They made a charge and again caused the rebels to flee so that many were killed or captured. A subsidiary action followed this at White Hills where a sharp contest took place and the rebels were scattered.
Prosperous June 1798
Another detachment of the 5th DG was operating in County Kildare and had several skirmishes with insurgents. A patrol commanded by Captain Pack encountered 100 rebels at Prosperous. They were mounted and armed but the dragoon guards attacked them so that the rebels fell back with the shock of the assault. Twenty were killed and 8 horse captured.
Ballinamuck 8th Sep 1798
The French decided to bring aid to the flagging rebellion and sent a 1,000 strong force under a General Humbert. They landed at Killala on 22nd Aug and the 5th Dragoon Guards, under Captain William Ponsonby, marched from Dublin to join up with The Marquis of Cornwallis's troops. The action at Ballinamuck on 8th Sep was fought against a combined army of French and Catholic Irish rebels. The result of the conflict was the surrender of the French and the dispersal of the rebels.
|
|
The Peninsula War 1808-14
|
|
Llerena (or Villagarcia) 11th April 1812
Six Troops of the regiment, now titled Princess Charlotte of Wales's, were embarked at Portsmouth to land at Lisbon on 4th Sep 1811. The Hon William Ponsonby was now in command of the regiment and they had a strength of 544 officers and men. They were brigaded with the 3rd and 4th Dragoons, their first task being to cover the siege of Badajoz in southern Spain. This fortress was captured on 6th April and the 5th DG made a forced night march to Bienvenida, covering 60 miles without a halt. At the village of Villagarcia they encountered a large force of French Cavalry the next day, and immediately charged them even though they were outnumbered 3 to 1. The 3rd and 4th Dragoons were in support in this action and the 16th Light Dragoons also charged. The result was the retreat of the enemy under cover of their infantry and artillery. The regiment inflicted heavy losses on the French, and took more than 140 prisoners and 100 horses. Lt-Col Ponsonby commanded the brigade for this action and the regiment was led by Major Prescott. They lost one corporal and 14 privates while 25 men were wounded including Major Prescott.
Salamanca 22nd July 1812
The night before the battle of Salamanca there was a terrible thunderstorm that caused many horses to break loose and stampede. Twenty men were injured when they were trampled in the confusion, and several horses ran into the French lines. On the day of the battle Wellington's army faced Marmont's French force south of Salamanca around a village called Arapiles. Both armies numbered about 50,000. The 5th DG, the 3rd and 4th Dragoons under Le Marchant attacked Maucune's infantry division and cut them to pieces in a heavy cavalry charge. They then went on to make another charge against Brenier's division with Stapleton Cotton and his staff out in front, but Le Marchant was killed in this action and replaced by William Ponsonby. The Heavy Brigade sustained many casualties from musket fire but continued on into the mass of men. The 65th French Regiment was nearly annihilated and the mace of their drum-major became a trophy for the 5th DG, subsequently carried on parades by the Trumpet-Major. They also captured 2 guns and many prisoners. Their casualties were one officer and 15 other ranks killed, one officer and 16 men wounded. The regiment was awarded its first battle honour on 26th Oct 1814: SALAMANCA.
Garcia Hernandez 23rd July 1812
There was a follow-up engagement to Salamanca that occurred beyond Alba de Tormes which achieved fame for the heavy cavalry of Major-General von Bock's King's German Legion. They charged and broke an infantry square, and then went on to break another square, a very rare occurrence. The left squadron of the 5th Dragoon Guards was attached to the KGL for this and must therefore take credit for a part in this victory. The British Light Brigade was also in support, involving the 11th 12th and 16th Light Dragoons.
The regiment saw Wellington enter Madrid on 12th Aug and stayed there for 6 days. They proceeded to Burgos and helped provide cover for the siege. But the weight of superior French numbers brought about a general retreat to Portugal. From Hormillos the Heavy Brigade covered the retreat and staved off a large force of enemy cavalry. When they crossed the Carrion their HQ was set up at Duenas and two squadrons were detailed to mine the bridges of Palencia but the French captured them before they could do this. When they reached Portugal they stayed at Gallegos, then Ervidal and wintered at Goes. The year 1812 had been hard for the regiment, they had marched 2,000 miles within 12 months and lost many horses as a result.
Vittoria 21st June 1813
The brigade ventured out in 1813, via Viride, Trasos-Montes, across the Esla on 26th May, past Valencia and onto Burgos. They overtook the enemy's rearguard on the heights of Estepar where the 14th Light Dragoons made a charge. The Wellington's army then proceeded over mountainous country and crossed the Ebro on 15th June to advance on the French defensive position at Vittoria. The battle was fought by the infantry using the bayonet for the most part, while the cavalry, unable to operate on the unsuitable terrain, could only act as support. But when the enemy were in retreat they pursued them and gave them no time to regroup. The 5thDG suffered only one casualty, a wounded private, in the battle, but were in pursuit on the following day. On 27th June they were detached to intercept General Clausel's division but they slipped through the pass of Jaca. The regiment spent 14 days at Tafalla then moved on to Mirando.
Toulouse 10th April 1814
The brigade entered France in Feb 1814 and followed the retreating French. Marshal Soult found a strong position to cover Toulouse and a battle ensued, starting on 10th April, Easter Sunday, which again involved the infantry. The 5th DG were in support of Spanish troops with the task of stiffening their resolve in case they should feel unable to continue. They were able to accomplish this and to save the Portuguese guns from being captured. The French were driven off their position and took shelter in the town. The regiment again had few casualties, one corporal killed and Cornet Lucas wounded. The battle honours VITTORIA and TOULOUSE were awarded to the 5th DG on 14th Feb 1820. Thus they accrued 4 honours, PENINSULA being awarded on 6th April 1815. The Peninsula War was now over and the regiment marched to Boulogne, commencing on 1st June and reaching the port in mid-July. They sailed for Dover and marched to Woodbridge barracks and in October went to Ipswich.
|
|
Crimean War 1854-56
|
|
Cholera in Varna July-Sep 1854
The British cavalry sent out to the Crimea in the summer of 1854 consisted of two brigades, the Light and the Heavy. Five regiments were to be represented in each brigade so that the Heavies contained the Scots Greys, the 6th Inniskilling Dragoons, The 1st Royal Dragoons, the 4th and the 5th Dragoon Guards. Each regiment was composed of 2 squadrons of at least 155 men, but they had difficulty finding enough men to provide that number. The 5th DG had to borrow 15 men from the 7th DG so that on embarkation they numbered 314 all ranks, and 295 horses. They sailed from Queenstown (Cobh), co.Cork, to the Black Sea on the 'Himalaya', a voyage that took 16 days. The voyage was terrible for the horses, and the men were fed very old salted food. They were taken to Varna where many died of cholera. The 5th DG suffered badly so that by 28th Aug three officers and 34 men had died. The army was mobilised and sailed eastwards across the Black Sea on 7th Sep 1854. The Heavy Brigade were left behind for some reason and had to wait for the empty transports to return for them. The first of the Heavies to arrive at the Crimea were the Scots Greys who came straight from England without stopping at Varna so were untouched by the cholera. The Battle of the Alma was fought on 21st Sep, before the Heavy Brigade set sail. They did not reach the Crimea until the end of September.
Command of the Regiment in the Crimea
Command of the 5th Dragoon Guards was nominally under Brigadier James Yorke Scarlett but his responsibility was now for the whole Heavy Brigade so the 5th DG were commanded by Lt-Col Le Marchant (according to the Marquess of Angelsey in Volume 2 of his History of the British Cavalry). But he had thrown up command and gone home on half pay. Actual command was down to Captain Adolphus Burton, however, Lord Lucan considered Burton to be 'a very gentlemanly-like young officer, but too young'. Lieutenant-Colonel Edward Hodge of the 4th DG was placed in command of the 5th as well, so that the two regiments came to be referred to, jokingly, as the '9th'. Burton certainly led the 5th DG in the famous charge at Balaklava. The official list of COs in 'Records & Badges' gives Sir Thomas McMahon as CO from November 1854 after exchanging into the regiment, although actual command was under Major Richard Thompson from the winter of 1854 until spring 1855 during which time McMahon was QMG of cavalry. To complicate matters even more, the regimental history has a picture of a Colonel Ferguson in 5DG uniform in 1854.
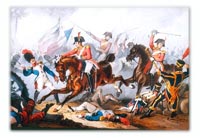
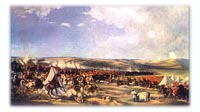
Balaklava 25th Oct 1854
Balaklava was the port used by the British to supply the army camped around Sebastopol, the objective of the whole campaign. The cavalry, along with the 93rd Foot, were employed in defending the area around the port while the infantry and artillery laid siege to Sebastopol. In the days leading up to the 25th Oct there were clear signs of a build up of Russian forces and an attack on Balaklava was imminent. They were first going to attack the 6 redoubts placed on the hills between north and south valley. These were manned by Turkish soldiers and a few Royal Artillerymen and armed with 9 twelve-pounder guns. The Heavy Brigade were formed up in South Valley, near Canrobert's Hill but it was not a safe place as Russian cannonballs were being fired over the hills from north valley and bowling into their ranks. 7 horses and 2 men were lost. The redoubts had to be evacuated and the guns were spiked. The Heavies were moved further west after receiving an order from Lord Raglan and found themselves in vineyards. The area they vacated filled with Russian cavalry who were repulsed by the thin red line of the 93rd.
The Charge of the Heavy Brigade
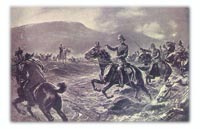
The other half of the Russian cavalry, numbering around 2,000 made its way along the Causeway Heights between the valleys and descended into the South Valley. This force of cavalry were light horsemen dressed in dark grey coats and black bell-topped shakos, and riding black horses. They were referred to in orders transmitted between the British commanders as the 'black-looking mass'. It was by sheer chance that the Heavy Brigade was moving back eastwards following a second order from Raglan, and were at the same place where the Russian black mass was descending the hill. Scarlett ordered the Inniskillings and Greys to wheel left. The 5th Dragoon Guards wheeled left to take a position on the left of the Greys but interpreted Scarlett's order to mean that they should support the Greys.
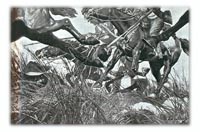
The parade-ground preparations of the Heavies must have shocked the Russians because they halted and fired their carbines. They also spread out on the flanks to enable them to make an enveloping manoeuvre. Scarlett himself led the charge, riding out in front with his ADC Elliot, a trumpeter, and Private Shegog, his orderly, who was also a skilled swordsman. They were well ahead of the main body who started galloping from a standstill. The progress of the Greys was impeded by vines which slowed them down. The 5th DG followed up left rear of the Greys and the 4th DG came at a trot at first then slammed into the Russian right flank. The Royals were in reserve but came forward on their own initiative to take part. What ensued was a confused melee of fighting horsemen. An officer who took part said that:
'it was just like a melee coming out of a crowded theatre, jostling horse against horse, violent language, hacking and pushing, till suddenly the Russians gave way.'
The swords were found to be very inefficient. They could not pierce the thick coats of the enemy and often bent. They were more successful when they cleaved their opponents' heads from the position of their taller horses. Casualties on the British side were light, mostly because the Russians had not sharpened their blades. Captured enemy weapons revealed the swords to be extremely blunt. ADC Elliot received 14 sword injuries but was declared only slightly wounded. It seems that the bravery and discipline of the Heavy Brigade unnerved the Russian black mass so that a force of around 300 men defeated 2,000 in an uphill charge. The Horse Artillery also played a part, however, and galloped five and a half miles to reach the battle. They fired at a range of 700 yards as the enemy was withdrawing, and prevented them from regrouping.
The part played by the 5th Dragoon Guards was actually quite minimal compared to the Inniskillings, Greys and 4th DG, as they were more outside the melee than inside, although Brigadier Scarlett and his staff of three were all 5thDG and were the first four men to charge into the Russians. The regimental casualties were few and in fact they suffered more dead and wounded in the charge of the Light Brigade which took place later that day. In that action they were held in reserve but positioned in a dangerous place that was exposed to enemy fire from small-arms and artillery. Col Hodge who was in command of the 4th and 5th DG wrote, 'We advanced to cover their [the Light Brigade's] retreat but the batteries got our range and began cutting us up terribly. I was not sorry when we were ordered to retreat.'
Casualties in the Charge at Balaklava 1854
Out of the 5 regiments
16 men were killed in the charge
42 men were severely or dangerously wounded
45 men were slightly wounded
The Scots Greys sustained the heaviest casualties with 8 killed or died later, and 50 wounded. The 6th Inniskilling Dragoons had one man killed and 14 wounded. The 1st Royal Dragoons had 2 men killed and 10 men wounded. The 4th Dragoon Guards had one man killed and 5 wounded. The 5th Dragoon Guards had 3 men killed and 9 wounded. Their names are:
Killed or died of wounds
Private Bernard Callery
Corporal Charles McKeegan
Corporal James Taylor
Severely Wounded
Private Charles Babbington
Private Henry Herbert
Private Joseph Jenkins
Private Edward Malone
Private John McCabe
Captain Frederick Hay Swinfen
Private William Wilson
Slightly Wounded
Private George Henry Dickson
Private William Morris
|
|
Gordon Relief Expedition 1884-85
|
|
Camel Regiment Detachment
Sir Garnet Wolseley's expedition to Khartoum to rescue General Gordon from the Madhi's army comprised the Nile River boat column, and the Camel Corps which was to make the trip across the desert from Korti while the boats followed the Nile northeast for 300 kilometres before turning south. The Camel Corps consisted of 4 regiments: The Guards Camel Regiment, the Heavy Camel Regiment, the Light Camel Regiment, and the Mounted Infantry Camel Regiment. The Heavy Camel regiment was to have 43 men and two officers from each of the following cavalry regiments: 1st and 2nd Life Guards, the Blues, 2nd DG, 4th DG, 5th DG, 1st Royals, 2nd Scots Greys, 5th Lancers, and 16th Lancers. There were 24 officers and 376 men in the regiment under the command of Lt-Colonel R A J Talbot of the 1st Life Guards. They were in effect mounted infantry as they were not intended to fight as mounted troops.
Abu Klea 16th-18th Jan 1885
The column halted at the wells of Abu Klea and were threatened by a large force of Madhists. They were sniped at all night and the next day formed a defensive square with the camels kept inside. They were attacked, and the Heavy Camel Regiment were ordered by Colonel Frederick Burnaby to exit the square to support the Gardner Gun operated by the Naval Brigade. The weight of the attack by the dervishes forced the gun crew back when the gun jammed and several casualties were suffered. In this action 9 British officers were killed, including Major Walter Hyde Atherton of the 5th DG along with 10 men of the regiment. The enemy were driven off and the column continued to Khartoum where they found they were too late to save Gordon.
|
|
The Anglo-Boer War 1899-1902
|
|
The regiment were stationed in India from 1893. They were one of the last regiments to sail from Portsmouth to India as a complete unit on a Government transport, because in the following season the use of transport was discontinued. In 1899 they were sent direct to South Africa, arriving in Natal before war broke out. They were posted to Ladysmith, the first arrivals being C and D Squadrons, arriving on 12th Oct. The remaining two squadrons arrived on 26th Oct making a total of 18 officers and 476 other ranks. The commanding officer was Lt-Col Robert Baden-Powell but he was kept busy at Mafeking. Major St John Gore was the actual commander and was regarded by Sir Henry Rawlinson as, 'a long nosed jabbering ass, with none of the qualities for a cavalry leader'. The journey from Bombay had been a difficult one because of storms, and the three trains that they had to take from Durban were even worse because wet weather caused the horses to slip around disastrously in their open carriages. Several animals were lost through injury in this way.
Elandslaagte 21st Oct 1899
The role of the 5th Dragoon Guards at Elandslaagte was that of pursuing the defeated Boers at the end of the battle. Elandslaagte, situated northeast of Ladysmith was occupied by 1,200 Boers under the aged General Kock. Major-General French was sent out with a force from Ladysmith to clear the Boers from the area. This force was made up of Imperial Light Horse, half a battalion of the Manchester Regiment plus gunners and sappers. But the force was too small and French called for reinforcements. These included the Devons, Gordon Highlanders, two squadrons of the 5th Lancers and two squadrons of the 5th Dragoon Guards. The mounted troops had the task of riding alongside the train that transported the infantry to Elandslaagte. They were kept busy driving large numbers of Boers away from the track.
The Boers entrenched on the heights were subjected to an assault by the infantry which turned into a horrendous ordeal for the Manchesters, Gordons and the dismounted Imperial Light Horse who were pinned down by accurate rifle fire and were also soaked in a tremendous thunderstorm. Theirs was a flanking attack which was intended to distract the Boers from a frontal assault made by the Devons who went in vigourously and achieved success but the Boers regained the heights again in a desperate fight. More hand-to-hand fighting took place and the British finally forced the retreat of the Boers who took to their horses and fled as the light of day began to fade. It was here that the Lancers and Dragoon Guards began their pursuit of the enemy. The ground was difficult for the cavalry at first, as St John Gore relates:
'At last I saw the Boers apparently coming down...by twos and threes: great uncertainty in the bad light as to what they were doing. Then "They're off!" "No they're not!" "Yes they ARE!" I sent back word to my two squadrons to "advance in line at extended files" [ie. 4 yards interval between each horse]. After half a mile our heads rose over a fold in the ground, and showed us a long stream of Boers going leisurely away from the position at right angles to my line of advance, and about 300 yards off. I gave the word "gallop". When they saw us, the Boers broke in every direction and galloped away. The ground was very stony in most parts, but there were some good grassy bits along which I was able to pick my way (being one single man), while most of the men had to go over the bad places as they happened to come to them in their line.'
They made three charges against the Boers. There was much blood spilt in these charges and the Boers harboured a deep hatred of the British after this 'massacre', especially the Lancers. They swore that any lancers they captured in the future would be killed. But there are conflicting accounts from those that took part in the charges at Elandslaagte. One lancer wrote home: 'They threw up their arms and fell on their knees for mercy; but we were told not to give them any, and I can assure you they got none. We went along sticking our lances through them - it was terrible thing: but you have to do it in a case like this.'
The accounts written by men of the 5th DG all talk of taking prisoners. Troop Sergeant Savage said, 'The pace increased, on and on, until we could see and pick out our man. After this I no longer tried to follow my Troop leader, but rode as hard as I could for that one man. As I approached him, he dropped off his pony (a grey) and fired at someone to the right. I overtook him and rode on for another who was some little distance in front. This fellow, by the time I got up to him, was laid on his back, and looked so helpless and so much like a civilian, that I took his arms and ammunition, and as by this time the troops were rallying, I marched him up a prisoner and handed him over to Corporal Howard, who was taking over the prisoners. This man, whilst I had my lance to his breast, asked for no mercy, but handed over his arms like a soldier who could do no more. I took the precaution to make him hand me the butt first. There was nothing of the coward about him.'
This narrative is interesting as it indicates that the 5th DG were using lances. Lieut Philip Reynolds wrote, 'Men were dismounted by twos and threes to make a single Boer prisoner, and our ranks were soon thinned out. At last we came to a spruit and the whole line halted. A few Boers here were dismounted, and fired a few shots without doing any damage. I took a few men, and we surrounded them and made prisoners of them.' Thus it becomes obvious that the taking of prisoners was detrimental to the pursuit.
Lombard's Kop 30th Oct 1899
The battle of Ladysmith, or Lombard's Kop was General White's attempt to take the offensive against the combined forces of General Joubert's Boers, General Lucas Meyer's force, and a commando from the Free State. The British were outnumbered and the Boers had powerful artillery building up to besiege Ladysmith, especially their Long Tom positioned on Pepworth Hill. White's forces were split into three and concentrated their attacks on the hills ranging around Pepworth in the north and Lombard's Kop 5 miles east of the town. The cavalry were made up of the 5th DG, 5th Lancers, 18th and 19th Hussars and the Natal Carbineers. They were all jammed into a nullah one and a half miles long and 10 or 20 yards wide and came under heavy fire from the Boers who had out-manoeuvred the British completely. They were forced to retreat in a disorderly manner described by an infantry officer as 'very nearly a stampede' It was only the brave and efficient actions of 53rd Battery RA under Major Abdy that saved the cavalry from serious casualties. As it was, they came off lightly compared to the infantry who had many men taken prisoner, 954 in all, and 320 casualties.
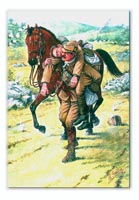
John Norwood VC
It was during the scramble to get away from Lombard's Kop that 2nd Lt John Norwood won the VC and Private William Sibthorpe was awarded the DCM. Norwood galloped back 300 yards under fire to help the wounded Private Mouncer. He carried him on his back and led his own horse. Sibthorpe came to assist him and helped carry Mouncer, still under heavy fire. Norwood made a report about Sibthorpe's bravery but omitted his own part in the action. When Sibthorpe was asked by the Squadron commander why he did what he did he said, "I only followed my officer's example." thus revealing Norwood's part. When the Squadron commander sent in his report he wrote, 'It is against the expressed wish of 2nd Lt Norwood that I report his share in this act of gallantry'.
|
|
|
|