|
|

|
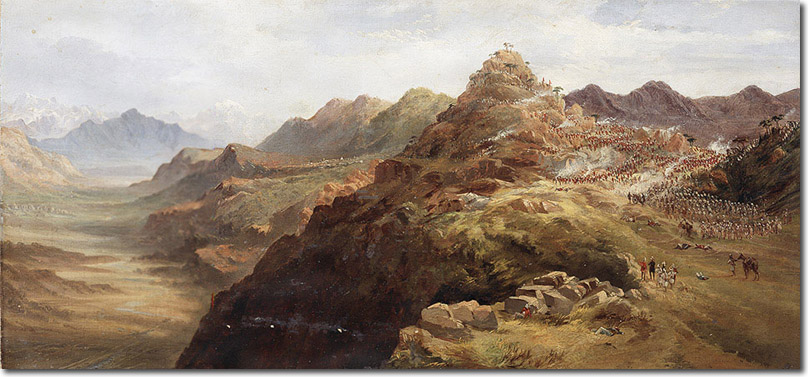
| This panorama of the Ambeyla Pass was painted by Colonel John Miller Adye CB who was Deputy Adjutant-General of the column. The Ambeyla campaign took place in the autumn of 1863 and was intended to punish jihadist Hindustani Fanatics by destroying the remote village of Satana, situated 75 miles northwest of Peshawar. The Fanatics had given refuge and weapons to mutineers in 1857 and a punitive expedition had been sent in 1858. But their activities against the British continued, and a force of 6,000 was sent against them. These troops included the 71st Highlanders, 4th and 5th Gurkhas, Corps of Guides, 11th Probyn's Horse, 101st Royal Bengal Fusiliers and several battalions of native infantry and mountain artillery. The route chosen by Chamberlain was through the Ambeyla Pass which was in the territory of the Bunerwals. They were mistakenly thought to be enemies of the Fanatics but when the column stopped for the night at the end of the pass they were attacked and suffered heavy casualties including the commander himself who was wounded. The Fanatics had persuaded the Bunerwals that the British were going to seize their land. The force was pinned down for a few weeks in which the wounded and sick increased in number. Chamberlain was wounded for the ninth time during a counter-attack. Reinforcements arrived including the 7th Fusiliers, 93rd Highlanders and 24th Punjabis. The second in command John Garvock organised a strong attack on the Heights of Laloo which dominated the British position and it is this action that is depicted in the painting. The attack involved heroic action by British, Sikh, Gurkha and Pathan troops all vying with each other to be the first to reach the enemy at the summit. The attack was successful and the Bunerwals capitulated. They were forced to set fire to the Fanatics' stronghold themselves as the British and Indian troops stood by and watched. |
Armed Forces | Art and Culture | Articles | Biographies | Colonies | Discussion | Glossary | Home | Library | Links | Map Room | Sources and Media | Science and Technology | Search | Student Zone | Timelines | TV & Film | Wargames
