|
Raising of the Regiment
|
|
The regiment was initially raised in 1689 as part of William of Orange's defence of the English kingdom he had just relieved from King James II. King James had made it known that he was openly Catholic and with the birth of a son made succession to a Catholic heir all but certain. In 1688 the English army had invited William of Orange to invade England as part of the 'Glorious Revolution'. King James though tried to reclaim his throne through the invasion of the more Catholic and sympathetic Ireland with the aid of Catholic France.
The regiment endured three years of hard campaigning and miserable conditions under the command of General Lord Schomberg before ultimately prevailing over the Jacobite incursions.
|
|
War of the Spanish Succession 1702-1715
|
|
When Charles II of Spain died leaving much of his lands to Louis XIV of France, an alliance of England, Holland and the Holy Roman Empire tried to stop this union between France and Spain. The regiment sailed from Cork in 1701. John Churchill, the Duke of Marlborough, was the colonel of the regiment from 1702 to 1704.
Schellenberg, 2nd July 1704
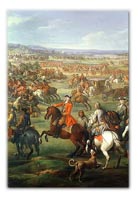
The regiment had as their Colonel at this time, the Duke of Marlborough himself. He organised the famous march to the Danube which had to move an army of 21,000 from Holland to the Danube in secret to deceive the French and Bavarians as well as his Dutch allies who would not have allowed him to take the army away and leave them defenceless. Starting on the 19th May 1704, he joined up with the Margrave of Baden on 20th June and the combined army now numbered 40,000. The first action was against the fortified hill of Schellenberg which Marlborough ordered should be attacked immediately while the enemy defences were still being built. At 6pm the Guards grenadiers led the assault with the 1st and 23rd regiments behind, and the 24th behind them. The assaults were repulsed several times before the final breakthrough. The French were driven from the hill and pursued by the cavalry. The casualties for the 24th Regiment were 28 rank and file killed, plus one officer and one sergeant. Two officers and 44 men were wounded. The battle of Schellenberg was never awarded as a battle honour.
Blenheim, 13th Aug 1704
A month of marches around Bavaria followed this victory then Marlborough's army joined up with Prince Eugene in early August and they discovered that the French/Bavarian army were at Blenheim on the Danube. The 24th were brigaded with 15th Foot and 21st Fusiliers under Brigadier Rowe. They were part of Lord Cutts's division which was given the task of attacking the village of Blenheim. Rowe's Brigade led the attack which was the first action of the battle and they came under a withering hail of grape-shot and musket fire. Rowe struck the pallisade with his sword but was later mortally wounded. His brigade fought furiously to try and break down the pallisade but were struck down with musket fire and forced back. The French cavalry charged them but they were held off by the British dragoons, who in turn were heavily fired on. Cutts's division were tenacious but the defenders of Blenheim were veterans who were prepared to hold on to the last. Elsewhere in the battle the enemy centre gave way and were put to flight. The village was besieged from all sides and eventually surrendered and became prisoners. The huge number of French captives had to be contained during the night by a hollow square formed by the British and their allies.
The British contribution to the Allied army was 16,000 men. The whole army numbered around 40,000, of which 4,635 were killed in the battles of Blenheim and Schellenberg, and 7,676 were wounded. The British losses were 676 killed and 1,928 wounded. The 24th's strength before the battles was 36 officers and 582 NCOs and men. They lost 5 officers and 113 men killed, with 9 officers and around 230 men wounded. The Treasury Papers tell us that the Queen's Bounty was paid to every soldier in the army after the great victory at Blenheim: The Colonel, William Tatton was given 75 pounds, Major Mead 51 pounds, Captain Oldfield 30 pounds, 3 wounded captains were paid double, 60 pounds each, 5 lieutenants 14 pounds, 4 wounded lieutenants 28 pounds, 9 ensigns 11 pounds, 2 wounded ensigns 22 pounds, 32 sergeants 2 pounds, 15 corporals 30 shillings, and 442 privates 20 shillings. The chaplain, adjutant, Quartermaster, Surgeon and his mate received no money. Money was, however, paid to orphans and widows of the dead officers according to their rank.
|
|
The American War of Independence
|
|
The regiment arrived in Quebec on June 1st 1776 and soon saw action at Sorel. It pushed south with Burgoyne the following year fighting at Freeman's Farm before being forced to surrender at Saratoga. The 24th returned to Britain in 1781 but was reposted to Canada between 1789 to 1800 to help guard the frontier from Revolutionary America.
|
|
Service in Canada 1789-1800
|
|
In April 1789 the regiment, under the command of Lt-Col Richard England, embarked at Dublin for Canada. They landed at Quebec where they were stationed until Dec 1791. From then until May 1792 they were in Montreal. At that time the regiment consisited of 18 officers, 4 staff, 19 sergeants, 10 drummers and 375 rank-and-file. In May 1792 they marched to Detroit, then a remote settlement in the backwoods and were posted in that area until the fall of 1796. The history of the regiment tells us at this point that Lt-Col England was one of the first landholders in Northwest Canada.
The regimental HQ and five and a half companies were based at Detroit, three and a half companies at Miami Rapids, and one and a half companies at Michilimackenaw. Here the regiment had the job of providing protection for the American as well as the Canadian settlers from attack by Indians. But the presence of British troops at Miami Rapids caused a problem with the Americans. The post had been fortified by the regiment and was in an area that had seen a massacre of American troops commanded by Major-General Sinclair in 1791. Another American army, under Major-General Anthony Wayne was sent to deal with the Indians in that area, in 1793, and had instructions from Secretary Knox to, if necessary, dislodge whoever was occupying Miami Rapids, in the name of the President of the United States. Maj-Gen Wayne defeated the Indians in a pitched battle near the Rapids and then turned his attention to the Fort built by the 24th Regiment.
The garrison of the Fort was commanded by Major William Campbell who warned the American soldiers to keep their distance, and entered into negotiations with Wayne. He warned Wayne against any act of hostility but Wayne said that the British were the ones who had committed an act of hostility by re-occupying a post on American soil. Campbell replied that he had orders to be where he was and would not relinquish his post unless ordered to do so by his superiors. He also expressed a hope that the matter would be 'settled amicably elsewhere'. The question was settled in the Treaty of 1795 and the garrisons withdrawn. On 10 Aug 1794 the Legislative Council of Upper Canada voted their thanks to Major Campbell 'for his temperate and dignified forbearance' in dealing with the Americans.
On its return from Detroit the regiment was stationed at Montreal. In 1797 they moved to Quebec where they were reinforced by the corporals and privates from the 5th Foot, while the officers and segeants of the 5th returned to England to recruit replacements. In November 1799 the 24th Regiment was sent to Halifax, Nova Scotia, under the command of Major Charles Erle. In Halifax, troops were needed to handle a problem with deportees from Jamaica. At the end of the Maroon War in Jamaica in 1795, six hundred Maroons had been sent to be settled in Halifax. After a year or two they started to cause trouble and were placed under guard at Port Pleasant. It was decided, by leading advocates of the abolition of slavery, to send some of these Maroons to Africa. In April 1800 the HMS Asia set sail with 350 Maroons, bound for Sierra Leone. The 24th provided a detachment to guard these people on the voyage. The rest of the regiment embarked at Halifax on 22 Sep 1800 and sailed to Portsmouth. They were quartered at Hilsea Barracks but in December marched to Exeter. In that month the detachment returned from Sierra Leone under the command of Lt Henry Dunbar Tolley.
|
|
The Revolutionary and Napoleonic Wars
|
|
The 24th regiment was sent to Egypt in 1801 to clear up the remains of Napoleon's Army of Egypt that had been stranded by Nelson at the battle of Aboukir Bay. The 24th captured Alexandria as part of General Hutchison's army.
A second battalion was raised in 1804, but the first battalion was soon back in Africa, although in South Africa as part of the Cape of Good Hope campaign to win the Cape from the Dutch. It was commanded by Sir David Baird.
Meanwhile the second battalion was despatched to Spain to fight with Sir Arthur Wellesley as part of the Peninsular War. The battalion suffered particularly severe casualties at Talavera despite the victory.
Talavera, 28th July 1809
The 24th was probably one of the unluckiest regiments in the British army. They suffered great disasters in their history and Talavera was one of them. The recently formed 2nd battalion embarked for Portugal in April 1809, commanded by Lieut-Col Drummond, with a strength of 39 sergeants, 22 drummers and 778 rank and file, plus 4 boys. They were brigaded with the 27th, 31st and 45th regiments under Major-General MacKenzie and made some long and tiring marches. There was widespread dysentery and the men had not been fed properly for three days. On top of this the regimental baggage had been plundered by Spaniards.
On the 28th July the army of Wellesley faced the French under Joseph Bonaparte next to the River Tagus at Talavera. MacKenzie's brigade was in the middle and slightly back from the Guards brigade. There was an opening of artillery fire which killed many men and they were ordered to lie down. At 9am the firing ceased and a lull gave them time to remove the wounded. Then the French attacked General Campbell's division on the right of the line which came under great pressure. The 24th moved over to their right and fired on the French column which was forced to retire.
The regiment were then ordered to move back to their original position to support the Brigade of Guards, which they did as fast as they could but the Guards had charged forward to attack. The 24th took up a position vacated by the Guards but had to wheel back by companies to allow the retreating Guards through. They provided a steady fire on the French to cover the retreat. The battalion was badly depleted by now and could only form a single rank. Also the burning grass claimed many casualties, as men were burned to death or blown up by the powder they carried. Nearly all the officers were wounded, with one killed. The rank and file lost 355 killed and wounded.
Some months later the officer commanding the battalion read the despatch of the battle and saw that the 48th regiment had received all the credit for supporting the Guards, with no mention of the 24th. He remonstrated with Lord Wellington who agreed that the 24th should be given credit and sent a letter home to that effect. But the letter was lost in the Marlborough Packet and did not get published. Thus the histories of the battle failed to mention the terrible sacrifice made by the 2nd battalion. The 24th were, however, awarded the battle honour TALAVERA on the 29th July 1817.
|
|
The Sikh Wars
|
|
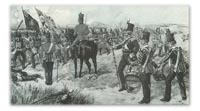
The first battalion was sent to India to fight in the Sikh and Punjab wars. The 24th were surprised to come up against such a modern and well trained army.
The Battle of Chillianwallah, 13th Jan 1849
The 24th Regiment lost 255 men at Chillianwallah, an indecicive night battle in the Second Sikh War. The army of General Gough marched 25 miles through thick jungle from Dingee and were preparing to pitch camp at Chillianwallah when Sikh artillery fire forced them to draw up battle lines instead.
The 24th were part of a brigade that was placed in the middle of the line. The other regiments in the brigade were the 25th and 45th Native Infantry and these 3 units were led by John Pennycuick who had exchanged to the 24th in April the year before. The 24th were commanded by Robert Brookes. Both men died in the battle. It is claimed that the 24th did not fire during the advance on the Sikh guns but relied on the use of the bayonet. This was the cause of the disaster that occurred. The 61st Regiment were more fortunate in that they were permitted to fire at the enemy and thus suffered fewer casualties. Lord Gough must take much of the blame for the 24th's fate since he stressed time and again that infantry should advance using only the 'cold steel'. The story of John Pennycuick is particularly sad because of the death of his 17 year-old son Alexander on the same day. After the battle the 24th was commanded by Major Mathew Smith of the 29th. He wrote a letter on 5th June 1849, to Colonel Mountain, with details of the battle:
"The sad tale of poor Brigadier Pennycuick's death and that of his son is brief. When the order was given for the line to advance he continued near his own regiment, the 24th. From some cause or other, he was dismounted from his horse and went on a little way in front of the 24th, on foot. They got under a tremendous fire of round shot and grape, the regiment was at the charge pace, and when within some 50 yards of the guns, a sergeant saw the brigadier stagger and put his hand to his body, just below the breast. He and another went up to him to offer assistance but he declined it saying, 'Go on with the regiment.' Shortly after, a private soldier seeing that he was wounded went to him and he accepted his assistance. Two sergeants then joined him and he said, 'I am badly wounded, take me to the rear.' They saw that he was bleeding profusely from a large wound in the body and rapidly losing strength. These 3 men conveyed him towards the rear and shortly found that he was dead.
They continued to carry the body, but in the meantime the regiment having reached the battery was overwhelmed by the close fire of a large body of the enemy drawn up in the rear of it. After suffering immense loss they retired, and swept in confusion past the men carrying Pennycuick's remains. The Sikh cavalry followed them up and slaughtered all they got near. To save their own lives, therefore, and the poor brigadier being no longer alive, they laid him down, took his handkerchief and keys from his pocket, and made the best of their way, like the rest, to the village where the regiment had rallied.
Young Pennycuick had been on the sick list and was brought to the field in a dooly. There he insisted on going with the regiment into action. He retired with it after the repulse, and at the village heard of his father's fate. Immediately he went to the front in search of the body, and it would appear, was killed by its side, for the two were found lying dead together. The poor boy was apparently shot through the back, and the ball came out almost exactly at the spot where his father was struck in the front. And thus, side by side, we laid them together in their graves, in the mound at Chillianwallah. Both were, and are, deeply regretted in the regiment."
The bodies of the 25th's officers were laid out on the mess table of the 2nd Bengal Europeans, which afterwards passed to the Norfolk Regiment. For weeks after the battle the 24th could see, through telescopes, their Regimental Colour flying over captured British guns.
Gujerat
A month later the regiment was back in action at Gujerat. The Sikh army was still intact and put up 60,000 defenders to the British and East India Army of 24,000. This time the defensive tactics of the Sikhs gave the initiative to the British who won a much less costly victory with just 97 dead and 700 wounded.
|
|
The Andaman Islands
|
|
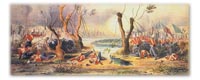
A strange incident occured in the Andaman Islands between India and Burma in 1867. Some of the 24th were travelling with a ship charged to make contact with the islanders with a view to setting up a new penal colony there. When the ship's commander and his landing party failed to return 5 members of the 24th went ashore to rescue their countrymen from local cannibals. All 5 were awarded the Victoria Cross for this brave action.
|
|
The Zulu War 1879
|
|
In the 19th century it was unusual for a regiment to have both its battalions serving in the same theatre of war but this was the case for the 24th Regiment during the Zulu War of 1879. The 1st Battalion had been in South Africa since 1875, campaigning in West Griqualand in 1875 and in the Galeka War of 1877-78. The 2nd Battalion which was raised in 1858 had seen service in Burma, the Andaman Islands and Madras. They arrived in Natal just in time to take part in Lord Chelmsford's invasion of Zululand in January 1879.
Chelmford's field force was initially divided into 5 columns, 3 of which would advance towards the main Kraal of King Cetshwayo at Ulundi. They were to be led independently and be supplied by their own transports. Both battalions of the 24th had companies in the 3rd column, led by Colonel Richard Glyn, an ex-CO of the 24th. Chelmsford and his staff accompanied Glyn's column but both commanders were some miles away from the battle so avoided the fate that befell the men in the camp at Isandhlwana.
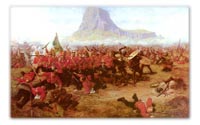
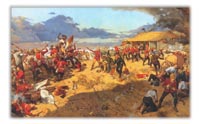
Isandhlwana, 22nd Jan 1879
Present at the battle of Isandhlwana were five companies of the 1st/24th: A, C, E, F and H Coys (407 men). The 2nd/24th were represented by G Company (170 men). A further 8 men of the 1st Battalion were detailed to assist the Rocket Battery RA and an unspecified number serving in the Mounted Infantry. Out of these 585 men (plus the MI) only two survived, bandsmen Bickley and Wilson.
The camp was set up on 20th January but strangely it was not fortified against Zulu attack. Prior to the start of the campaign, Lord Chelmsford had made careful preparations and given instructions that any camp set up, for however long or short a period, must be laagered with a central circle of wagons as a last chance citadel, and an outer perimeter entrenched and protected with stones and thorn bushes. As an extra precaution, broken bottles were to be scattered around to welcome the barefoot Zulus. None of this was done at Isandhlwana. Chelmsford himself was too concerned about a report from Major Dartnell of the Natal Mounted Police who had been involved in a skirmish with 1,500 Zulus 10 miles to the southeast. Colonel Glyn and Lt-General Lord Chelmsford busied themselves in this area while the main force of 20,000 Zulus approached Isandhlwana from the northeast.
The total force in the camp numbered 1,800 made up of colonial troops, Natal Native Contingents, artillery, sappers and ancillary troops, and the 24th, the only British regular infantry regiment. The camp came under the command of Colonel Durnford RE from 10am on the 22nd when he arrived in camp. Up until then the camp had been commanded by Colonel Pulleine of the 24th and in reality remained in his command. At around 1pm the Zulu hordes surrounded the camp losing many of their number to the artillery grapeshot and the steady firing of the Martini-Henry rifles. The Zulus wavered at one point and were about to give up but the men ran out of ammunition and had difficulty in being re-supplied. So the attack continued and ended with desperate hand-to-hand fighting. Many of the Natal troops ran away but according to testimony given by Zulus after the war, the red-coated men of the 24th stood their ground and fought bravely to the last. The only survivors on the British/Natal side were 300 who had managed to flee towards the southwest over the Buffalo River to Helpmakaar. Lord Chelmsford repeatedly disregarded the desperate messages he was receiving from the battlefield and did not arrive with his contingents until nightfall. They spent a nervous night on the battlefield and were ordered to leave before dawn so that the troop would not be demoralised by the sight of stripped and mutilated bodies lying all around.
Rorke's Drift, 22nd-23rd Jan 1879
The bulk of the 2nd Battalion accompanied Lord Chelmsford several miles away from the doomed camp at Isandhlwana but B Company was detailed to the less glamorous task of guarding the supply depot and hospital at Rorke's Drift. The two main buildings, with kraals, were not fortified as an attack was not expected. The officer commanding B Coy was 35 year old Lieutenant Bromhead, but slightly senior to him was Lieutenant Chard RE who was responsible for building a pontoon bridge over the Buffalo River, a quarter of a mile away.
At around lunchtime on 22nd Jan 1879 the garrison became aware that something was happening at Isandhlwana and an hour or so later an officer of the Natal Native contingent rode up to tell them that the camp had been overrun by a huge Zulu impi and that they were on their way to destroy Rorke's Drift. Chard and Bromhead immediately set everyone to building barricades with biscuit boxes and mealie bags. Mealie was corn used to feed animals and native troops. At first there were a large number of Natal troops who helped build the defences but most of them beat a hasty retreat leaving only 113 men of the 2nd/24th, 10 men of the 1st/24th, 4 men of the RA, 2 men of the RE, and 24 others, total: 153. Some of these were patients who were either capable of firing a rifle or too ill with fever.
Men were posted around the perimeter and six were placed in the hospital to help the patients. As the garrison was greatly depleted after the Natal troops ran away, the perimeter defences had to be reduced in size. The attack began after 4.30pm from the south, around the west end of the Oscarberg mountain. The men found that the charging Zulus were not deterred by their fellows falling dead besides them. Some Zulus took up positions on the side of the mountain and fired down on the defenders from the cover of a stone ledge. The area was completely surrounded and assaulted continuously up until 6pm. The Zulus broke into the hospital, killed some of the patients and set fire to the roof. The hand-to-hand fighting of the men in the hospital, and their saving of the patients is one of the more exciting parts of the Rorke's Drift story and was reflected in the awards of VCs that went almost exclusively to the hospital detail.
The bravery of the men around the perimeter was no less remarkable. The bayonet was used frequently, especially as the Martini Henry rifles proved so difficult to use. The recoil was very heavy causing the men to suffer badly bruised shoulders, and in the words of Private Alfred Hook VC:
'I need hardly say that we were using Martinis, and fine rifles they were too. But we did so much firing that they became hot, and the brass of the cartridges softened, the result being that the barrels got very foul and the cartridge chamber jammed. My own rifle was jammed several times and I had to work away with the ram-rod till I cleared it. We used the old three-sided bayonet and the long thin blade that we called the lung bayonet. They were fine weapons too, but some were very poor in quality, and either twisted or bent badly. Several were like that at the end of the fight; but some terrible thrusts were given, and I saw dead Zulus who had been pinned to the ground by the bayonets going through them.'
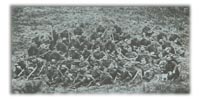
The Zulus did not generally fight at night so there was a lull in the fighting as the night wore on. At first the burning hospital illuminated the attackers making it easier for the defenders to shoot them, but when the fire died down the attacks stopped and the men spent an uneasy night watching and waiting, but at daybreak the Zulus could see Lord Chelmsford's column approaching and decided to withdraw. The Zulu force numbered about 4,000 according to Chard's account. He counted 351 of their dead but later more bodies were found, and there was no way of knowing how many Zulus had died of wounds. The figure may be more like 400. The 24th lost 10 men killed plus two that died of their wounds, and 11 wounded.
After Isandhlwana and Rorke's Drift
The 2nd Battalion remained at Rorke's Drift after arriving there to relieve B Company. They spent a miserable time without tents and covering and had to sleep on muddy ground. This state of affairs lasted 3 months during which time 12 men and one officer died of sickness and 13 men and 2 officers were invalided. The battalion was then split for various duties including building Fort Warwick on the Itelezi ridge. They did not take part in the Battle of Ulundi but when Lord Wolseley took over command, two companies, F and H provided his escort. After that the same companies had to go to Isandhlwana and bury the dead. At the end of 1879 the battalion was ordered to Gibraltar which they reached on 12th Feb 1880.
The 1st Battalion, having lost 5 companies at Isandhlwana, needed to be re-formed. In England the news of the disaster had stirred the nation and there was no shortage of volunteers from other regiments to transfer to the 24th. Men from 17 regiments were taken on so that 520 new soldiers were sent out to southern Africa on the 'Clyde', setting sail on 1st March 1879. Unfortunately the Clyde hit a reef between Dyer's Island and the mainland on 4th April. The men were disembarked, but before the baggage could be unloaded the tide rose and the ship sank. They eventually reached Durban on the 11th and marched to Dundee where they were united with D and G Companies who had been posted at Helpmakaar at the time of Isandhlwana.
For the rest of the war the 1st Battalion was in the 2nd Division under Major-General Newdigate. They were required to built a stone fort on the River Umvelosi and remained there while the battle of Ulundi took place. They were ordered back to England in July 1879 and on 27th Aug they embarked at Durban on the 'Egypt'. They were commanded by Colonel R T Glyn, their strength at that time being 767 privates, 11 drummers, 36 corporals, 46 sergeants and 24 officers. They arrived at Portsmouth on 2nd Oct and went into barracks at Gosport.
|
|
|
|