|
Origins
|
|
The regiment dates back to 1715 when they were dragoons, raised for the suppression of the Jacobites against whom they fought in 1715 and 1745. Dragoons were not proper cavalry like the regiments of Horse, rather they were mounted infantry. In 1776 they were converted and titled 14th Light Dragoons, by which time they operated as versatile mounted troops for patrolling, recce and skirmishing, with the occasional opportunity to charge the enemy in line of squadrons. They were titled 14th King's Light Dragoons in 1830 and this royal status transferred with them when they were converted into hussars in 1861.
|
|
From Light Dragoons to Hussars, 17 Aug 1861
|
|
The 14th Light Dragoons returned to Britain after spending 19 years, from 1841 to 1860, in India, where they had fought and distinguished themselves in the Second Sikh War and the Indian Mutiny. In 1860 they were sent to Newbridge in County Kildare to recruit and buy horses. On 17 Aug 1861, a few days after the Prince of Wales, later Edward VII, had dined with the officers in the cavalry barracks at Newbridge, the regiment became hussars. The commanding officer at the time was Arthur Scudamore who was in charge from June to October of 1861. The change to hussars was resented by some because traditionally light dragoons had always looked askance at other branches of the cavalry, describing the heavies as Overweight Louts, and hussars as Theatrical Bounders. They were to be titled 14th (King's) Hussars, the parenthesis remaining in place until 1920, 2 years before amalgamation with the 20th Hussars.
|
|
India and South Africa 1876-86
|
|
The 14th Hussars left Ireland in 1862 and moved around Britain, from Lancashire, to Aldershot, then Hounslow and finally Edinburgh before returning to Ireland in 1868. After six years, in 1874 they went to Aldershot and then Colchester. In 1876 they were posted to Poona, and later Bangalore, in India. They prepared for active service in Afghanistan but were sent instead to South Africa at the end of February 1881. The disaster at Majuba had occurred but the British government responded by granting independence to the Boers in the Transvaal. The regiment had little to do and saw no fighting. At the end of 1881 they returned to India, disembarking at Bombay, and marched to Secunderabad, a journey that took six weeks. They spent four years in this posting, enjoying a good climate and indulging in sports like panther hunting, polo and steeplechasing or hurdling. But the time in India was also used for constant training and inspections to keep horses and men in good condition.
|
|
Home Service 1886-99
|
|
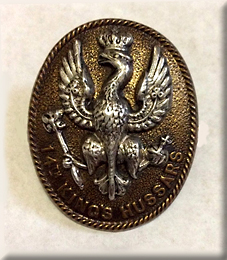
The 14th sailed home to England with a strength of 17 officers and 405 rank and file. Also there were 3 officers' wives, 24 soldiers' wives and 58 children. They were stationed at Shorncliffe, Aldershot, Hounslow and Brighton. While at Brighton they performed three Military Tournaments for the public, and organised a Full-Dress Ball at the Pavillion attended by 400 guests. On at least two occasions they had contact with Kaiser Wilhelm II, in 1889 and 1891, escorting him from Crystal Palace to Buckingham Palace, and staging a sham fight at Aldershot for his amusement. He was interested to see the badge of the 14th, being the Prussian eagle. The commander of the escort Captain Richardson was presented with a signed, framed photo of the Kaiser but on the outbreak of war in 1914 he smashed it to the floor and stamped on it. In 1891 they moved to the north of England and were called out in aid of the civil power but the rioters dispersed as soon as the cavalry arrived. At Manchester a squadron in full dress turned out to quell a riot in Chester but were not needed. On their return they came across a hunt meet and the officer, Major Gage asked the master of the hunt permission for the squadron to join in, which was granted. In 1894 the 14th escorted Queen Victoria at the opening of the Manchester Ship Canal and soon after embarked for Ireland. They stayed there for 5 years posted to Cahir, Dublin and Newbridge.
|
|
The Boer War
|
|
Voyage to South Africa, 1899
The 14th were mobilised for active service on 9 Oct 1899 while they were stationed in Newbridge, Ireland. This was welcome news but frustration set in when it was realised that influenza and pink eye had spread around the stables and the horses were declared unfit for embarkation to South Africa. The officers and men were forced to wait until 16 Nov before travelling to Aldershot. A depot was establish at Curragh Camp with a reserve squadron and on 13 Dec, and the bulk of the regiment sailed from Southampton on the 'Victorian', convinced by this time that they would arrive too late for the war against the Boers. However news reached them of the defeats suffered by the army during Black Week, so on-board training was stepped up.
Meanwhile B Squadron were ordered to remain at Aldershot and sailed 8 days later under the command of Major R M Richardson on the 'Cestrian'. They arrived at Cape Town on 10 Jan 1900 to join up with Major-General French's Cavalry Division which was part of Lord Methuen's column tasked with the relief of Kimberley. The rest of the 14th Hussars landed at Durban on 5 Jan 1900, to join Sir Redvers Buller in his march to the relief of Ladysmith. The Headquarters, and A and C Squadrons had a strength of around 300 men, and a draft of 115 men joined them in March 1900.
Klip Drift, 15 Feb 1900
General French's Cavalry Division was made up of 3 brigades; the 1st Brigade under Brigadier-General Porter consisting of the Carabiniers (6th DG), Scots Greys and 2 squadrons of the 6th Inniskilling Dragoons, the 2nd Brigade under Brigadier-General Broadwood had the 2nd Life Guards, 10th Hussars and 12th Lancers. The 3rd Brigade under Brigadier-General Gordon was made up of the 9th and 16th Lancers. As well as that there were mounted infantry companies and 7 batteries of Horse Artillery. This is the list of units involved in the Cavalry Division that relieved Kimberley on 15 Feb 1900 as laid out on the Anglo Boer War website, which more or less agrees with Louis Creswicke's contemporary account in the South Africa and the Transvaal War. Neither source mentions B Squadron 14th Hussars. The detailed history of the regiment (1901) by Colonel Hamilton makes a brief mention of the squadron's part in the relief, 'On the 15th, the date of the relief of Kimberley, the B squadron was engaged on the Modder River and outside Kimberley,'
Lt-Col L B Oatts in his history of the regiment, The Emperor's Chambermaids has a much fuller account that states that the squadron was part of the 1st Brigade. He says that after their sea voyage Major Richardson's men took the train from Cape Town to Orange River station where they met up with the Carabiniers (6DG) who were detailed to escort a supply column being sent to French's Division waiting at De Keil's Drift. Having reached French, the whole division set off on 13 Feb for Klip Drift on the Modder River. This was a huge gathering of mounted troops, 6,000 in all, 'the largest assembly of British cavalry in history'
The hot weather made the journey arduous and many horses perished but Klip Drift was reached by that evening and the Boers guarding the river crossing fled. B Squadron was ordered to do outpost duty while the division bivouacked on the north bank of the Modder. The cavalry rested the next day to allow the Infantry to catch up. Lord Roberts was now commanding the whole column and upon conferring with French it was decided that the cavalry should push ahead the next day to reach Kimberley before the besieging Boers could be reinforced.
The cavalry formed up on 15 Feb to move along the valley which was blocked ahead by Boers who had set up barbed wire to hamper the British advance. The wire was cut and cleared by a heroic party from the 16th Lancers who all suffered wounds, and their officer killed. General French decided on a bold massed cavalry charge to clear the way through the Boer defence. Many officers were shocked at this choice of tactics but it turned out to be one of the most successful actions of the war. The 9th and 16th Lancers were deployed at the front of the formation, then came B Squadron 14th Hussars placed in front of French and his staff. First Brigade were behind them and the 2nd Brigade brought up the rear.
As they set off they were fired on by the Boers but because of the dry ground a huge cloud of dust was created. This acted as a screen for the troops but it also caused men to be blinded and unsure of what was happening. However, nobody seemed to lose their way, they only had to follow the sound of thousands of thundering hooves. The effect of the sight and sound of this massed cavalry sent the Boers fleeing in terror and most of them were speared by the lancers. The British casualties were extremely light and General French was congratulated and cheered by all.
Bryan Perrett's short history of 'The Hawks' confirms the involvement of the 14th Hussars and adds that following this action the advance was resumed with B Squadron in the lead, and it was actually 2nd Lieutenant J B Walker's troop which reached Kimberley first.
Dronfield, 16 Feb 1900
The entry of Walker's Troop into Kimberley was in the capacity of General French's bodyguard. The commander of the garrison, Colonel Kekewich and Cecil Rhodes came out to greet the force that relieved them. They all rode back in so that the first unit, apart from French's staff, to enter Kimberley was a Troop of the 14th Hussars. The cavalry were exhausted after their 15 mile ride from Klip Drift so a pursuit of the retreating Boers was not feasible. However, French was anxious and at 3am he ordered a small force to mount up and head north to Dronfield, 10 miles away, where the Boers were entrenched across the rail track. Lt Dawes's Troop accompanied this party, and were instructed to draw the enemy fire while a dismounted attack was launched. The battle lasted until the evening of the 16th Feb when the Boers retreated once more, and the Troop sustained one man seriously injured, SQMS Ayres.
Paardeberg, Feb 1900
The relief of Kimberley put Cronje in a perilous situation at Magersfontein so he moved out and headed east towards Bloemfontein in the Orange Free State. But he was cornered at Paardeberg. The cavalry that had rested at Kimberley were taken to pursue Cronje while the others followed later. The infantry and advance guard of the cavalry surrounded the Boer laager but Cronje refused to surrender in the hope of being reinforced by Christian de Wet. However, the rest of French's cavalry, which included B Squadron, arrived on 21 Feb and the Division was able to prevent any Boer commandos reaching the laager. On 27 Feb, Majuba Day, Cronje surrendered and handed over 4,000 of his men along with huge wagon loads of supplies. This was a very welcome boost to British morale, due in no small part to the work of the cavalry.
Hlangwane Hill, 23 Jan 1900
A and C Squadrons and HQ of the regiment were in a 3,000 strong mounted Division commanded by Lord Dundonald. The division was mostly made up of locally raised irregular horse, mounted infantry and police but the regular cavalry was provided by the Royal Dragoons and the 14th Hussars. Buller was in command of this half of the British army, operating in Natal with the object of relieving Ladysmith. The CO, Colonel Hamilton, with his HQ, two Troops of A Squadron and two companies of mounted infantry, based at Chieveley, patrolled up to the Tugela River. They came under shell fire near Hlangwane Hill and then found themselves surrounded by stealthy Boers who crept up on them. Major O'Brien ordered a tactical withdrawal which was carried out successfully. The casualties amounted to 26 including the medical officer, Capt Dalton, who took a bullet in the stomach. The Boer who shot him came to him to apologise but Dalton had to make his own way back in great pain.
Spion Kop, 24 Jan 1900
The squadrons were separated so that one Troop of A Squadron under Lt Hutchinson was attached to Coke's 10th Infantry Brigade at the disastrous battle of Spion Kop. The Troop patrolled around the flank, drawing fire but did not suffer casualties unlike regiments like the Lancashire Fusiliers.
Pieter's Hill, Feb 1900
The battle of Pieter's Hill took place over several days and is remembered for the great bravery of the Irish Infantry Brigade who made suicidal assaults against a storm of rifle fire from Boer trenches. Although the battle was a victory Buller was widely criticised for sustaining heavy casualties, so when the enemy retreated on 28 Feb the cavalry were held back when they should have pursued and prevented the Boers from regrouping. He was finally persuaded to allow one squadron from each of his two hussar regiments, the 13th and 14th. They were ordered to follow the Boers as far as Elandslaagte on the strict understanding that they incurred no casualties. When they came under shrapnel fire they had to dismount and take cover. The risk of casualties was too great to take effective action so they withdrew.
Relief of Ladysmith, 1 Mar 1900
Ladysmith was relieved on 1 Mar, just in time to save the population of 13,500 troops and 8,000 civilians from starvation. According to Colonel Oatts's history the 14th once more led the relieving force into the town, accompanying Lord Dundonald and Winston Churchill. Louis Creswicke sets out in detail the units that he says entered the town. He gives the date as the 28th Feb when Lord Dundonald actually approached the gates to relieve the defenders. With him were the Natal Carbineers, the Imperial Light Horse and the Border Mounted Police. Most of the Natal Carbineers formed part of the garrison inside Ladysmith so it was only one squadron that entered on 28 Feb. There was another, formal, entry into the town on 3 Mar when General Buller ceremoniously led a smartened parade of his men into the town. The first unit to accompany him and his staff was the Dublin Fusiliers who had lost many men, including their CO, on Railway Hill in the battle of Pieter's Hill.
Poplar Grove, 7 Mar 1900
Lord Roberts's army was, meanwhile, heading towards Bloemfontein but had to dislodge the Boer Commandoes of de Wet and de la Rey from their positions at Poplar Grove. French's cavalry, which included B Squadron, were required to make a 30 mile ride to turn the Boer left flank. This was an exhausting march in hot dry weather so that when the Boers retreated the cavalry horses were in no condition to pursue. Changes to march discipline and horse management were made as a result of this incident. Had the cavalry been up to scratch they would have been able to capture President Kruger and much of the enemy baggage.
Driefontein, 10 Mar 1900
Roberts resumed his march in three columns with B Squadron riding with the left column. The previous day the 14th had been fired on from Abraham's Kraal whilst on recce patrol. This was the right flank of the Boer position which proved to be impossible to approach so General French collected his cavalry brigades and attacked the Boer left. However, the enemy remained in place despite repeated attacks by the cavalry. When the infantry did dislodge them they retreated but could not be pursued because the horses were, once more, too tired. B Squadron was heavily engaged and under fire all day but managed to avoid casualties.
The Squadrons Reunited, 14 Apr 1900
Regimental HQ and A and C Squadrons were sent by ship from Durban to East London, and from there by train to Bethulie. They were reinforced by a draft of 115 men from the UK and were given remounts bred locally and also shipped from Argentina. At the end of March they made their way to Bloemfontein, which was now occupied by Lord Roberts's force, and were in the 4th Brigade with the 7th Dragoon Guards and 8th Hussars, commanded by Major-General J B B Dickson. They were put into camp at Donderhoek and two weeks later B Squadron rode in so that the regiment was reunited for the first time since Aldershot. There was an unfortunate incident at Donderhoek when the 17th Lancers inadvertently caused the horses of the whole 4th Cavalry Brigade to stampede. The 14th lost 53 of their animals which they had been carefully nursing back to health after their long treks on starvation rations.
Relief of Wepener, 21-25 Apr 1900
When Sanna's Post was seized by the Boers, a detachment of troops was cut off at Wepener. This and other actions improved enemy morale and encouraged the Boers to increase their guerrilla activities. Lord Roberts divided his force, taking one part to recapture Sanna's Post and another to relive Wepener. The 3rd and 4th Cavalry Brigades were detailed to go to Wepener with Colvile's 9th Infantry Division. At one point on the 22nd, the cavalry halted and were bunched together when the Boers opened fire from a kopje called Paardekraal Hill. A sergeant was killed and several horses killed and injured.They were unable to catch up with some fleeing Boers after this but the next day they assaulted another hill after cutting through enemy wire. They galloped through the cut wire under fire from pom-poms, dismounted and captured the enemy position with only a few casualties.
Roodekop, 24 Apr 1900
There was an advance towards De Wetsdorp that took the cavalry past Roodekop. Here the 14th and 8th Hussars were ordered to occupy a high ridge to their front. They galloped forward and dismounted, reaching the top just before the Boers. A fire-fight ensued during which A Squadron were pinned down so that they had to keep their faces flat on the ground. The squadron CO was killed outright, he was Captain Denny, on attachment from the KDG, and 2 other men were killed. This action delayed the cavalry so that it was unable to cut off the retreat from Wepener. The infantry captured De Wetsdorp but the Boers were reinforced by Louis Botha and withdrew to the mountains around Thabanchu. It was here that the 4th Brigade narrowly avoided being surrounded, only managing to escape due to the rearguard actions of the 14th. Several of their horses were lost but no men were hit, only one was captured by the enemy but later released.
Advance to Pretoria, May 1900
Lord Roberts commenced his advance northwards to Pretoria, capital of the Transvaal, on 3 May, setting off from Bloemfontein where the cavalry horses were still recovering from overwork and hunger. The 4th Brigade did not leave until 7 May, being responsible for escorting the vast baggage train. The 14th were kept busy riding back and forth to protect the wagons which was a strain on the horses. They were involved in an action at the Sand River on 10 May and on the next day they were required to gallop for half an hour to reach the Valsch River to prevent the Boers from digging in. This was successful and the enemy retired.
Kroonstad, 12 - 22 May 1900
Kroonstad had been declared as the new Boer capital of the Orange Free State and that was captured on 12 May. While there the cavalry were sent out patrolling and skirmishing. On 18 May the 14th were sent to burn down a farm that had been used as a base for enemy snipers who had made use of a white flag to trick the British. The farm was successfully destroyed despite Boer efforts to prevent them. Another farm was also burned for good measure. The regiment returned to Kroonstad with prisoners and 134 head of cattle. The advance continued and they entered the Transvaal on 24 May. The nights were getting cooler and the men were without blankets as well as adequate food. On top of these troubles they were fired on and had to put out fires caused by enemy shell-fire.
Johannesburg, 29 May 1900
In the approach to Johannesburg the 14th were given the tough task of assaulting enemy positions on the kopjes. They suffered some men and horses wounded and Major Brown had his horse killed. The battle proper been on 29 May and the cavalry was well handled, managing to turn the west flank of the Boer position. The 14th had to dismount and attack on foot several times. Sir John French made special mention of Major Brown's C Squadron which captured and held a kopje together with the 7th DG. They had to work under heavy fire from rifles and guns with 'gallantry and efficiency'. Johannesburg surrendered on 30 May and Lord Roberts entered the city the next day.
Diamond Hill, 12 June 1900
The 14th were in a poor state by the time that Pretoria was secured a few days later. They were reduced to 135 mounted men, hungry and in a ragged condition because of Roberts's rapid advance. Any horses that foundered were to be turned loose near water if possible and the men report to any unit they could find, with their saddles. The regiment lost many men this way as they never rejoined their unit. The cavalry were engaged against De La Rey's commando at Diamond Hill, a battle that lasted two days. They were ordered to ride round the Boer flank but De La Rey kept extending it, making the task impossible. But by extending their flank the Boers left the centre weakened and the infantry were able to beat them. The 14th were in close action during the whole battle, mostly fighting dismounted and running out of ammunition. The artillery was also short of horses and were not able to support the cavalry as was usual. The regiment ended the battle with only two casualties. The enemy retreated but it was no use pursuing them as the horses were exhausted. The 14th were sent to Kameel Drift where they rested for 3 weeks and were supplied with remounts.
Advance to Middleburg, July 1900
The officers and men suffered badly from cold and hunger during the advance to Middleburg. It was winter in South Africa and Lord Roberts had failed to accumulate enough supplies before the start of his approach to the Middleburg where Louis Botha had his Boer HQ. Those wagons that managed to keep up with the troops became bogged down. The men were bivouacked on bare hillsides without food and warm clothes. The 14th were on Naauwpoort Hill, across a drift over the Klein Olifant River, tired from being in action all day on 25 July. They were now in the 1st Cavalry Brigade, having been transferred from the 4th. When dawn broke on 26th July everyone was so cold and miserable that nothing happened even though the Boers were only 200 yard away and in some cases even nearer. The enemy withdrew however and the brigade pursued. The 14th were lagging behind but caught up with the action at Sterkwater. C Squadron was in the lead and was shelled but no casualties were suffered. On reaching Middleburg it was found that Botha had decamped.
Machadodorp, August 1900
Botha's men, numbering 6,000, having let Middleburg, were determined to hold out at Machadodorp. The 14th were positioned 14 miles south of Belfast, with a strength of 340 men and 250 horses. Morale had improved because the men were allowed 'living at free quarters' which meant helping themselves to whatever food they could find. It was the only way to keep themselves and their horses going. They mounted patrols and outposts to keep an eye on the enemy 5 miles away. Roberts decided to attack from Middleburg while Buller approached from the Natal railway through Ermlo. The Cavalry Division advanced ahead of the infantry and was in a single extended line well spaced out. Buller's attack was successful, and combined with the cavalry drove the Boers off, so that Belfast and Machadodorp were evacuated. On 27th Aug the 14th were holding a line of kopjes far out to the left of their brigade and were attacked. Several men and horses were injured in this defensive action, but they were able to mount an attack along a spur which was led by Sergeant Dove who was mentioned in despatches.
Barberton, Sep 1900
The regiment were now operating in country where they were forced to move in single file through the hills. On 30th Aug the went against Watervalboven but had to withdraw, luckily without loss of men. Buller was ordered to concentrate on Lydenburg while the cavalry moved out through the Barberton country. They reached Carolina on 7 Sep and were involved in actions which were led by the squadrons of Lieut Hill-Whitson and Hon H Grosvenor. The regiment were then ordered to capture a Skopje called Nel's Hoek. They moved in file over rough ground but had to trot fast to avoid the fire from both sides, but they succeeded and the Boers retreated from the position. The brigade, which included the Greys, Inniskillings, Carabiniers and the 14th Hussars, was joined by the rest of the cavalry and they advanced to Barberton which surrendered, providing the troops with wagon-loads of Boer supplies as well as 10,000 pounds worth of gold.
Geluk, 13 Oct 1900
The war, according to Lord Roberts was over, and he had relinquished command after annexing Transvaal. Kitchener was left in charge to mop up. The cavalry was re-organised so that the 14th Hussar were now in a new brigade commanded by Colonel B T Mahon. Their fellow regiments were the 8th Hussars, Mahon's Horse and M Battery RHA. On 12 Oct they marched to Heidelberg with a large transport column, and on the first day bivouacked on a ridge at Geluk. This was stalked by Boers in the night and attacked at dawn. They were forced to retire to Dalmanutha but they were slowed down by the wagons. A picquet of the 8th Hussars lost 2 officers and several men killed and wounded. A Squadron of the 14th under Capt Tottenham was dug in on the forward slope of the ridge covering the retreat. When the wagons were out of range of enemy fire Major E D Brown, second in command of the regiment, rode back to extricate A Squadron. This involved the men leaving the trenches one at time and running for the horses, a distance of 150 yards. M Battery came under heavy fire and lost men and horses so that the guns had to be manhandled out of action under covering fire from A Squadron. Major Brown and their horses were in a dangerous position, being fired on from two sides. This made the animals very agitated but two Troops managed to get away. One Troop of A and one of C Squadron were having trouble getting mounted but three men were helped by Brown. He then rescued Sergeant Hersey whose horse was killed. Then, together with Trumpeter Leigh he rode back to check that no-one was left behind. They found one unmounted man, Private Gregory, but he was too heavy to ride behind the saddle so Leigh gave him his horse and got up behind Major Brown. This was all done under heavy fire but they got themselves clear. Meanwhile Sergeant Hersey found another unmounted man and rescued him.
Tottenham halted his squadron to take up a position from where they could cover C Squadron's withdrawal. This time the horses were not exposed and it was easier for them to retire. But one officer, Lieutenant J G Browne could not mount his horse although he had a hold of the reins. Major Brown was still keeping an eye on the rearguard and saw the Lieutenant's difficulty. He galloped over and held Brown's horse until he was mounted. They both survived, later to become commanding officers of the 14th. Major Brown was awarded the Victoria Cross and altered his name later so that he became Colonel Edward Douglas Browne-Synge-Hutchinson VC CB, commanding the 14th from 1907 to 1911. Lt John Gilbert Browne reached the rank of Lieutenant-Colonel commanding the 14th from 1921 to 22, and the 14th/20th Hussars from 1922 to 25. The brigade casualties amounted to 70 killed and wounded while the 14th had one man killed and 9 wounded, with 5 horses killed and 10 wounded. Sgt Hersey had been wounded and was decorated for his bravery, as was Trumpeter Lance-Corporal Leigh and Private Shenton.
The Regiment Re-Armed, Nov 1900
The 14th went to Pretoria, arriving at their camp a few miles west of the town, on 3 Nov and sleeping in tents for the first time in 6 months. They were re-equipped, having their carbines replaced by .303 Lee-Enfield rifles which were sighted up to 2,800 yards as opposed to the 1,200 yards of the carbines. They also received 300 remounts and a draft of men. Their brigade organisation changed again so that they were now with the 7th Dragoon Guards and O Battery RHA. The brigade was commanded by their former CO Colonel Hamilton who relinquished command of the 14th on 21 Nov to be replaced by Lt-Col O'Brien.
Varkenskraal, 24 Dec 1900
The regiment were at Hartebeestfontein on 22 Dec 1900, then moved to Stinkhoutboom on the 23rd. The next day the brigade marched to Welverdiend Station making a reconnaissance to Mooi River and back. A patrol of 25 men was sent out under Lieutenant the Hon Hugh Grosvenor investigating reports of a large number of Boers at Varkenskraal. They were ambushed and would have escaped serious harm but Lt Grosvenor ordered that wounded and unhorsed men should be picked up. The lieutenant and Private Shenton were recommended for awards for bravery. But the fact is that the Boers at this stage did not take prisoners because they had nowhere to keep them, and they didn't harm captives other than remove their boots and sometimes their trousers. Two men were killed and several wounded, and 11 horses were killed.
The Imperial Light Horse Disaster 1901
At the end of December 1900 the regiment was split up and did not come together again until Feb 1902. Kitchener was now in command and the tactics now involved drives in parallel columns one of which was General J M Babington's and another commanded by General Gordon. On one occasion the flank guards of Babington's and Gordon's Columns exchanged shots with each other while A and B Squadrons were riding with Babington's. A patrol was sent out under the command of Sgt Ridgewell, to investigate a sighting of horsemen descending the hills above Naauwpoort. The Imperial Light Horse, a locally raised unit set off later to occupy a ridge to their front. They assumed that Ridgewell's men were ahead of them but this was not the case and instead the ILH came under fire from a strong force of Boers on the crest of the hill. The Boers had held their fire until the ILH were within 100 yards, so the horsemen made easy targets. They lost 23 killed and 41 wounded in the disastrous incident. The 14th Hussars were held responsible for not giving warning to the ILH but Ridgewell had taken a different direction and run into difficulties of his own, losing two men killed and being captured himself along with two others. The two squadrons of the 14th then set off and drove the Boers from their positions and sent out patrols to keep an eye on the retreating enemy. When the column returned from its drive the 14th came under attack from a large body of Boers near Ventersdorp, but sustained few casualties.
Hartebeestefontein, 24 Mar 1901
During this period the squadrons were engaged with the enemy on 9 separate occasions. Of these the most significant was an action fought near Hartebeestefontein on 24 Mar 1901, involving Babington's column of which A Squadron was part. The enemy on this occasion were commanded by De La Rey who had assembled a large force for an attack on the garrison at Lichtenburg. While retiring from this unsuccessful attack they were attacked by Babington's column. The Boers fled in all directions, 30 being killed and 140 captured, the majority being from Smuts' Commando with whom the 14th had been fighting at Geluk. De La Rey's men were pursued for 12 miles, losing 53 wagons, 2 field guns which had been captured at Colenso, one pom-pom and 5 Maxims.
Harrismith Drive, Feb 1902
The war was now dominated by sweeps and blockhouses. One line of blockhouses ran from Harrismith along the central railway to Kronstadt, and another to the north between Frankfort and Heilbron. De Wet was operating within this enclosed area and in February a drive was organised which brought in 300 prisoners but De Wet himself got away. Another drive was set up on 21 Feb which included the 20th Hussars, advancing south from Perekop. At Harrismith, the other end of the drive, were the 14th, dismounted and entrenched at intervals along the wire between the blockhouses. De Wet again escaped by cutting the wire but 50 Boers were killed, 778 captured, 25,000 head of cattle rounded up as well as 2,000 horses and 200 wagons. The 14th were now operating more in the dismounted role and engaged in digging trenches. Posts of 10 men between each blockhouse occupied a trench. Dummy trenches had to be dug and, when they were attacked from behind they had to reorganise and prepare for all round attack.
The End of the Boer War, 31 May 1902
In the middle of May 1902 a peace conference took place at Vereeniging, during which operations continued. The peace treaty was finally signed on 31 May 1902 at Pretoria. The 14th Hussars received the news of the ceasefire while they were posted at Lindley. Shortly afterwards a detachment was sent home to attend the Coronation of King Edward VII. The war had cost the regiment 5 officers and 84 rank and file killed. They went in to camp at Kroonstadt with no immediate prospect of returning to the UK. In March 1903 they were told to sell their horses prior to embarking for England. Boers came in eagerly to buy the horses which had a reputation for hardiness and good condition. On 28 Mar 1903 the regiment sailed home on the Dunera from Cape Town. They stopped at Durban where the 20th Hussars embarked but they were dropped off at Suez. The 14th went on to England and entrained to Aldershot. From the station they marched dismounted behind the band and attracted much attention, not least because of heir new mascot, Kruger the baboon.
|
|
Back to India 1906
|
|
The regiment moved from Aldershot to Shorncliffe before being sent abroad once more, in 1906. They were sent to Bangalore in India, remaining there until 1911 when they moved to Mhow. In that year the establishment included a two-gun Maxim machine-gun section in addition to the four sabre squadrons. The sabre in question was replaced by a new pattern sword, straight-bladed and longer, that remained in use by the British cavalry for the rest of the 20th century and beyond.
|
|
The Great War
|
|
When the Great War broke out in 1914 the 14th were declared to be a very fine regiment, fit to take the field but apart from a move to the unhealthy climate of Meerut in November 1914 there was, frustratingly, no sign of mobilisation. On 1 Jan 1915 there was the annual Proclamation parade which was a spectacular event in which the 14th Hussars paraded in full dress for the last time. It was not until 27 Oct 1915 that they received the order to mobilise for Mesopotamia. They embarked at Karachi on 8 Nov in three ships, with a strength of 18 officers, 443 rank and file and 490 horses.
Mesopotamia 1915
The 6th Indian Division had been in Mesopotamia for several months, and under the command of General Charles Townsend had captured Kut from the Turks in Sep 1915. The Commander-in-Chief, General Sir John Nixon was keen for Townsend to advance on Baghdad but for this he needed reinforcements, and the 14th were part of that reinforcement. After a week's voyage they arrived off Basra and the men transferred to 4 river steamers. The horses, Walers, were loaded, with difficulty, onto lighters which were secured to one side of the four steamers. They reached Kut in late November, a few days after Townsend had been defeated at Ctesiphon. They were ordered forward with 2 companies of the West Kents and met the retreating British at Aziziyeh on 28 Nov. The 14th were made very welcome especially as they were now the only British regular cavalry regiment in the 6th Cavalry Brigade (7th Hariana Lancers, 16th Bengal Lancers, 33rd Bombay Light Cavalry, and S Battery RHA).
El Kutunie, 28 Nov 1915
On the evening of 28 Nov the gun-boat 'Shaitan' ran aground 8 miles upriver from Azizyeh. The guns and ammunition had to be taken off to lighten her but the crew were attacked by Turks and Arabs. On receiving their message for help Townsend sent the cavalry. The enemy were around the village of El Kutunie, many Arabs being spotted among the trees north of the village. The 7th Lancers swung south along the river bank and A Squadron was ordered by Major Hewitt to attack the Arabs on the north side. Just as they set off, led by Lieut. J A T Miller, a blinding sandstorm blew up which hampered their vision but also covered their approach. They came upon the Arabs as they were forming up and swept through them, scattering them. Lieut Woodhouse's Troop cut down about 40 while the 7th Lancers accounted for 100 more. The enemy were fleeing on foot, on horses and camels, towards the river and many were shot as they swam across. Then the main Turkish force was seem coming towards them and S Battery opened fire. This halted their advance and the cavalry withdrew. None of the British/Indian cavalry were hurt in this action but when they bivouacked the next night they were shelled, causing two men and several horses to be wounded.
Umm-al-Tubal, 1 Dec 1915
Townsend's retreat to Kut was in danger of being overtaken by the pursuing Turks so he halted his army at Umm-al-Tubal to give battle. Seeing that his right flank was threatened he sent the cavalry with the order to charge the enemy. There was no opportunity for that so they had to dismount and deploy for firing on the Turks with their .303 Short Magazine Lee Enfields. As they spread out they were given covering fire by S Battery and the 14th's Maxim section commanded by Lieutenant Pope. The 14th were a regiment of marksmen and at a range of 1,200 yards created gaps in the enemy line. The Maxim section distinguished themselves in his action, saving the RHA from having to withdraw to avoid encirclement, and suffering heavy casualties. Seven men in the section were wounded and Pope avoided death by a hair's breadth when his helmet was shot through. Later on as the withdrawal continued, enemy infantry and cavalry were seen on the exposed flank. The 14th were sent to deal with them and Hewitt ordered his extended line to charge, but they were galloping too early, at a range of 800 yards so it was lucky that the Turks decided to turn and flee. The day's fighting had cost the regiment 5 men and 9 horses killed, 15 men and 25 horses wounded.
Kut-al-Amara
Kut was reached on 2 Dec 1915 and Townsend prepared the town for defence. There was talk of keeping the cavalry there so that the horsemeat could be used for feeding the garrison. But Nixon ordered them to carry on to Ali-al-Gharbi 70 miles away. Some men of the 14th remained in the doomed town; 16 men to guard the baggage and 25 sick and wounded horses. The regiment reached their destination on 8 Dec after a short skirmish with a large force of mounted Arabs. They had an uncomfortable time in Ali-al-Gharbi because it was now cold at night and they were not carrying blankets and coats. But their troubles were small compared with the suffering in the besieged town of Kut.
Sheikh Saad, 3-9 Jan 1916
The Turks decided to avoid fighting the 6th Indian Division defending Kut, and to starve them out instead. Meanwhile reinforcements were being prepared at Ali-al-Gharbi under the command of Lt-Gen Aylmer. The 7th and 3rd Indian Divisions had been brought in from France but there were delays so that Maj-Gen Younghusband was sent on ahead, as far as Sheikh Saad to pin the enemy down in that area until the Tigris Corps could be concentrated. The Turks were entrenched on either side of the Tigris, south of the village, so the force was divided. The 14th Hussars were in the vanguard of the Cavalry on the right bank, but one Troop, under Lt Brooke remained with the infantry. A and C Squadron were fired on, and C Squadron dismounted to return the fire. S Battery came into action when a mass of Arab horsemen appeared on the flank and a battle began which lasted three days. As the infantry attacked along both banks the cavalry were busy manoeuvring against the flank to determine the Turkish dispositions. Some brave actions were fought by men of the 14th including individual heroism such as SSM Wright who was awarded the DCM for galloping up to a trench and firing his revolver to create a diversion while wounded men were rescued.
The Wadi, 13 Jan 1916
The Turks withdrew on 9 Jan and moved to a new position on the Wadi, a tributary if the Tigris. The cavalry was ordered to cross the Tigris and attack the left flank of the Turkish position but came under heavy shell fire whilst in an area of exposed flat ground. They had lost direction and there was considerable confusion so that the enemy were able to move to prepared positions at Hannah.
Hannah, Jan 1916
The cavalry were of little use in the battle of Hannah in the third week of January. They were in a poor state with sickness and with the worsening weather. They bivouacked in a place that was knee deep in mud so that they had to walk around at night in the icy rain to keep warm. They remained on the flanks to protect the force against attacking infantry but were not called upon. The infantry of the 7th Indian Division suffered heavy casualties and the wounded received little attention as they lay in the mud. There was a second attempt at dislodging the Turks at Hannah made by the same 7th Division, in which the cavalry brigade came within sight of Kut but had to withdraw to Ora having gone without food or drink for both men and horses, for 60 hours.
Kut, April 1916
The final attempt to relieve Kut began on 5 April with another attack on Hannah but the Turks had withdrawn to Fallahiya. This was captured but at great cost to the infantry. The rest of the fighting around Sannaiyat brought about the decimation of many units and the wiping out of the 7th Division. The 14th Hussars, along with the rest of the cavalry had little fighting to do on the right bank of the Tigris. The tragedy of the starving garrison's surrender on 29 April is one of the low points in British and Indian military history. The regiment camped at Gomorrah, an extremely unhealthy place. Most of the hussars suffered from fever, jaundice, dysentry or other illness. The CO Colonel Hill-Whitson was invalided and relinquished command to Major R W Hewitt.
Sannaiyat, May 1916
The weather was becoming hotter and the main enemy in Gomorrah camp was flies which covered everything and made eating almost impossible without having a mouthful of these pests. On 19 May they were ordered to pack up and ride to Maqasis where the Turkish pontoon bridge had to be seized. The 3rd Indian Division were already on the move towards the main Turkish defences at Sannaiyat but they were in a very bad condition because of the heat and lack of water. A message was received that the pontoon bridge had been moved from Maqasis but the cavalry went there to water the horses. There was shelling from enemy artillery at Kut but no casualties. The whole force bivouacked at Imam-al-Mansur but the cavalry were ordered to set off at 3.30am to secure another pontoon below Kut, across the Shatt-al-Hai.
Shatt-al-Hai, May 1916
The 14th Hussars led the 6th Cavalry Brigade and at first light came under fire at 600 yards range. B Squadron, who were leading dismounted, took cover and the other four squadrons followed suit. Col Hewitt sent a Troop off to find the bridge, this was commanded by 2nd Lt Deakin who led his men to the Turkish trenches at the confluence of the Tigris and Hai. They dismounted and exchanged fire, being joined by the rest of D Squadron. Very soon the whole regiment was involved in a general advance on the trenches but the brigade commander could not support them as they were 3 miles in advance of the others, and ordered their withdrawal. C Squadron covered the retreat with rifle and machine-gun fire and fortunately the hussars were able to get away even though they were heavily outnumbered and could easily have been wiped out. Deakin was killed in the withdrawal, as well as Captain Mewburn, the first two officers of the 14th to die in the campaign. Fifteen men were wounded and 8 horses killed.
Change of Command, July 1916
The regiment was inactive for most of the rest of 1916, encamped at Arab Village. The condition of the men and horses deteriorated through monotonous diet, poor supply, heat and disease. But there was a change in command when the unpopular General Sir Percy Lake was replaced by General Sir Stanley Maude in July 1916. By November there was a marked improvement in morale and fighting efficiency due to better administration. The 6th Brigade was now part of a cavalry division with the 7th Cavalry Brigade, and the two Indian regiments brigaded with the 14th were replaced by the 21st Daly's Horse and 22nd Sam Browne's Cavalry. Maude was not only a good administrator, he was a tactician and made good use of cavalry.
Bridge on the River Hai, 13 Dec 1916
It was not until December that Maude renewed the offensive against the Turks at Sannaiyat and on the Hai. The cavalry marched at daybreak on 13 Dec and crossed the Hai at Basrugiyah and headed for Shumran. The 7th Brigade was leading and the 14th were on the left rear of the 6th Brigade. When the cavalry came under fire from small arms and from an enemy gun-boat, Captain T R Bruce and B Squadron were sent forward at the gallop to recce the enemy positions. The squadron moved at high speed towards the bridge over the Hai and reached a point 700 yards from the Turkish defences, under heavy fire. Bruce turned his men about, having accomplished his task and returned with only two horses wounded.
Kala Haji Fahan, 15-18 Dec 1916
The 3rd Corps and the Cavalry Division made good progress from the 15th to the 18th Dec, covering 90 miles riding on the left flank up the west side of the Hai. There were enemy trenches everywhere, some occupied and some abandoned. The cavalry were busy chasing off Arab irregulars who were watching the British progress. Near Kala Haji Fahan on 15 Dec the regiment came under fire and dismounted to attack a Turkish trench. They lost two men killed and a number of wounded men and horses. On 20 Dec the rain began to fall heavily and turned the desert to mud. The rain lasted until 6 Jan 1917.
Hai Town, Jan 1917
While the 1st Corp assaulted the Turks at Khudhaira in mid-January the cavalry raided Hai Town. The 14th remained in the town for 3 days, astonished that life was carrying on as normal there. The shops were trading and were well stocked and the people seemed unconcerned by the sound of battle not far away.
Massag Canal, 8 Feb 1917
The Turks in the Hai salient made a last stand in the liquorice factory on the river bank below Kut. The Cavalry Division made a dismounted attack at Shumran with the 14th attacking along the Massage Canal, engaging the Turks at 800 yards.
Recapture of Kut, 24 Feb 1917
The defeat of the Turks at Sannaiyat was the next objective with the 3rd Corp engaged in desperate fighting from 22 to 24 Feb. When the enemy began their retreat from Kut the cavalry were ordered to cross the Tigris at Shumran and pursue. They had to pass through the 14th Division but the bridge had been damaged by the weight of the guns of the division. The Turkish rearguard had taken a position on Dahra Ridge, but later moved nearer the river. This position was attacked by the dismounted cavalry, aided by two batteries of RHA.
Bughaila and Imam Mahdi, 25 Feb 1917
Air reconnaissance had found the Turkish main body at Bughaila and a rearguard of 2,000 men with 20 guns at Imam Mahdi. Confusing orders were given to the cavalry commander, Brigadier-General Crocker who understood that Imam Mahdi was to be captured. The 6th Brigade came under fire from inside Imam so they deployed to attack from two directions. The 7th Brigade also joined in and a dismounted attack was well under way, with equal numbers of men on each side but the Turks out-gunned them with artillery. Early in the afternoon General Maude called off the attack and ordered Crocker to take the division to Bughaila. This was a frustrating order to obey as they were in close action. The officers were sure that they could have defeated the Turks in this battle and blamed Crocker for the premature withdrawal. They looked as if their misgivings were justified when command of the 6th Brigade was taken over by Brigadier-General Holland-Pryor that very evening. The following day the cavalry were ordered once more to attack the Turks at Bughaila but that position had been abandoned. They could not pursue the fleeing Turks because shellfire from the Naval gunboats was just as much of a threat to the cavalry as it was to the enemy.
Aziziyah, 27 Feb 1917
The 6th Brigade were shelled from a Turkish position 3 miles from Aziziyah. The 14th dismounted to fire back with rifles and Hotchkiss guns. Holland-Pryor ordered them to take up a position on a low ridge and send out patrols. Captain Bridges and Lt Whadcoat led two patrols that were able to make a full recce of the enemy position after dark because there were camp fires burning, showing that Turkish discipline had broken down. The guns that had shelled the regiment plus others were later captured by Lt Macintyre's Troop. On 1 Mar the Cavalry Division entered Aziziyah to find that the Turks had left.
Lajj, 5 Mar 1917
Maude had to wait for his supplies to catch up before continuing on to Baghdad. On 5 Mar the army set off, with instructions to the cavalry to clear the area at Lajj of the Turkish rearguard. They were unaware that the Turks were there in force, a whole division, which was well dug in. The 7th Cavalry Brigade attacked and the 13th Hussars made a heroic charge which caused 9 officers and 77 other ranks to be killed or wounded. The 14th Hussars led the 6th Brigade but in a more cautious dismounted attack. Even so, they sustained six casualties including Captain Astley who was killed. The Turks were unaware of the small size of the force attacking them and abandoned their trenches during the night. Thus the cavalry had won a great success performing a function normally associated with the infantry.
Baghdad, 9-11 March 1917
The advance to Baghdad was not as straightforward as the army would have hoped. The enemy put up another fight at Diyala. The 7th Division engaged with the Turks but were halted after some hard fighting. The cavalry found the enemy flank at Shawa Khan and started to fire on them but they were withdrawn by General Crocker in order to water the thirsty horses. But the presence of the cavalry had achieved the result so that the Turks withdrew in the night to their main position at Um-al-Tubal. The next day saw more heavy fighting and again the enemy withdrew in the night. This opened the way for General Maude to enter Baghdad on 11 Mar.
Kazimain, 11 Mar 1917
As Maude entered Baghdad the 14th Hussars with the rest of the cavalry were ordered to march on to Kazimain, 8 miles to the north. Colonel Hewitt was at the head of his regiment which was leading the division. At 2pm the flank patrols of the advance guard, which was B Squadron, reported white flags flying over the walls of the town. Hewitt sent another squadron to cover his approach and he proceeded in person to receive the surrender of the sheikh and leading townsmen who came out. They went back into the town and prisoners were released. The cavalry then bivouacked outside, the 6th Brigade remaining near Baghdad while the 7th Brigade took part in operations as far as Baqubah.
Delhi Abbas, 27 Mar 1917
The Turks were gathered in strength at Delli Abbas and the 7th Cavalry Brigade had been unable to make any progress against them on 26 Mar. They withdrew to Baqubah where they were joined by the 6th Brigade. The Cavalry Division was now commanded by Maj-Gen L C Jones. General Maude was anxious to prevent the approach of the Turks from the north and ordered the cavalry to 'retard and operate vigorously against, any advance along the Lambarak-Muhurar road'. On 27 Mar the 6th Brigade reconnoitred between the Diyala and Khalis Canal. They came under attack just after noon by a force of 2,000 Turks who had 5 guns. They halted, with the 21st and 22nd Cavalry forward and out to the flanks, while B and C Squadron were dismounted on either side of the Delli Abbas road. Mounted patrols of the 14th were out in front but the Indian regiments had left B and C Squadrons too exposed and they became heavily engaged. S Battery RHA came into action with shrapnel, and the dismounted men fired rifle and Hotchkiss guns but the enemy advance continued without pause. The 21st and 22nd withdrew long the flanks but this left B and C Squadrons further exposed, this time to enfilade fire. They mounted up and withdrew to be in line with the 21st's 2 squadrons. The brigade stop line was behind this, consisting of the 22nd, the 14th's A and D Squadrons and the machine-gun squadron. The men fought dismounted until ordered to withdraw, then led-horses were brought up and they galloped back to the next bound. Casualties were light, while the Turks suffered badly. It was a textbook example of firepower and mobility combining to erode the strength of the enemy's attack. The battle was an important action and had considerable influence on the course of the operations dealing with the Turkish counter-offensive.
Ramadi, 28-29 Sep 1917
During most of 1917 the Turkish main body was at Tikrit but a detachment of 1,000 men was at Ramadi on the Euphrates, 60 miles west of Baghdad. General Maude 's 7th Infantry Brigade made an ill-advised attempt to drive them away in July but the unusually extreme summer heat at that time made life difficult as every metal object was hot enough to burn a man's hand. The attack had to be abandoned and no further effort was made until September by which time the enemy garrison had increased to 3,500 infantry, 10 guns and some Arab irregulars. They were well stocked with large amounts of ammunition and supplies. Their main positions ran along the Euphrates valley canal east of Ramadi and across the southern front of the town to the Aziziyah canal.
The British/Indian force was commanded by General Sir H Brooking, made up of the 50th Brigade Group from Faluja, the 6th Cavalry Brigade and most of the 15th Division from Baghdad. The cavalry brigade, commanded by Holland-Pryor, was to be placed west of Ramadi to cut off the enemy retreat which was expected to head that way following the main attack from the south. Brooking's intention was to mislead the Turks by making a feint attack along the river from the east. The 6th Brigade took up positions across the Hit-Ramadi road on the afternoon of 28 Sep. The men were dismounted and took up firing positions. Mounted patrols were in action to warn of the approach of the enemy. Lieutenant Moule's patrol was the first to give warning, soon after midnight. He was sent back to keep an eye on them and returned only 150 ahead of the Turks. The fleeing Turks could be seen in the moonlight and the 14th opened fire, followed by V Battery RHA, the machine-gun squadron and the 21st and 22nd Cavalry. The enemy advance was halted when they sustained heavy casualties. But as the moon dropped down in the west the Turks were able to see their opponents and returned fire more effectively. The brigade were thinned out in the centre and had to be reinforced from the left flank near the river. This allowed the enemy to move around the flank and enfilade the cavalry firing line. Between 100 and 200 Turks escaped through this opening and had to be chased later. One of the 14th's casualties was the CO, Colonel Hewitt who was shot in the lower back the bullet coming out of his chest. This did not kill him immediately, he had a painful 50-mile ride to Faluja where he was treated in an ill-equipped hospital. He died on 31 Sep 1917. One other officer of the regiment and 9 other ranks were killed. One officer and 15 men were wounded, this out of a strength of 170. The Turks gave up their effort to break out and returned to Ramadi while the ones that had escaped through the flank were pursued unsuccessfully. The defeat of the Turks was completed by 11 am on 29 Sep following a heroic assault by the 39th Garhwal Rifles against artillery. The surrender produced a horde of 3,545 prisoners, 13 guns, and a huge quantity of ammunition and supplies. Lieutenant Moule's patrols had produced very accurate reports on the enemy which contributed to the success of the operation. He was rewarded with the MC.
Tikrit, 5 Nov 1917
The Turks were driven from the Jabal Hamrin north of the river Diyala which brought their 18th Corps down towards Samarra and Tikrit. Maude sent his 1st Corps and Cavalry Division against this reinforcement. For the cavalry the march to Tikrit was difficult, moving by night and watering the horses by day. This involved getting near to the Tigris which was watched by Turkish aircraft so the enemy would have been aware of their approach. They intended to repeat the success of Ramadi by cutting off the line of retreat, although there was a plan for the cavalry to charge en masse. This was changed to a safer assault with dismounted men and mounted recce patrols. One of these was led by Lt Whidborne, mentioned in despatches for getting close enough to report the exact location of machine-gun emplacements while under heavy fire. Tikrit was captured and the Turks driven off so that the way was opened to advance on Mosul. Sadly the C-in-C General Maude died of Cholera on 15 Nov, replaced by Lt-Gen Marshall.
Bridges' Column, 1918
The Russian Revolution of 1917 had made it easy for the Turks to advance through Persia to try and seize the Baku oilfields in Azerbaijan on the shores of the Caspian Sea. Because of the breakdown of control in Russia and the Caucasus the British sent Major-General Dunsterville with a mission to foil Turkish ambitions in the region. In January 1918 the 14th Hussars were detached from the Cavalry Division to form the major element of a column operating in North Persia and beyond. The column, commanded by Lt-Col E J Bridges, included a section of S Battery RHA and the machine-gun squadron. They were sent off in advance of 'Dunsterforce' and left Sadiyeh Camp on 13 Jan 1918. They joined up with a battalion of the Hampshire Regiment, 2 Troops of the 12th Lancers and some admin services. They stayed at their meeting point, at Qasr-i-Shirin, just inside the Persian border, awaiting orders. General Dunsterville arrived on 27 Jan.
The plan was to link up with Russian cossacks under General Bicharakoff at Kermanshah. While waiting for the arrival of Dunsterville the column had been busy dealing with various tribal factions including Kurds, Jangalis, Kalhurs and Sinjabis at at time when there was famine in the region and disruptive Bolshevik influence. After Dunsterville arrived there was an abortive trip to Baku via Hamadan and Enzeli (Bandar-e-Anzali) but the Bolsheviks were at Baku and the column was forced to return. During March and April there were squadron expeditions to punish tribes like the Kalhurs and in some cases the Kalhurs helped the squadron to fight and pursue their rivals, the Sinjabis.
Manjil Bridge, 16 June 1918
In June Bridges' Column was scattered over a 400 mile area between Kasvin and Ruz. C Squadron, commanded by Captain A V Pope (later CO of 14th/20th) escorted Dunsterville to Kasvin, 50 miles from the Caspian Sea.There they met up with Bicharakoff and his cossacks. The squadron went with them to Enzeli where the Russians embarked for Baku. But on the march to Enzeli the bridge at Manjil was occupied by Jangali tribesmen commanded by the Persian revolutionary Mirza Kuchik Khan and a German adviser. Somehow, at this point, Capt Pope had at his disposal two twin-turreted Austin armoured cars, operated by an experienced unit called Duncars, part of the Machine-Gun Corps, which had been serving in Russia under the command of Oliver Locker Sampson. On 16 June the cossack infantry attacked the Jangali trenches and C Squadron attacked the flank. At the same time Duncars charged for the bridge with guns blazing. The enemy fled and 40 prisoners were taken. Bicharakoff continued on, leaving Pope's squadron to hold the bridge until the Hampshires arrived. They stayed in that desolate spot until the middle of August, building blockhouses at each end of the bridge. They were then ordered to Zenjan and while riding through a defile near Kaskal were attacked by tribesmen. One of their horses was wounded but they captured four men and four horses. This journey was across mountains 7,000 feet high, along goat tracks, until they reached their bivouac in the Zenjan Valley. The squadron , around this time, acquired two small barrels of caviare, one for the officers and NCOs, and one for the men. Pope's men were by this time, in threadbare uniforms and worn out boots, but asked if they had any complaints one of them said, "Yes sir,we don't like this 'ere fish jam."
The Kuflan Kuh, Sep 1918
The Turks attempted to cut off Dunsterville's communications with the Caucasus, concentrating their 11th Division at Tabriz. Reinforcements were sent to the detachment of Dunsterforce that was watching the enemy movements. Two companies of the Hampshires, some Gurkhas, artillery and two LAMB armoured cars were sent, along with Pope's C Squadron who had barely recovered from their spell in Manjil. The Turks attacked on 6 Sep but the British force were heavily outnumbered and had to make a fighting withdrawal across the Kuflan Kuh mountains. The hussars operated on both flanks with the infantry in the centre. They had to close together and cover the infantry's disengagement on several occasions. The fighting lasted a week and at one stage they fought for 7 hours continuously, during which time the Turks gained only 2.5 miles. Pope's men held the mountain pass until the infantry got clear, and then, with great difficulty retired through a ravine. When the enemy advance slackened the squadron made an offensive recce back to the mountains, and by working round their flank forced the enemy back. They disengaged and reached Kasvin where they joined up with Captain Ambler's B Squadron at the end of October.
Sain Kala
As for the rest of the regiment, A Squadron were based at Senneh and were in control of that part of the country. B and D Squadrons operated from Bijar and were concerned with the homeland of the Christian Jelu people who were the victims of persecution by the Turks and Kurds. There was a severe refugee problem which kept the three Troops of D Squadron separated and acting independently. There was one occasion at Sain Kala when a Jelu levy commanded by a Dunsterforce officer was surrounded and in considerable danger. A 12-man patrol under Sergeant Paddy Hallard came to their rescue, although heavily outnumbered. They managed to get everyone out and fought a rearguard action to cover their retreat until more reinforcements could arrive. Two men were wounded and Sgt Hallard won the DCM for this action.
Bijar, Sep 1918
In September Bridges Column was at Bijar, less B and C Squadrons. The Gloucesters had joined the column along with a Field company of RE, a Mountain Battery and a machine-gun section. Dunsterville had managed to reach Baku and was doing his best to keep the Turks out. He was helped by Bicharakoff who had changed sides to join the Bolsheviks and was the C-in-C in Trans Caucasia. But he had to evacuate Baku. The British forces were now under the command of Major-General W M Thompson and it looked as if he had his work cut out. The Turkish cavalry were reported to be within 7 miles from Bijar, but the armistice came just in time at the end of October. The Mountain Battery fired a 21 gun salute and the 14th Hussars returned to Mesopotamia via the Jabal Hamrin in December 1918. They were accompanied by Armenian irregulars, Russian sailors, a Cossack Prince, refugees and an Indian pilgrim. "A rare circus", someone commented.
|
|
Germany 1920-23
|
|
In February 1919 one squadron of the 14th remained behind in Mesopotamia as part of a composite regiment with the 7th and 13th Hussars while the rest returned to England. They were stationed at Tidworth, arriving by train, and being met by their band. In November 1920 they were posted to Cologne and quartered in a German cavalry barracks at Deutz. They were paid in pounds sterling so were able to avoid the horrors of the local currency inflation. When the French advanced up the Rhine to enforce reparations the regiment were moved to Dusseldorf as part of an Allied column. They rode about through the Ruhr and at the end of May, B Squadron advanced to Herne to put out an outpost line to cover the movement of the French. After a financial agreement had been reached the French withdrew and the 14th returned to Cologne. A Squadron, however, was sent to Silesia when fighting broke out between Germans and Poles over the Polish Corridor between Germany and East Prussia. The squadron spent a year in Silesia, based at Lublinitz. The winter weather was extremely cold which made patrolling unpleasant.
|
|
Amalgamation, 1 Oct 1922
|
|
After the Great War there were the inevitable cut-backs in military spending. The requirement was to reduce the number of cavalry regiments from 30 to 22 so some of them were paired up and it was decided to amalgamate the 14th and 20th Hussars, which took place on 1st October 1922. The 14th had only recently, in 1921, removed the brackets from its title to become the 14th King's Hussars but after joining with the 20th the title King's was dropped. The 14th/20th Hussars, under the command of Lt-Col J G Browne (formerly of the 14th), returned from Germany in October 1923. There was an unfortunate homecoming. As their ship approached England a gale kept them from disembarking at Dover so they had to stay at sea for another 5 hours. The regimental baggage was stowed on deck and much of it was washed overboard. Also, there was a hut on shore with a meal waiting for the returning regiment but that was washed into the sea. They eventually reached Tidworth and joined the 2nd Cavalry Brigade with the 12th Lancers and the 17th/21st Lancers.
|
|
|
|