|
A Dramatic Gesture
|
|
In 1915, an Anglo-French Naval Squadron attempted to force a passage through the Straits of the Dardanelles in an attempt to seize them for the Allied cause and open up a much needed supply route to Russia. Turkish minefields foiled this dramatic gesture. The decision was therefore taken to seize the Gallipoli Peninsular by landing over 30,000 Allied troops on April 25, 1915. The Assault Force struggled ashore but the Allied commanders could hardly have chosen worse terrain to attack. The craggy, dry and mountainous terrain would prove every bit as formidable as the Turkish foes in their fortifications whose fighting prowess had been too easily dismissed. For eight months Imperial, British and French troops endured merciless conditions. More men and resources were poured into the tiny toeholds claimed in that first invasion but ultimately it was all in vain. Eight months later, the Allied forces were forced to withdraw and except their most disastrous defeat of the war to date. However, in the midst of that failure were the embers of new, more confident nations being created: ANZAC sacrifices helped meld new ideas of solidarity and nationhood for the young Dominions of Australia and New Zealand. And their Turkish foes also took heart and confidence from their own performance. The Ottoman Empire may have gone on to be on the losing side of the First World War, but their resilience in the face of the full might of the British and French Empires would help form the basis of a modern Turkey rising from the Ottoman ashes. The biggest loser of all from the failure of this campaign though did not even commit troops to the fight. Russia would not get the vital supplies and material it needed to continue to fight the war against the German and Austrian Empires. Tsarist Russia would soon start its convulsions that would end in Revolution and a total collapse of the Eastern Front. The Gallipoli Campaign was no mere diversion it was a major commitment of Allied resources whose failure undoubtedly prolonged the war. The campaign's very failure would go on to change the map of the Middle East in unexpected ways as the British and French had to find alternative ways of defeating the Ottoman Empire and bring in new allies and open new fronts. In essence, Gallipoli had been a truly Imperial Campaign in terms of the soldiers who were committed to its execution and the ambitions of the Imperial planners who were so confident in its success. Their intention had been to break the deadlock of Trench Warfare on the Western Front with a bold stroke and elan where the enemy least expected it. In reality, they ended up creating Trench Warfare in the Eastern Mediterranean in a manner that managed to outdo even the horrific conditions back in France and Belgium. British and Imperial troops suffered over 115,000 troops killed or wounded, their French allies took another 27,000. Their Turkish foes suffered over quarter of a million casualties. Over 400,000 soldiers were killed or wounded to maintain the status quo. Except that Gallipoli did change the Empire but in ways that were not fully understood at the time.
|
|
Historical Precedent For a Royal Naval Seizure of the Straits
|
|
1915 was not the first time that the British had attempted to force a Royal Naval force through the Dardanelles Straits. It had been attempted in 1807 by Admiral Duckworth. Once again, this had been done to placate and aid Russian Allies, although in 1807 the common foe had been Napoleon. The problem facing Admiral Duckworth were the vagaries of the wind in the era of sail. He was actually able to sail his ships through the Narrows where they were fired upon but passed through safely. They then proceeded to engage a small Turkish flotilla in the Sea of Marmora. However, his instruction to bombard Constantinople and seize the Turkish battlefleet revealed the limitations of his naval squadron. More difficulties with the wind and the reluctance of the Turkish fleet to leave the safety of their port and covering guns ultimately doomed the venture. The return trip through the narrows was even more dangerous than the journey in for the Royal Naval ships as the Turkish were by now prepared and were aided by French advisers. Although Admiral Duckworth lost no ships, they did take serious casualties evacuating the Straits. The venture had been a disaster and had revealed the limitations of naval power to achieve such a strategic goal as knocking the Ottoman Turks out of the war by maritime endeavour only. This should have been a precedent to have concerned military planners in 1915. These were given very similar instructions indeed at first. Coal and oil powered ships would not have been so handicapped as the sailing ships of a century before, but the standard and power of shore gunnery had increased markedly and now powerful mines with enough explosives to sink the largest of battleships lurked beneath the waves. Besides this, French military advisers of the early 19th Century had been replaced by German ones of the German Military Mission which had expanded markedly since its arrival in 1913.
Undaunted, the First Lord of the Admiralty, Winston Churchill and the War Cabinet as a whole hoped that a daring Naval expedition to force the Straits with predominantly older and increasingly obsolete Royal Naval warships might be able to substantially change the strategic map without drawing manpower from the all important Western Front nor from draining the Royal Naval of its primary objective of keeping the German Fleet bottled up in its home ports. However, not all sailors were agreed that this was a good use of its manpower and ships. Admiral Fisher was the most forthright in expressing reservations to the War Cabinet and directly to the Prime Minister himself. His argument was that obsolete warships would not be enough for the mission at hand and besides if they were sunk the skilled and experienced personnel would be lost to the Royal Navy just as more modern ships were leaving the shipyards and needed crews. The most fundamental flaw of all though was the same that faced Admiral Duckworth. Even if the Royal Navy had forced its way through the Narrows, how might these ships force the capitulation of a city the size of Constantinople? They could bombard it undoubtedly, but they could never hope to seize or capture a city that size. The best that they might hope for is a capitulation of the Young Turk government that had thrown in the Empire's lot with the Central Powers so comprehensively. But there was no guarantee that this would occur and there would be little that a fleet of Royal Navy ships could do to encourage it.
Churchill, Asquith and most importantly of all Kitchener felt that it was a risk worth taking. They also thought that they might encourage other Balkan Nations like Greece, Rumania and Bulgaria to join in with the Allied Cause by opening a front against their old imperial overlord. They also hoped to nudge Italy to their side by showing the scope of their ambition. The fact that the Ottomans had launched their own attack upon the Suez Canal also confirmed that they were an adversary that could not be ignored. Most importantly of all though was that with the Russian defeat at Tannenburg and the deterioration on the Eastern Front, it was more essential than ever to be able to send supplies and expertise to their ally. This small stretch of water was taking on ever greater strategic ambitions for its adherents. Fisher still felt strongly against the Naval plan and had wanted to resign but Kitchener personally appealed to his sense of duty and convinced him to stay on board with the proposal. Dardanelles Naval Expedition Mark Two was given permission to proceed with the full backing of the War Cabinet.
|
|
The Naval Assault
|
|
The mouth at Cape Helles is 4,000 yards wide but at its narrowest point, the 'Narrows' are a mere 1600 yards wide. These Narrows were some 14 miles upstream of the Dardanelles and between the mouth and the Narrows were some 100 guns, torpedo tubes, forts and mines. These were formidable defences that would have been a test for any Naval force and undoubtedly yet more guns and men would undoubtedly be rushed to the area too.
The initial task fell to Admiral Carden who had happened to have been the ranking officer in Malta when the plan was originally put forward. In addition to all the cruisers, destroyers, minesweepers and tenders he had 14 battleships, two semi-dreadnoughts, the Lord Nelson and the Agamemnon, a battle cruiser, the Inflexible and the brand new Dreadnought Queen Elizabeth. There were four further French battleships and attendant ships also.
The initial plan was to engage the forts at long range as the British guns could far outrange anything that the Turks could fire back. They were then to move to medium range before offering yet more devastating fire at close range. At this point, it was intended that minesweepers would move in to clear the channel of these dangerous weapons that could sink the largest and most powerful of ships.
Admiral Carden ordered his ships to begin their assault on February 19th, which coincidentally was the anniversary of Admiral Duckworth's 1807 attempt to force the Dardanelles. The long range bombardment was proving ineffective as the moving ships found it difficult to find their targets. In the afternoon they moved closer inshore but this revealed that the Turkish guns had been holding fire and they promptly opened up on the approaching ships. As the light was failing by this time, Carden ordered a withdrawal. Unfortunately the weather took a significant turn for the worse at this point and a serious storm interrupted operations for the next five days. It was not until the 25th that the fleet returned in earnest to resume their attack.
This time the ships went right up to the mouth of the Straits. They were able to engage these outer forts at closer and more effective range. Over the next few days, despite continued bad weather, they were able to put ashore small teams of Royal Marines to destroy guns and weaken fortifications. They were surprised to find much of the area around the Gallipoli peninsular and the Southern Kum Kale area deserted. The poor weather made sustained bombarding difficult but not impossible. Admiral Carden was confident of the progress being made and telegraphed an optimistic cable back to London saying that he hoped to get through to Constantinople in about fourteen days!
The Turks though were learning from their mistakes. More soldiers were sent to the fortresses to repel the Allied landing teams. They were also finding that smaller, more mobile howitzers and guns were more useful than the big static guns in forts. The smaller guns could be moved and camouflaged and wait for targets to present themselves within range before firing and then moving. They also realised that targetting the smaller ships was more beneficial as they could do little to harm the biggest of the battleships. Minesweepers though were particularly vulnerable and it was these that were key to the success of the Royal Naval mission.
The idea had been that during the day the British ships would pound the forts and guns and then under the cover of darkness, minesweepers would clear a route through to the Straits. However, the Turks used searchlights and moved their mobile guns into a position to attack these small, unarmoured vessels that were often little more than fishing trawlers. It did not help that the crews were not Royal Naval personnel either but volunteer mariners who expected to clear mines in relative safety. When they entered into the straits they were disconcerted to be spotted by searchlights and opened up on by Turkish guns. Even when bigger Royal Naval vessels were sent in to escort these smaller minesweepers, they still found themselves the principal target. Admiral Carden realised that he would have to replace these crews with experienced Royal Naval personnel, but this would take time. The weather was remaining unpredictable and so the attacks were intermittent. They were entering into a Catch 22 situation. The minesweepers could not clear the mines until the guns were silenced and the guns could not be silenced until the Allied ships could get close enough by sailing through a cleared minefield.
By March 14th, Churchill at the Admiralty was becoming impatient at the lack of progress. Admiral Carden was relieved to have not lost any major ships but his minesweepers were taking casualties and his own nerve was breaking. He was dismissed by a Doctor on March 15th and replaced by Admiral De Robeck. Churchill gave him instructions to hasten the attack even if it meant taking losses in doing so. The implication was clear, a major assault was expected.
That assault was launched on March 18th. The ships advanced in three lines with the Royal Navy's biggest ships leading from the front. They opened fire at close range and received accurate but ineffectual return fire. The French under Admiral Guepratte were then given permission to move up to join the bombardment. Despite the size of the Allied guns, the Turkish guns continued to fire back. They were able to hole the French ship Gaulois below its waterline and she had to pull out of the line and beach herself. Inflexible,
Lord Nelson and Agamemnon were taking hits but not sustaining any important damage. However, when the remaining French ships were ordered to make room for the minesweepers to begin their task, disaster struck when the Bouvet either hit a mine or had its magazine hit directly by a shell. Either way, she sank with great loss of life in just three minutes. Worse was to follow as the Irresistable hit a mine. HMS Ocean was sent to tow her away when she also struck a mine. Both ships had to be abandoned, although most of their crews were rescued. Unbeknownst to the Allies a German built minesweeper the Nusret, had been laying fresh mines in areas already considered cleared by the Allies. These mines were almost certainly the ones that did so much damage to this Assault.
As the sun began to set, De
Robeck signalled all ships to retire. De Robeck's signal marked the end of the attempts by
the British and French navies to force a passage of the
Darda nelles unaide d by the army. That night, De Robeck's
gallant and aggressive chief of staff, Commodore Keyes,
went forward in the destroyer Jed, to see what could be
salvaged from the situation. He convinced himself that the Turks were beaten
and pressed de Robeck to try again. Rightly, in hindsight,
de Robeck refused. Of 176 Turkish guns in fixed defences,
just four had been destroyed. Three capital ships had been
sunk, and three damaged. Only one line of mines out
of about ten had been swept, and the chance of sweeping
more with the enemy howitzers still fully operational were
low indeed. Another attempt could have been made, but by this time thoughts were turning to a combined land and naval operation.
|
|
The Debate: Continue With Naval Assault or Land an Army?
|
|
A combined operations assault on the Straits assault had been considered from the outset. However, there was much debate over taking badly needed soldiers from the Allied Generals on the Western Front. It should be said that the Admiralty still felt ownership of the operation and the War Cabinet was deeply divided on the issue. The 29th Infantry Division was available in Britain and had even been earmarked on February 16th for despatch. However, a growing confidence in the ability of the Navy to force the Straits combined with concern from Western Front general to see it delayed, fatefully so. The change of orders was announced on February 18th just the day before the initial Naval bombardment began. Appropriate transport was dispersed and the Division assumed it would be setting off for Northern France instead.
There was hope that the Greeks might be able to intervene and send troops into the theatre themselves. They formally offered 3 divisions on March 1st to occupy the Gallipoli Peninsular and to march on Constantinople with the support of the Royal Navy. Yet another fateful intervention occurred although this time from the Tsar of Russia. It had been a long standing desire of the Russian Royal Family for many generations that the Russians might hold Constantinople and the Dardanelles themselves. The thought that a Greek army might usurp that ambition filled the Tsar with dread. Failing to appreciate just how precarious the military situation of the Russian armed forces were in was a serious error on his part. He informed the British ambassador on March 3rd that in no way could he agree to seeing Greek troops entering Constantinople. When news of this veto arrived in Athens, the pro-Allied government promptly fell and were replaced by a more pro-Central Powers government. Another opportunity had been wasted.
Although initially hesitant to continue the Naval Assault alone, Admiral de Robeck in conversation with Commodore Keyes came around to pressing home the attack before the Turks could recover their losses and rebuild their defences. In particular, they began the process of fully converting the minesweeper crews to Royal Naval personnel - largely taking the crews from the sunken and damaged ships from the assault on the 18th. However, Ian Hamilton had arrived in theatre just in time to witness the naval assault for himself. He seemed to be more sceptical and thought that a deliberate and prepared army assault on the peninsular would be necessary to hold open the Straits for the Navy's ships. He communicated as much back to London to Field Marshall Kitchener on the 19th of March. Once more though the weather made another fateful intervention in delaying any immediate further Naval Assault and the variously damaged ships and crews were reshuffled and repaired in preparation for another assault forthwith but not immediately.
A meeting between the Navy and Army commands occurred on March 22nd on the Queen Elizabeth off Lemnos to discuss strategy. It appears that Hamilton conveyed to de Robeck that he had no faith in the success of any further naval assault without army support. The Navy reluctantly conceded deference to the newly arrived commander who appeared to have the support of Kitchener and the War Cabinet. However, they still disagreed over how best to employ the army. De Robeck vigorously argued that they should be landed at the narrowest point of the Peninsular at Bulair and quickly cut off the Turks who would be expected to capitulate. This had the added bonus of being relatively flat terrain compared to the rest of the peninsular. However Hamilton dissented saying that the Turks had already built extensive defences in and around Bulair which he had seen for himself from the deck of HMS Phaeton. He therefore proposed the more deliberate assault on the tip of the Peninsular and to fight their way up. In matters of land warfare, de Robeck felt he had no option but to defer to the Army's greater expertise in these matters and reluctantly agreed. Winston Churchill, on the other hand, was less forgiving when he discovered the abrupt change of tactics. He had fully expected the Navy to continue to force the Straits several more times at least yet. The fact that his commander on the spot had been willing to be persuaded otherwise dismayed him.
The Navy commanders on the spot were to lose one more vital battle to Hamilton. They were keen to press home any attack as soon as possible lest the Turks make good on their losses and bolster their defences. Arguments were made to quickly land Royal Marines from the ships combined with Australian and New Zealand troops from Egypt almost immediately. Hamilton prevaricated and was concerned that these would not be able to hold off a determined Turkish counterattack. The main difficulty for Hamilton was that his core 29th Division was still at sea and Kitchener had personally requested that he wait until it arrived before starting the assault (Kitchener also forbade landing on the Asiatic coast). Had it left back in February it would have been in theatre to follow up the naval assault. As it was, it had once again hastily and somewhat chaotically been packed up and despatched and was not expected to arrive and be reorganised for an amphibious assault until the middle of April at the earliest. It would need to put into Alexanddria, land its equipment and supplies and repack them for an assault. Hamilton pencilled in April 14th although in reality it would not be until April 25th that the assault occurred. That gave plenty of time for the Turks to reorganise.
|
|
The Lull Before the Storm
|
|
The Turks defending the Straits were certainly of the opinion that the Allies would resume their naval assault forthwith. The deteriorating weather of the 19th of March may have explained their initial hesitancy but that they would return was not in doubt. As the days passed anticipation slowly transformed into relief and then into the idea of victory. The Turks had stood up to the mighty Royal Navy and had prevailed. The person who took the most credit for this was Enver Pasha and his fellow Young Turk Talaat Pasha. Their regime had certainly felt precariously close to collapsing. Their roots were not deep and hitherto most of their recent military escapades had ended in disaster. March 18th provided that rare propaganda gift for the beleagured government, a victory - even if only a temporary one.
With this victory came confidence, and time. Time to reorganise the defences in and around Gallipoli. The head of the German Military Mission, Liman von Sanders, was given command of the Dardanelles in entirety. He arrived on March 26th and quickly analysed the threats to the 52 mile long peninsular with its 4 major beaches and also similar threats on the Asiatic side of the Straits. He found that the Turkish forces had been deployed to cover all eventualities but had retained no central reserve. Six Turkish divisions were at his disposal in addition to the fortresses and gunners (who were already under German Naval command). He placed two divisions on the Asiatic coastline, two divisions at Bulair (the narrowest point of the Peninsular), one division at Cape Helles and a last division (commanded by Mustafa Kemal) in reserve at Maidos. It was ready to respond to the Allied threat whereever it presented itself.
Critically, Liman von Sanders needed time to train, drill and dig. As far as he was concerned ever day of delay would give him more chance of success in resisting an invasion. Trenches were dug, barbed wire was laid out, guns and rifles were ranged in, troops prepared.
There was an element of a phoney war as the Ottomans were certain that the Allies were preparing for an attack through intelligence reports from Lemnos, Alexandria and even as far as Rome. The British and French were making little secret of their preparations in the region as British, French, Australian and New Zealand troops gathered and made their own preparations for attack. More modern planes than had been seen before started to fly over the Peninsular on reconnaissance missions. The Royal Navy still patrolled the coastline and even made incursions into the Straits on a number of occasions. On April 19th, a British submarine got caught in eddies and drifted ashore whereupon Turkish guns and machine guns opened up. Interestingly, the Turks displayed a magnanimous attitude to those sailors who they took prisoner. The British sent ships, planes and patrol boats to try and destroy the abandoned British submarine to prevent it falling into enemy hands. It resisted all such attempts for three days before a torpedo finally found its mark. The Royal Navy also tested their new balloon observation platforms to direct British guns on Turkish positions from time to time if they saw a target of opportunity.
The 5 week period of grace also gave the Turkish authorities time to deal with what many Turks regarded as the enemy within: the Armenians. As early as April 24th, when the threat of Allied success seemed a real possibility, saw the Turkish authorities begin the process of rounding up well known Armenian political activists in Constantinople. Many Turks blamed Armenians for helping the Russian army comprehensively defeat the Turkish army in Sarikamish during the winter. The fact that Armenians were a non-Muslim, and relatively successful, community in a predominantly Muslim country made it easier to identify them as potential traitors in the eyes of many. In truth, they provided a convenient scape goat and rallying cry for a regime concerned for its own survival. The fact that the Allies were expected to return imminently made the Young Turks redouble their efforts to eradicate any potential traitors in their midst, however small that risk might actually be in reality. They also took on a barbaric and depraved momentum of their own as the Turkish authorities sought retribution, inflicted mass murder and enslaved peoples on unprecedented levels. Previously, international opinion might have forced moderation upon a Turkish government, but with the World War raging there was little room for these atrocities in the international press even if word could be got out. Their new German allies not only did not object but positively encouraged the process in order to bolster the political strength of the Young Turk government which had hitherto been regarded as precariously poised. It had the added bonus of making it appear as if the entire Allied was a battle between the Muslim Turks and the Christian infidels. The diabolical act infused many Turks with righteous indignation and they could blame the foreigners for having to take extreme measures to defend their homeland. And the more extreme the measures, the more it demonstrated their willingness to make sacrifices. The fact that they knew that the Allies would return soon added its own urgency to Turkish actions against the hapless Armenians.
|
|
Allied Preparations
|
|
There seemed to be remarkable enthusiasm for the enterprise from soldiers and lower ranked officers alike. Steeped with condescension towards the fighting abilities of the Turk combined with the thought of a brief adventure that would end in the midst of Classical and Oriental Cosmopolitanism of Constantinople enthused many. Senior commanders were, initially at least, less optimistic about the size of the operation before them. Quite simply, Hamilton's task of putting 75,000 troops ashore in hostile territory was the largest amphibious assault in history until that point in time. The sheer magnitude of the operation combined with limited time and ambitious targets set back in London.
Initially, Hamilton was expected to launch his assault in mid-April. Three weeks to organise the largest invasion in history without any specialist landing vessels or equipment was a tall order indeed. His own administrative staff did not arrive in Alexandria until April 11th as it was. Troops were still arriving in Alexandria from Britain, France, India and Australia. They would then all have to be transferred the 700 miles to Mudros Harbour in Lemnos before being reorganised for the actual assault. Poor weather further hampered naval planning in particular.
Hectic improvisation became the order of the day as troops scoured the bazaars of Alexandria for guidebooks of the Orient (due to a lack of maps), vessels to hold water (there was uncertainty as to any water sources in the areas to be invaded) and draft animals galore (along with their Egyptian drivers). Additionally, every sea-going vessel of every size was assembled as ships would be unable to deliver their human cargoes directly to the beaches. A series of transferrals to more suitable vessels would be required.
Amidst all this optimistic chaos, maintaining any semblance of secrecy was hopeless. It did not help that with Egypt being technically an independent nation, the authorities could not insist on media censorship. Egyptian newspapers proudly revealed the arrival of various formations and ships and speculated as to their target. Added to this, various Greek and Lebanese fishing vessels carried news back across the Mediterranean to various Turkish agents who were only too willing to pay handsomely for the news they brought with them.
Hamilton sailed from Alexandria to Mudros Harbour on Lemnos on April 10th in order to present his plan to the Royal Navy who would be putting them ashore. Simply put, his plan was to land what her perceived to be his most formidable Division, the 29th, ashore along five beaches on Cape Helles on the tip of Gallipoli. These were intended to strike forward to seize the Achi Baba crestline some six miles interior. Meanwhile the ANZAC formation was to be landed further up the coast between Gaba Tepe and Fisherman's Hut (later to be known as Anzac Cove). These were supposed to strike out across the Peninsular over the Sari Bair hills towards Mal Tepe. The idea was that this would cause the Turks fighting the 29th Division to fear being enveloped from behind and cut off from their own lines of communication. To further through confusion upon the Turks, two further diversionary probes were to take place. The French were to land on the Asiatic side of the Dardanelles to seize Kum Kale. Meanwhile the British Naval Division was to 'appear' to land at Bulair further up the coast. Given the known density of defences at this point, this was a total feint, but one designed to cause yet more hesitation for the defenders.
This entire enterprise was within range of the Royal Navy's impressives guns and they were to provide covering fire where appropriate. A small airfield had been constructed at Lemnos and although the planes were delicate and offered little military value, they could at least provide valuable intelligence as to the movements of the defenders and the state of their defences. Worryingly, the first few missions showed more barbed wire and trenches than had been anticipated. It hinted that the Turks were indeed bracing themselves for an invasion. However, by this time, the momentum and enthusiasm from the lower ranks had begun to percolate itself up the Chain of Command so that even the more hesitant Commanders began to believe that success of such a large enterprise had to be a foregone conclusion. Poor weather pushed the invasion back further but on the 23rd of April, a window of good weather finally presented itself to the Navy. They began loading up soldiers destined for the assault onto the larger ships. On the 24th these were transferred to smaller vessels and lighters in preparation for an eventual assault at dawn on the 25th. The Gallipoli Landings had gone beyond the point that they could be called off. It was all systems go.
|
|
The Initial Landings: So Near Yet So Far
|
|
As already explained, the main landings on the 25th of April were divided into two separate key objectives; The British 29th were to land on five beaches on the tip of the peninsula and provide the bulk of the invasion force whilst the the Anzacs were to land further up the coastline at Gaba Tepe to attempt to seize the high ground and support the British landings and cut off the Turkish defenders. Meanwhile a separate landing took place by the French on the Asiatic side of the Dardanelles at Kum Kale whilst the Royal Naval Division was to attempt a feint landing at Bulair. Taken together, the idea was to sow confusion as the actual objectives of Hamilton and the Allied troops. In some ways, this multiple landing effect did indeed foil Liman von Sanders for at least 24 hours.
With reports of multiple landings by the Allies coming into his headquaters, von Sanders convinced himself that Bulair was the actual target of the British. He personally arrived at Bulair to direct the defenders. The Royal Navy Division did indeed lower themselves into cutters and lighters and made for the beachhead only turn around once they came within range of Turkish machineguns and rifle fire. Von Sanders still wondered if this might have been to coordinate with yet more reinforcements and so held his men and himself in place. Meanwhile the reports of further landings to the South kept arriving at his headquarters. Fortunately for the Axis powers, the well respected Kemal Ataturk was the reserve commander in the central belts of the peninsular who took it upon himself to intervene, decisively, to hold one of the key Allied thrusts by the Anzacs.
Before continuing with the narrative of the events of that day, it is worth considering the relative command structures of the two protagonists. Hamilton made the fateful decision to remain aboard the flagship Queen Elizabeth for the entire day in question. He was quite removed from unfolding events ashore and besides was aboard a ship which had its own role to play during the landings. Furthermore, signals would become a recurrent problem when landings went astray and confusion reigned ashore for much of the day as plans went awry and the enemy interfered with the carefully thought out plans. Getting accurate information as to what was unfolding during that day was to be a serious issue. The two British divisional commanders were not much better off. They also placed themselves and their headquarters staff on board ships for the duration of the landings. Blackwood of the Anzac Division did at least come ashore later in the day to make some assessments but by then the opportunities to exploit some key initial probes had already been lost.
The Turks, on the other hand, were fortunate indeed to have had a decisive commander with the expertise, prestige and experience to react to events. It is no generalisation to say that he critically intervened to stop the Anzacs in their tracks. He committed reserves and personally took charge of a situation that was close to collapse for the Turkish defenders to change the direction of the battle and seize the initiative back from the Allies making their landings. He presents the perfect antidote to the command paralysis exhibited by many of the Allied commanders. He was forceful, sought good intelligence and provided the leadership necessary to restore morale and hope to the defenders. It was to the great misfortune of the Anzacs that he happened to turn the tide upon their bridgehead.
It had seemed to start so well for the Anzacs in the early hours of the 25th. They came ashore on time and although there was sporadic Turkish gunfire it was not as bad as they had anticipated. However, the reason for this relatively quiet welcoming committee was that the Anzacs had been put ashore almost a kilometre further north than had been planned. Instead of a mile of beach at Gebe Tepe with a valley helpfully leading into the heights they were put ashore on a thin stretch of land on the lunar like landscape of the Sari Bair range of hills. This had forbidding cliff faces and terrain that rose dramatically. However, it did at least have the advantage that the Turks had not considered defending this stretch of land. Indeed their guns and trenches were covering the beaches at Gaba Tepe.
Confused skirmishes became the order of the day as various Anzacs responded to those Turks who did indeed take up firing positions. Soon, the Anzac commanders struggled to restrain some of their forces as soldiers disappeared up gullys and over rockfaces in pursuit of the Turks. It did not help that the smaller beach was soon massively congested as more troops and supplies arrived. There was barely any room to organise themselves. The haphazard Anzac attacks also meant that naval gunfire was constrained for fear of hitting their own troops. Anzacs were at least able to secure the very first ridge overlooking their landing area and Turkish morale ebbed although still offering resistance when attacked. Australian scouts were even able to climb the heighest of the peaks amidst the confusion of the defenders.
It was at this point that Mustafa Kemal had arrived from Boghali to assess the situation for himself. He immediately appreciated that this was no feint and that the Anzacs were committed to seizing the heights which would have dominated the entire peninsular and even the narrows themselves. He called up reserves immediately, even though he technically did not have the authority to do so as this lay with von Sanders who was still convinced that Bulair was the real target. Before these Turkish reserves could arrive though, he was able to maintain the morale of the original Turkish defenders who were rightfully concerned that they would be overwhelmed by Anzacs as 8,000+ arrived below them.
A desperate battle unfolded for the Second ridgeline. The Anzacs outnumbered the Turks to begin with, however the Turks had the advantage of being able to call in artillery to help defend this critical ridgeline. The confusion on the beaches meant that Anzac artillery was not able to respond, and the naval guns were not getting reliable signals back explaining which formations were in which positions. Additionally, the Turks always had the benefit of height and could usually see the Anzacs long before the Anzacs could see them. The longer the battle endured, the more of Kemal's reinforcements were able to arrive and relieve the hard pressed initial defenders. A golden opportunity was slipping through the Anzac hands as the hoped for third ridgeline seemed as far away as ever.
Concerned at the situation, Birdwood actually came ashore finally at 9:15 pm to evaluate the situation for himself. He discovered scenes of chaos as wounded men streamed back to put yet more strain on the overburdened shoreline. He called an immediate conference with his two divisional commanders, Bridges and Godley. He was astonished when they both recommended an immediate evacuation of the bridgehead. At first, he over ruled their request but as the conference continued he began to appreciate the difficulties and issues that they faced. They were most concerned of a concerted counter-attack upon their precarious position and their casualties had indeed been significant throughout the day. They feared that morale might collapse in the relatively inexperienced formations under their command. Reluctantly, Birdwood communicated their concerns back to Hamilton aboard the Queen Elizabeth. He was forcing Hamilton to make his first direct intervention of the day. Up until this point, Hamilton had deferred fully to his commanders and the original plan. Of course, Hamilton also had to take into consideration the events further South down the peninsula with the 29th Division's landings along Cape Helles.
13 miles to the South, the supposedly more experienced 29th British Division was making five simultaneous landings. The landings at Sedd-el-Bahr were planned to be the most important of these with the other landings designed to protect its flanks and in the case of Y beach to threaten Turkish defenders with an immediate envelopment attack. Four of the beaches were to be assaulted by lighters and rowing boats bringing the troops ashore as was customary for the era. However, the Sedd-el-Bahr landings at V Beach were to be innovatively augmented by a converted collier, called the River Clyde, which would have 2,000 troops crammed inside and towing a steam hopper to catapult forward and help form a link to the beach for the troops to unload onto. Unfortunately, this ambitious plan almost immediately went awry and the hopper veered off course and so was unable to form the needed bridge to the shoreline. Although there had been an extensive naval bombardment before the British vessels landed, many Turkish were still in place to open up with withering fire as soldiers attempted to leave the stricken River Clyde or came too close in the rowing boats. Casualties were fearful and despite heroic efforts on the part of junior officers to bring lighters into place to form easier bridges to the beaches, losses were significant. A second attempt to evacuate the ship in the afternoon came to a similar fate. It was only under the cover of darkness that a renewed attempt to vacate the ship and bring more troops ashore finally succeeded in forming a foothold in the barbed wire strewn beach.
The landing on X Beach could have met a similar fate. Despite the relatively few defenders, they were well placed and committed. In this instance though, the captain of HMS Lockyer actually defied orders and accompanied the rowing boats of the 2nd Royal Fusiliers as near as he could safely get to their landing beaches. Consequently, his gunners were able to provide direct fire support over open sites and if not kill the defending Turks at least suppress them long enough for the British troops to get ashore. More initiative along these lines or more ambitious planning may have made all the difference on this day. As it was a potential disaster was averted on this particular beach.
The Tekke Burnu landings at W Beach came close to disaster also. The Lancashire Fusiliers were pulled close to shore by steam picket boats before being released to row for the final part of the journey. Of 24 boats in the first wave, only 2 boats made it ashore in the face of Turkish resistance. Troops leapt out fully clad in gear too far out to sea as they sought to escape the bullets careering towards them. Mines and barbed wire further complicated the approaches. The second wave delivered more troops but found the beach equally deadly. In an act of supreme courage a small number of these troops scaled the cliffs to the left of the beachline to outflank the defenders and finally put an end to the murderous fire pouring down on the beaches. It had been a close run thing but eventually they got ashore at least.
The S-Beach at Morto Bay and Y-Beach landings were more successful. Indeed the latter was virtually unopposed. This was partially due to the fact that Y-beach was not a beach at all. It was a rocky cliff face with a tiny slither of land to start the climbing from. The Turks had considered this a wholly unsuitable location for a landing and so had not placed any defences nearby. The troops here got ashore without a shot being fired and although it was an arduous climb made it to the summit of the cliffs in relatively good order. Almost inexplicably though, the commanders here failed to exploit the one unadulterated success of the day. They merely regrouped at the top and awaited further orders. They could clearly hear the sound of gunfire to the South who they had originally been planned to support and link up with. The remoteness of the Divisional and Commander in Chief on their ships out at sea revealed itself here perhaps more than anywhere else. Hunter-Weston was barely aware of the tactical situation on any of the five beaches. His only solution to the endangered beach at Sedd-el-Bahr was to pour more troops in as per the original plan. The troops on Y-beach not only failed to take any initiative they even failed to take appropriate defensive precautions such as digging trenches and setting up fields of fire. Consequently, when the local Turkish troops did realise the danger they were in, they launched attacks on British troops out in the open. The defenders took at least 700 casualties and an element of panic took hold in some of the British who scaled back down to the waterline and requested evacuation. Naval personnel were under the mistaken impression that an evacuation had been ordered. This had most certainly not been the case, and the surviving commander was shocked to find that a gaping hole had appeared in his defences as some troops had simply abandoned their positions. This had the consequence of making the position untenable and so the evacuation became a self-fulfilling prophecy and the one successful landing became the first definitive defeat!
Amidst all this chaos and confusion, the request from Birdwood to Hamilton to evacuate the Anzac beachhead was a defnining moment in the campaign and also in the career of Hamilton himself. Hitherto, he had placed his faith wholly in the command abilities of his appointed generals and of the plan they had formulated back in Mudros Harbour. At about midnight of the 25th, he was called on to make his first decision of the day. If he agreed that the Anzac Division be withdrawn then it would consign the British Division to the full force of the Turkish defenders and almost inevitable defeat of the operation. He considered his options long and hard before making the one clear decision that would commit the Allied and Turkish forces to nearly a year's worth of fighting rather than the 24 hours it might otherwise have been. He had been buoyed by news that a submarine AE2 had penetrated the Turkish naval defences and arrived in the Sea of Marmara. Taking this as a positive omen, his response to the Anzac Commander was as follows:
Your news is indeed serious. But there is nothing for it but to dig yourselves right in and stick it out. It would take at least two days to re-embark you, as Admiral Thursby will explain to you. Meanwhile, the Australian submarine has got up through the narrows and has torpedoed a gunboat…Hunter-Weston, despite his heavy losses, will be advancing tomorrow which should divert pressure from you. Make a personal appeal to your men…to make a supreme effort to hold their ground.
P.S. You have got through the difficult business, now you have only to dig, dig, dig until you are safe.
This was a fateful decision that would prolong the campaign for many hard months to come. Yet, in the short term it gave renewed direction to the stalled Anzac Division and consequently hope for the small British toeholds further to the South. The sobriquet of the Australian soldier as 'Digger' would be born out of this order from Hamilton. Realising the precariousness of their position and the disadvantage of height to their Turkish foes, the Anzacs did indeed dig for their lives in the harsh, hard and unforgiving terrain. They had lost the initiative for sure. Von Sanders was now able to move his two divisions from Bulair southwards firm in the knowledge that he now knew where the Allied objectives lay. The French withdrew from their successful seizure of Kum Kale on the Asiatic coastline. Hamilton once more sticking to his plan rather than taking advantage of another potential opportunity. The two new Turkish divisions would join with the French and British Naval Divisions as fresh troops to be fed into the meat grinders that was forming along the Gallipoli coastline. Hamilton had not succeeded in his objectives, but they were oh so tantalisingly close still....
|
|
A War of Attrition
|
|
News of the Gallipoli landings made surprisingly little impact back in Britain. To start with there was something of a news embargo. Only two journalists made it to Gallipoli and only one of those was officially sanctioned. The censor put enormous constraints on what could be said so that even this limited reporting was of little interest or use back in the newspapers in London. There was also the difficulties of communicating the news back home which relied on the goodwill and collaboration of the military to use their signals and cables. Given that even military signals on the beaches were in a terrible state, giving any priority to journalists was simply not going to happen. Perhaps more significant still was that when news of the landings did reach Britain, it was drowned out by other events elsewhere in the war. By a sinister coincidence, the first use of German poison gas was reported on the same day that news of the Gallipoli landings was finally admitted. There were further reverses to consider on the Eastern Front with the imminent collapse of the Russian Galician offensive and of yet another forlorn offensive on the Western Front at Aubers Ridge. This latter failure gave release to a scandal that would eventually come to engulf the government, spill over into the Gallipoli Campaign and eventually bring down the Asquith Government; this was the matter known as the 'Shell Shortage'. It was soon regarded as almost treasonous that the government was unable to furnish the basic materials to its soldiers to conduct and win the war. This would be a slow burn issue, but it coincided very much with sequence of events in the Dardanelles as the troops there would also soon be rationing its own ammunition.
Meanwhile during the night of the 25th and morning of the 26th, the Royal Navy came close inshore along the Anzac beaches to provide searchlights and gunfire to protect the frantically digging troops as they sought any cover they could from what would become incessant Turkish shelling. By daylight, Von Sanders had already started the process of transferring his reinforcements southwards to deal with the larger British beachhead. Mustafa Kemal already had the troops that he required in order to try and push the Anzacs back into the sea. He believed speed was of the essence and that his Turkish troops had to strike immediately before the Anzacs could get enough troops and equipment ashore and prepared their own defences. Desperate Turkish assaults hurled themselves against the Anzacs as the two protagonists switched roles. Unfortunately for the Turks, many of the advantages that they had enjoyed the day before now swung to the benefit of the invaders. It was now the Anzacs who could remain hidden in their shallow trenches and who could bring their machine guns and accurate rifle fire to bear on the exposed Turkish soldiers running down the various slopes towards them. Supplemented by naval fire which could be more certain of Anzac positions when they were stationery rather than on the attack, Kemal would soon realise that his forces may have been strong enough to resist the invasion force, they were not strong enough to destroy it. By the night of the 27th, Turkish attacks petered out through exhaustion and exasperation. A stalemate had descended upon the front lines.
Down in the South, the British 29th seemed to fare better on the 26th as they linked the bridgeheads to one another and the only settlement in the area, Sedd-el-Bahr fell. Despite this success, the precariousness of their position was still apparent to all. The beaches were still cluttered with debris, supplies and wounded personnel seeking evacuation. It did not help that the British position was not only in range of Turkish artillery to their front, but also from the various batteries and forts from across the Narrows. It was a totally exposed position.
Hamilton appreciated his difficulties and urged that the British combined with the French, who had been landed from Kum Kale, assault and capture the heights of Achi Babu overlooking all the beaches. It was imperative that this was done before von Sanders reinforcements arrived from the North. The next three days saw desperate fighting as British and French forces came tantalisingly close to gaining these heights. They advanced some two miles distance in hard fought conditions. However, the expenditure in effort, ammunition and lives was fearful and costly. Nearly a third of the troops committed had become casualties. Once again this battle encapsulated the warfare of the era had put the advantages firmly on the side of the defender. That and the fact that Turkish reserves were arriving to replace and supplement the Turkish defenders who were undoubtedly suffering themselves from this intense warfare.
By April 28th it was clear that Hamilton's ambitious plans made before the landings were in tatters. He had got ashore but none of his formation had seized the heights that were so critical to the success of the endeavour. Furthermore, he had committed all his formations to battle and they were all now either exhausted or had been weakened to a dangerous level. Confusion and chaos were the still the defining hallmarks of the operation as stores and supplies struggled to reach where they needed to be and all the time there was little or no rest for soldiers who when they were not fighting directly were digging for their lives or moving stores and equipment around. The strain was palpable but Hamilton found it difficult to request fresh reserves. As someone who had known Kitchener personally, he was very much under the impression that Kitchener wanted this operation to be achieved on the cheap as far as manpower was concerned. He did not feel able to request reserves as he felt that Kitchener would turn him down. Hamilton did not aid his cause by returning optimistic communiques back to London emphasising the positives and overlooking the significant challenges and setbacks that they had had to endure. Indeed, word of the unfolding disaster only got back to London via the Admiralty and the French commanders. The Royal Navy in particular had been horrified by how close their ships could get to see the terrible conditions and nature of warfare along the beaches and cliffs of the Dardanelles. It was they who urged action to avoid disaster. Eventually, news filtered back to Kitchener who gave permission for reinforcements to be sent from Egypt. Hamilton was convinced that one fresh heave with new troops would be enough to break the deadlock. Alas, the Turks were of the same mindset.
Whilst British troops would have to cross the 700 miles from Egypt to reach the beaches of Cape Helles, Turkish troops were being gathered much more quickly. Von Sanders' soldiers were already in position and more were made available by the Turkish government. Enver Pasha urged that the Turks go on the offensive as soon as possible before Allied troops could arrive. The date of May 1st was set for yet another gigantic push. Once again though the defenders absorbed the waves of assaults and increasingly desperate charges became less and less likely to succeed. As elements of the 42nd Division and Gurkhas arrived during the course of the Turkish Offensive, Hamilton sensed one more opportunity as he saw the Turkish strength ebb away before his eyes. Hamilton also transferred troops from Birdwood's command to launch his own Counter-Offensive with the relatively fresh 25,000 troops from May 6th to May 8th. The pattern repeated itself once more though as Turks who could not succeed in attack became successful in defence. Artillery shells were exhausted and even the desperate efforts of the Royal Navy to aid their plight was not enough. The only victors on either front were the trenches themselves.
|
|
Desperate Measures Lead to Desperate Political Consequences
|
|
Impotent feeling Royal Naval Officers pleaded for permission to attack the Narrows once more with their ships. The idea was that such a course of action might distract the Turkish Command and lead to a feeling envelopement should they be successful. Permission was sought to launch another purely naval assault alongside the ongoing offensives ashore.
The request went down with a damp squib though back with the Admiralty in London. First of all, they were fearful of another heavy toll in shipping as had happened in the previous attempt in March. The timing of the request was also problematic for a number of reasons. Firstly, the Italians were negotiating to join the war on the side of the Allies and part of the deal was that four Royal Naval battleships and four cruisers would be made available to them to help protect their coastline from Austro-Hungarian retaliation. Secondly, there were reports of German submarines entering the Mediterranean en route to the Aegean and presumably for the significant shipping activities around the Dardanelles. Thirdly, and most critically of all, on May 12th the battleship HMS Goliath was sunk in Morto Bay within a 100 yards of the shoreline and the British positions ashore. An audacious torpedo attack from a Turkish destroyer captained by a German sailor saw three torpedoes hit the aging but still impressive battleship. 500 sailors lost their lives as more struggled ashore. The timing of this event seemed to confirm the risks of any frontal assault on the Narrows. Indeed not only did the Admiralty refuse permission for the endeavour, they went one step further and ordered the immediate recall of HMS Queen Elizabeth. It was agreed that she would be replaced by specialist monitors but these could hardly replace the military capabilities of a ship of the size and power of Queen Elizabeth.
This downgrading of the Royal Navy's commitment to the Gallipoli enterprise would begin dominoes falling in an ominous manner. Kitchener was furious when he heard that Lord Fisher at the Admiralty had ordered the recall of HMS Queen Elizabeth. This crisis in the corridors of power also coincided with the shell shortage issue being the front page news of the Times. It appeared to some that the Asquith government may not be wholly committed to victory. Kitchener himself was very downbeat at a meeting of the War Council on May 14th. He went so far as to suggest that if Russia were to fall, which seemed possible, then Britain may not have the military power to resist a German offensive and even invasion of Britain. Fisher, on the other hand, made it clear that he had been against the Dardanelles commitments from the outset and that he was being vindicated in his assessment. Kitchener believed that it was his lack of commitment from the outset that had doomed the enterprise. Either way they left the meeting disappointed and without clear direction.
That same afternoon Churchill met with Fisher to try and salvage some naval support and commitment to the Gallipoli enterprise. They agreed on some minor shipping vessels and monitors and left relatively amicably. However, once the meeting had ended, Churchill added two submarines to his list of requirements for the Admiralty to send to the Dardanelles. He probably thought nothing of it and left a message to Fisher to the effect. The following morning Fisher found the memo and was incandescent with rage. The straw had broken his camel's back. He felt that Churchill was dragging the Royal Navy back to commit on what he felt was a forlorn enterprise. Fisher tendered his resignation there and then. Even a meeting with the Prime Minister failed to mollify the Admiral. In a lost communication to Churchill he wrote:
You are bent on forcing the Dardanelles and nothing will turn you from it - nothing. I know you so well.... You will remain and I shall go - it is better so.
His fury was out in the open and his manner of leaving left Churchill dangerously exposed politically. At an earlier point in the war Churchill might have survived the resignation of Fisher. However, the ongoing shell shortage scandal was working its way through Fleet Street into Whitehall and heading towards Downing Street. Over the next fortnight, there were increasingly shrill calls for a change at the heart of government. Although most of the focus was on the shell shortage on the Western Front, the fact that British Artillery at Cape Helles had to be rationed to just two shells a day seemed to confirm that there was a major issue revealing at best incompetency if not treachery at the heart of government. Asquith was forced to form a grand coalition government in order to retain office. He moved the popular and energetic Lloyd George to the Minister of Munitions to try and deal with the shell shortage. However, there was to be no room for the by now tainted Churchill. The Conservatives coming in would not have been keen to work with who they regarded as a turncoat anyway but with the debacle of Gallipoli becoming more apparent, this reshuffle was the perfect opportunity for Asquith to remove himself one step away from the operation and certainly from the prime instigator. Churchill would not return to front line politics for another 24 years.
|
|
The First Victory for the ANZACs
|
|
Propaganda and ignorance had informed most ANZACs view of the 'dastardly Turk' who was regarded as little more than a cartoon caricature of a villain and enemy. Certainly upon arrival, few Imperial troops had a good word to say about their foe and their initial experiences of combat against the Ottomans had done little to dispel this view. The Turks had fought wildly and offered little quarter. Their trenches hugged ever closer to the ANZAC positions partly to avoid Royal Naval bombardments but also to allow grenades to be showered downwards on the exposed and isolated ANZAC positions. Turkish snipers caught out unwary neophytes exposing too much of their frames with shots that rang out without warning and with all too deadly consequences. Disruptive artillery shells rained down incessantly without warning and with an abundance of targets available. The uncompromising weather and poor conditions hardly enamoured even those Australians used to harsh conditions to the 400 square acres that clung so close to the coastline. The fact that it was so hard for these ANZACs to retaliate from their positions made them feel even more impotent and at the mercy of events beyond their control. Increasingly it was regarded as a great disappointment that warfare was not as much 'fun' as they had hoped when they had volunteered in their thousands. On top of all this, the Divisional Commander General Bridges was mortally wounded on May 14th and even General Birdwood had been wounded - although not fatally.
Rumours of a Turkish offensive made the ANZAC soldiers even more exposed than normal. During the day of the 18th of May, the Turkish gunners and snipers became unnaturally quiet. An eerie silence filled the heat filled day. Some 42,000 Turks were indeed amassing in the hills above. This was confirmed by aerial reconnaissance who just happened to notice an increase in traffic across the Dardanelles and long columns of soldiers advancing to the heights above the ANZACs. The small and cramped ANZAC positions had actually had their numbers reduced to a mere 10,000 soldiers at one point. Fortunately for Birdwood, a new Brigade arrived on the 17th and helped swell the numbers to 17,000 in total although only 12,500 of these were actual frontline troops.
The Turkish plan was nothing if not simple. Kemal Ataturk had simply given the order for his men to kill or push the ANZACs back into the sea by nightfall of the 19th. The offensive was to begin under the cover of darkness at 2345 on the 18th of May. The principal target for the advance was Wire Gully. Tipped off by the aerial reconnaissance, the ANZACs lay in wait in their trenches with extra ammunition and heightened senses. Wave upon wave of Ottoman troops poured out of their own defensive positions and rushed headlong towards the ANZAC positions. The response was a wall of brutal defensive firepower. Turks fell, first by the dozens, then by the hundreds and ultimately by the thousands. Turkish officers attempted to motivate and coordinate further human wave charges but even the significant numerical advantage of the attackers began to peter out and there was very little new territory to show for the enormous sacrifice. By 5am on the 19th, the Turkish offensive was effectively over, however further isolated attacks were made throughout the daylight but with fearsome consequences for those brave enough to persevere. By nightfall the Turks had suffered some 10,000 casualties.
So far in the campaign there had been very little trust between the two protagonists and any attempt to sally out to pick up survivors and the wounded were met with withering fire. There was also the very real risk of disease breaking out with so many dead lying out in the open so close to both sides' trenches. Attempts at local ceasefires were proving to be disappointing despite the best efforts of those on the frontline. Suspicion of the motives of anyone going into No Man's Land was too great. Both sides commanders though soon recognised the threat to their own soldiers' health and morale for coexisting amongst so many decaying corpses. An enterprising Intelligence officer by the name of Aubrey Herbert started the process which culminated in himself being offered as a Turkish hostage whilst Kemal Ataturk crossed the lines to discuss the terms of a temporary armistice with Birdwood directly. This tense meeting was held on May 22nd with elaborate precautions made on both sides to deny any intelligence gathering abilities. The Kemal-Birdwood tension was somewhat broken when a naive Australian soldier accidentally poked his head into the tent where the conference was being held with the somewhat prosaic words: "Have any of you bastards got my kettle?". The officers couldn't help but smile and proceeded to establish terms for a full scale truce on May 24th.
The truce itself was kept to the letter of the agreement and three large burial areas were designated and teams were sent out by both sides to gather the dead and bury them with full religious rites being provided. Aubrey Herbert was recognised by Albanian troops fighting for the Turks and given that he was a fluent Turkish speaker he found himself in the unusual position of giving instructions and orders to Turkish soldiers and stretcher bearers during the ceasefire. Undoubtedly both sides had officers and soldiers attempt to gather information about enemy position and trenches and indeed it was claimed that Kemal Ataturk himself disguised himself as a Sergeant in order to go out and gather intelligence whilst also helping collect the dead. However, there was respect shown to one anothers' troops - both living and dead. Small gifts and pleasantaries were exchanged and both sides could appreciate the carnage that had been meted out on the precarious battlefield. A discernible difference in ANZAC attitudes to their Turkish foes can be traced to this May 24th ceasefire. No longer was the Turk a simplistic propaganda device but a human being who fought hard and was undergoing privations and difficulties of his own. A Turkish sniper may well have ended the truce with a shot at 1645 to signal the resumption of hostilities but a new found respect for the foe was clear to all those participated in this event. Turks no longer underestimated the ANZAC soldiers' capabilities as warriors and vice versa. A new found live and let live attitude seemed to spread through the trenches... officers wondered why snipers were not taking easy shots at exposed enemies or why one Turk could even hang out his unit's socks without fear of death. Raids and attacks were still part of the daily routine and were conducted as ruthlessly as ever but everyday activities seemed to get easier on both sides as the conditions and plight of both sides were understood and appreciated. The ANZACs had indeed won their first significant victory at Wire Gully but they also gained wisdom and respect from the consequences of that action. They were also beginning to define a new national identity that was beginning to transcend their intial Imperial imperatives.
|
|
Constantinople and the Sea of Marmara
|
|
Considering the bloodshed and suffering being experienced at Gallipoli, there was an air of uncanny normality back in Constantinople. With extensive control of the media, Young Turk propaganda convinced the population that victory was assured and that the Allied threat upon their historical city was virtually gone. There was no mention of the disastrous May 18th/19th Offensive. In fact, far from destabilising the Enver Pasha's government, it allowed him to regain a new stronghold on the levers of power. They used the landings as an explanation for the privations that many were forced to undergo. The increase in prices was put down to the war. The calling up of additional soldiers, increasing taxes and requisitioning stocks of food could all be justified by the national emergency. Even more sinisterly, the secret police rounded up yet more opponents to the regime or those from national minorities thought to be hostile to the Empire.
Strategically, by the early summer, there was more relief for Turks as the threat from Russian troops on the Caucuses diminished as the Germans made inroads into European Russia. This freed up more Turkish troops and military personnel to be sent to the Dardanelles. The lack of quick success for the Allies also deterred the Greeks and Rumanians from being tempted to throw in their lot and attack the Ottomans from the Balkans. This also allowed for more attention to be focussed on the immediate threat. The Germans also increased their military aid to Enver Pasha's regime even if this still had to be done somewhat surreptiously in order to pass through the European nations hostile to the Turks in the Balkans on the train lines.
Enver Pasha's dictatorial powers were exemplified by a fit of pique when he decided to round up any French and British nationals who had remained in Constantinople. Now most of these had happened to have dual nationality and perhaps had never set foot in either France or Britain but could make a claim on a passport thanks to a relative or direct parent. Enver Pasha's justification was that he claimed that the British and French navies were indiscriminately firing on villages in the Gallipoli peninsular and therefore by placing British and French nationals in those places, they would be killing their own nationals. The American Ambassador to Turkey (America still being neutral at this point in the war), Sir Henry Morgenthau, was appalled by the idea and objected vociferously. He pointed out that the towns in question were indeed being used by the Turkish military as headquarters and coordination points for the defence of the area. By negotiation, he convinced Enver Pasha to firstly limit the hostages to just men, then this became young men and ultimately it became just 50 young men. Even these were provided with American transport and food to accompany and provision them. Their care and welfare were soon thought even by the Turkish military to be more of a liability than an asset and even these 50 men were soon secretly sent back to the capital city. American diplomatic influence had played a decisive role in alleviating this particular problem.
A new dimension to the campaign would soon have a direct impact though even on the supposedly safe haven of Constantinople. Submarines would soon find a route through the 40 mile journey through the Straits into the Sea of Marmara. It was an extremely dangerous and onerous journey for sure and the perils were considerable. These early submarines could not remain submerged for long periods of time due to their limited battery power. Surfacing at night time to replenish battery power with their diesel engines was dangerous in the extreme as virtually the entire route was festooned with searchlights and coastal artillery. Patrol boats and mines provided further hazards whilst the fresh water currents mixing with salt water and complicated constantly changing currents and tides provided yet more complications for the submariners.
Undaunted, the first British submarine to successfully force its way through was E14 under the command of Lt Cdr Boyle. His arrival in the Sea of Marmara after a six hour test of nerve and skill marked a significant new threat to the Turkish defenders. He was to cruise the seas at will for three weeks sinking vessels and causing havoc. His biggest scalp was a Turkish troopship carrying some 6000 reinforcements to the frontlines. It was sunk with no survivors. He had claimed more casualties than virtually the entire land campaign had achieved to date. As Boyle slipped back through the Straits to replenish and rearm, his threat was replaced by E11 under the command of Lt Cdr Nasmith. Illustrating the unconventional tactics of this new arm of mariners, Nasmith went so far as capturing a Turkish sailing vessel to lash to his own submarine to act as a disguise and a decoy. Nasmith sunk a number of smaller Turkish vessels before chancing upon the Turkish transport Nagara. There was something of a bizarre exchange as Nasmith conversed with an American reporter who happened to be travelling on the ship at the time. The Turks were given time to evacuate the crew from the ship before it was holed and sunk. Two days later E11 sunk another ship, Stamboul, whilst it was rearming at the Arsenal in Constantinople. He then proceeded to sail through the city to the Bosphorous. He returned two days later and continued to cause panic and confusion. Once again it was the shortage of torpedoes that finally forced him to return back to resupply and rearm but in the meantime Constantinople was feeling very exposed and suddenly on the frontline of action.
It was not just British submariners who were making hay. A German submarine, U21, had been despatched from Germany as early as April 25th. It had taken a considerable amount of time to avoid all Allied shipping and make the epic journey to the Eastern Mediterranean but by May 25th, he had arrived amongst the French and British ships servicing and supporting the landings at Gallipoli. U21s first target was the aging battleship HMS Triumph. This was sunk in full view of the troops on land. Fortunately it did not sink too rapidly and only 71 of its complement of 729 were lost. Still, it was a blow to the security of the Royal Navy squadron and caused consternation to the Naval Commanders. Transports and warships alike were sent back to the relative safety of the ports leaving the soldiers on land feeling somewhat isolated. A single battleship, HMS Majestic, was left on station with a small escort. The following day, this too was sunk in sight of the shoreline by U21. 48 more RN souls were lost. Chased by a plane, U21 disappeared into the relative safety of the Narrows and made the journey towards Constantinople where they could replenish and resupply. By coincidence, this journey was being made at exactly the same time as E11 was travelling in the opposite direction and the two submarines must have passed each other on their respective journeys.
The arrival of submarines was a wake up call to both protagonists. In the grand scheme of things, their arrival was probably more beneficial to the Allies than to the Central Powers. Primarily this was because they simply had more of them, Some 13 Allied submarines raided over the course of the campaign and between them sank a battleship and nearly 200 other vessels. They also fired upon trains and port facilities and made coastal transportation a risky enterprise on land or on sea. Nasmith alone sank over 100 vessels. Not that their exploits were without risk, 8 of those submarines were lost. An extensive steel mesh was created as an additional barrier by the Turks but a number of submarines still made it through. In total there were 27 missions that made it through to the Sea of Marmara. So many ships were sunk that the Turkish military decided to all but abandon resupply by sea. Instead an onerous journey by rail and road put considerable strains on Turkish logistics and reinforcements. U21, on the other hand, had only one more mission where he sank one more French transport ship before retiring back to the Western Mediterranean. However the damage was definitely done to the Allied naval presence who were no longer complacent and spent a lot more time patrolling for imaginary submarines and protecting them from torpedo attacks that actually never prevailed again. The troops on shore received far less fire support and felt far more isolated without the reassuring presence of so many ships just off shore. Submarines hindered both campaigns and perhaps ensured that the agony ashore was only prolonged rather than providing a quick way of resolving the strategic impasse. However, the exploits of these submariners were quite remarkable and a new potential and opportunities were spotted by both sides.
|
|
No Monopoly on Misery
|
|
The Anzacs positions sank into an easy coexistence with their Turkish foes. Down at Cape Helles, there were still to be several more forlorn frontal attacks by both sides before they too fell into sullen defensive features. Just as on the Western Front, the defender appeared to have so many more advantages than any attackers leaving the safety of their dugouts and trenches. Nevertheless, both Allied and Turkish generals still needed to that lesson for themselves with 4 attacks out of the Cape Helles enclave and one towards in during June and early July. The familiar pre-offensive bombardment was followed by desperate charges through barbed wire towards machine guns and well protected defenders. Initial successes were met with savage counter-attacks and the process was invariably repeated several times before commanders ran out of manpower, ammunition or both. Both sides sustained remarkably similar casualties of c57,000 proving that neither side was gaining an advantage over the other. The Allies were reducing their aspirations and few believed they would be in Constantinople any time soon. Reaching the heights overlooking their positions seemed ambition enough. Likewise, the Turkish defenders soon realised that pushing the Allies back into the sea was just not going to happen with the well trained and well armed soldiers waiting to repel them.
Hamilton and his staff were quick to blame the lack of shells for their lack of success. It was claimed that the Western Front was receiving the priority of politicians and that Gallipoli had been consigned to a backwater theatre of operations. There was also the added logistical effort to get men, supplies and ammunition to the men on the front line with very long supply lines stretching back respectively to Mudros, to Alexandria and even back to Britain and France. The Turks though were suffering their own logistical problems, especially after the success of the Allied submarines in removing coastal transportation as an option for the defender. Liman von Sanders went so far as to say that he was relieved that the Allied offensives did not continue over several days as the penny packet attacks allowed time for his forces to be resupplied. The lack of artillery shells was arguably a bigger missed opportunity for the Turks than it was for the Allies. For example the Turks at Achi Baba overlooked virtually the entire Cape Helles British and French positions. Had they enough ammunition they really could have made the Allied rear areas all but uninhabitable. This was hinted at from the end of June when heavier Turkish guns were brought up behind Achi Baba and did create a serious problem for the exposed defenders. However, the relative lack of sustained firepower due to the ammunition scarcity merely gave the British and French time to dig deeper trenches. A similar opportunity was missed when the Turks finally brought big enough guns to fire over the Straits from Kum Kale towards the Allied positions. Once again, new trenches and dugouts had to be built to shelter from this new firing position, but the slow rate of fire never allowed the Turks to get the killer blow into place. And although both sides' generals believed that firepower was key to their success, both sides' generals failed to understand that defensive positions could and did withstand even the mightiest of sustained bombardments. The ingenuity of the engineering works combined with the resilience of the soldiers to allow them to overcome this particular threat.
Enemy action was by no means the only discomfort for the Allied troops on the Peninsular. Offensive action undoubtedly petered out as the summer progressed and temperatures soared. Water was a particular issue for the Allied invaders. There were few if any sources of fresh water available to them on their tiny footholds. Nearly all of it had to be brought by ship from over 700 miles away from Alexandria. The ANZACs did attempt to desalinate salt water much to the unhappiness of the soldiers forced to drink the far from fresh water produced. Water became the prime concern for nearly all forced to live amongst the dry and barren landscape and the rising heat of the Orient. Food was not far behind although the tinned bully beef that provided the bulk of the rations was not particularly suited for the conditions. Fresh food was virtually unheard of as it simply did not survive the 700 mile journey followed by the travails of being landed and brought up under fire to the soldiers in the front line trenches. The chaos on the beaches was often replicated back in the relative safety at Mudros as ships sought to make the final leg of their journey as quickly as possible to avoid submarines, mines and shelling. The wounded were often brought back to Lemnos for treatment, but the hospital facilities there could barely cope with the sheer quantity of patients.
Another torment for the soldiers on the frontline were flies. These delighted in tormenting any soldiers attempting to eat their rations. There was an explosion in the fly and maggot population thanks largely to the prevalence of corpses within which to breed and feast. Soldiers also had to contend with the filth and squalor of living in the same clothes for weeks on end. Lice were yet another bane in the life of the soldier and proliferated in the heat and conditions. It was not surprising that the Allied forces would soon confront a new and possibly more dangerous enemy yet in the form of dysentry. At best, soldiers would become listless and soiled themselves. At worst, it could and did kill. Thousands were evacuated alongside the wounded to the overcrowded hospitals at Lemnos. Reinforcements which arrived were not increasing the strength of the Allied forces but invariably just replacing those evacuated as sick. Indeed, even the British general Hunter-Weston had to be evacuated permanently due to dysentry.
It should be said though that despite all these privations, and possibly because of them, there was an unusual bond of camaraderie that grew up amongst the soldiers, of all the Allied nations, thrown together. They may well have been suffering, but they suffered together and appreciated one another all the more for it. There were very few, if any, distractions in the enclaves and any pleasures that could be had were appreciated fully; bathing in the sea, receiving post from home, etc... morale undoubtedly waned but never collapsed. The biggest threat was generally inactivity. If there were preparations for an offensive or fortifications to dig then these were taken in deadly earnestness. However, if there was no purpose seen, then soldiers were more susceptible to complain and become more melancholy. The status quo was both a positive and a negative. The soldiers were less likely to be killed but they were also less likely to achieve victory!
Not that the Allied soldiers were the only ones to suffer. The Turks also underwent massive privations of their own. It is true that they had more access to fresh drinking water and their simple diet was almost certainly better suited to the conditions on the Peninsular. However, they also were victims of shelling, especially from the Royal Navy's guns out to sea. Their own logistics support was arguably far worse than the Allied one despite the relative proximity of supplies. As already mentioned, the Allied submarine offensive had a profoundly negative effect on the supply chain for the Turks. Ottoman Army standards of hygiene were appreciably worse than for the Allied soldiers - latrine discipline was peculiarly poor given the high density of soldiers in the field. Also, unlike the Allied soldiers, they had not been inoculated against Typhoid and dysentery spread by flies was no respector of nationality. In short, neither side had the monopoly on suffering. Both sides' soldiers were convinced that victory was within grasp but both sides' soldiers were equally required to undergo terrible suffering in pursuit of that all elusive final goal.
|
|
Reinforcing Failure?
|
|
The lull on the battlefields in June and July were not being replicated back in Whitehall where new arguments were being had over how best to turn the setbacks into success at Gallipoli. No less a person than Churchill, who had been relieved from the Admiralty but was still on the War Council at this point, was making the argument that, for a relatively small infusion in troops in the Dardanelles, a decisive outcome might be achieved. Especially when compared with the fighting in France where the 24 divisions of the British Army were making little or no headway at all on the Western Front. By contrast, the 4 British divisions at Gallipoli (with the 2 ANZAC and 2 French Divisions) military strength would be amplified significantly by adding just a few more divisions. Kitchener agreed with Churchill on this point in a key meeting on June 7th. Kitchener was keenly aware that the massive infusion of new recruits into the army were not yet ready for major offensive action on the Western Front. However, a smaller action on the Dardanelles might be more achievable. The War Council therefore agreed to give Hamilton 5 more divisions to attempt to break the deadlock on the Peninsular.
This was not the only good news coming Hamilton's way. He was also soon to be in receipt of the new Royal Navy monitors with their huge guns, thick armour and anti-submarine defences. He was also going to receive a huge injection of the artillery shells that he had been demanding so keenly for so long. As there was not going to be an offensive on the Western Front, shells could be diverted to the Eastern Mediterranean. More aircraft were also to be sent to the area as their reconnaissance and anti-submarine abilities were considered essential to any new landings to be made. They had even designed a new kind of landing barge having taken on lessons from the initial April landings. The 'Beetles' were armour plated and had specially designed landing planks that looked a little like a beetles' antennae. The fact that they were also painted black for use during night landings only confirmed the appropriacy of the nickname.
All these new assets were assembled in far more secrecy than was achieved before the April landings. They were brought through the Mediterranean to the Aegean without the loss of a single ship or indeed a single life through the month of July. The key for Hamilton was how best to employ this fresh infusion of personnel and equipment. He was keen not just to reinforce failure but to achieve a decisive breakthrough. He felt that he had learned painful lessons from the April 25th landings, the key lesson being on the need for speed to catch the enemy unaware before they could bring up reinforcements and dig themselves into appropriate defensive positions. He came up with an elaborate plan revolving around a fresh landing at Suvla Bay just up the coast from the ANZACs. His idea involved putting ashore 25,000 new troops at the ANZAC Bay so that they could spearhead an attack Northwards towards Chunuk Bair just as 25,000 new troops landed at Suvla Bay with instructions to make for the high ground as soon as possible and link up with the attack coming out of the ANZAC enclave. Whilst this was happening, the British and French were to launch attacks from Cape Helles to tie down the Turks and keep them occupied. Meanwhile the new attacks once they had joined together were intended to cross the Peninsular and cut off thousands of Turks from their supply lines and effectively seize the European side of the Dardanelles.
On paper it was a suitably daring plan. It had the advantage that the Turks had indeed neglected to reinforce the Suvla Bay beaches. There were only three battalions of infantry in the area with no machine guns and not even any barbed wire. Meanwhile they still kept three divisions further North up at the Bulair beaches. Furthermore, the Ottoman and German Commands were having command spasms of their own. Enver Pasha temporarily relieved Mustafa Kemal of Command over a disagreement on offensive actions being over ruled. Enver Pasha was concerned that Mustafa Kemal was too cavalier with his troops' lives. Liman von Sanders had to smooth over relations between the two and had Mustafa Kemal reluctantly be returned as a Divisional Commander at least. Not that Liman von Sanders' position itself was entirely safe. The German Supreme Command was concerned that his defence was not being dynamic enough to break the deadlock and finish off the Allied attacks once and for all. He was technically relieved of command himself at one point but managed to retain his position on condition of receiving a new Commander, von Lossow, on his general staff to keep an eye on operations and ensure that they were being prosecuted vigorously enough.
It should be noted that despite the elaborate secrecy of Hamilton, the Turks and Germans did suspect that a new attack was imminent. It was difficult to hide the fact that thousands of new soldiers were arriving throughout the Aegean and in Egypt along with their stores and equipment. They just did not know where they were to land. They concluded that the two likeliest places were either up at Bulair or over on the Asian side of the Dardanelles at Kum Kale. They did not predict a landing at Suvla Bay.
Despite the optimism behind renewed offensive action, there were reasons to be cautious about the prospects of success of the plan. Firstly, it required an inordinate amount of precision execution - not something that even the experienced soldiers already on the front lines had shown was easy to pull off. The new precision was to be left to new soldiers who had never experienced fighting in the scorching conditions of a Turkish summer and the geographical challenges of the terrain they were landing on. Suvla Bay did indeed have a natural harbour that could accept ocean going vessels but very soon the beaches gave way to the familiar cliffs. The attack out of the ANZAC enclave was to be conducted by the new troops rather than the battle hardened and experienced troops who were already there. The ANZACs were to conduct yet another feint further South but the main bulk of the fighting Northwards was to be by the newly arrived troops who were secretly deposited by the cover of darkness from August 4th until the offensive on August 6th. Perhaps the most significant problem was that of leadership of the new formations. The generals and staff selected were not the battlehardened soldiers from the Western Front, but second line soldiers who often had been called back into their roles from retirement. They tended to have little comprehension of anything other than colonial battlefields or were overly wedded to the fantasy of the power of artillery to smash the enemy. A winning combination is often to have virile and dynamic leaders in charge of experienced battle-hardened soldiers. This second operation was to be the other way around - experienced, perhaps long in the tooth, officers with new and untested troops! Hamilton was not to blame for the choice of commanders which was made back in Whitehall. However, he compounded and amplified their weaknesses by his own leadership style. He was indeed a consummate diplomat who did well to keep competing officers cooperating with one another. However, he often achieved this peace through allowing his generals to have too much freedom to interpret and indeed deviate from the master plan. He simply did not put down his foot at crucial times to insist upon key aspects of his plans. Most fatally of all would be his failure to articulate the need for speed to General Stopford whose division was landing at Suvla Bay. A more forceful leader would have ensured that General Stopford understood that time was of the essence. Instead, he trusted Stopford's judgement - with fatal consequences for the whole enterprise.
|
|
Squandering New Opportunties at Suvla
|
|
The British landings at Suvla Bay by Hammersley and Stopford on the night of the 6th and morning of the 7th of August did actually achieve complete surprise over the Ottoman defenders. Indeed, the local German commander in the area, Major Willmer, had even had one of his three battalions stripped from them as the Turks had needed reinforcements for the ANZAC bay attack which had already started. There were less than 1500 Turks in the area with just a couple howitzers and no machine guns. Even these were not set up on the beach but were set back on the heights. Some 7,000 British troops came ashore with literally a single shot being fired by an isolated Turkish piquet guard.
Nevertheless, the promising start was not all as it seemed. The Navy had been wary of putting troops ashore at Suvla as it had no reliable underwater charts to work from and had not wanted to tip off the defenders by going out and making some. There were indeed underwater reefs and shallows that complicated the landings. They were also landing inexperienced troops ashore on a peculiarly dark and featureless night. The third Brigade to be put ashore was particularly off course. It did not help that maps of the area were unreliable and there was also confusion over the commanders referring to English geographical terms but the local commanders only have maps with Turkish names on them. Confusion began to cascade as the various formations intermingled and orders began to be regarded as vague requests.
There were isolated, almost accidental, advances by smaller formations. As they reached some of the valleys and heights they began to receive Turkish fire and rather than push forward were content to stop and await further orders from above. The golden opportunity was when small groups of soldiers had seized Chocolate Hill and Green Hill and requested further orders. The units and commanders that had been tasked to seize these objectives were nowhere to be seen so the soldiers simply stopped where they were!
Command and control was poor from the very outset. Hamilton remained at his headquarters back at Imbros. He waited in vain for reports back from the front for the longest time. General Stopford tried to coordinate the attack from the safety of a Royal Navy ship where he had little clue to the confusion unfolding at the landing sites. General Hammersley did at least go ashore but was as confused as everyone else was as to where the formations were and where they were headed to (or not). He was further put out the next day when one of the few shells that landed from a Turkish Howitzer hit his headquarters and killed several of his staff. Orders were issued, but hesitation and repeated counter-orders only added to the confusion. The inexperience of the troops and especially their officers began to tell as lack of direction from above meant that they decided that caution and reorganisation was the key to survival.
Their lack of progress led to a new crisis when it was realised that there was not going to be enough water for the 20,000 troops who had been put ashore. It had been assumed that they would race inland and seize water sources for themselves. The fact that they were idling around on this baking summer's day with barely a shot being fired in anger put a terrible strain on the water supply envisioned. The Royal Navy were required to make extraordinary provisions to get water on to land as rapidlly as they could. This further delayed the landing of other supplies and especially of artillery. This last factor would be a key decision maker for General Stopford who convinced himself that modern war could not be won without the aid of massive firepower. Rather than ordering his troops to seize the heights that were tantalisingly close he gave the order for his division to entrench itself and await the arrival of the artillery and then they would resume the attack on the 8th. What made this particularly galling to various Royal Navy Commanders who had witnessed the missed opportunities of April 25th, was that the ANZAC commanders had confirmed that the Turks were indeed falling back and abandoning their positions in front of the troops at Suvla Bay. This was further confirmed by aerial reconnaissance. Desperate messages back to Hamilton at Imbros to inform him of the lack of initiative and dynamism of his commanders seemed to go astray or arrived too late. Even when Hamilton did finally make the decision to abandon his headquarters at Imbros to come chastise his underlings, he found that there was no fit Royal Navy boat available to convey him to the landing site as the allocated ship's boiler had broken down. It was only late on the 8th that he arrived and his worst fears were confirmed. Surprisingly, Stopford seemed pleased with his troops' performance on that day and was confident that the next day would bring a great victory. Hammersley felt constrained by the confusion and feedback from his commanders and felt that any further advance would be futile. Hamilton tried to insist that what would now be a night time attack must be prioritised. The heights had to be seized before they could be reinforced. Alas, his lack of firmness on this fact before the operation had commenced now came back to haunt him. He had trusted in the judgement of his underlings but this trust had been seriously misplaced. His diplomatic savoir faire may well have suited theoretical strategic planning but it had not prepared his commanders nor their troops for the reality of modern warfare. It was a critical mistake that cost this second opportunity for victory.
|
|
Ottoman Desperate Defence
|
|
The Suvla Bay landings were only a part of Hamilton's elaborate plan. There were still three other attacks that were designed to support and for at least one of those attacks to unite with the Suvla Bay landings. One of the attacks was to be out of Cape Helles whilst the other two were from the ANZAC beachhead. The Cape Helles attack by British and French troops was always supposed to be a diversionary attack designed to hold down Turkish troops from rushing further North to reinforce against the main battle there. One of the ANZAC attacks was also designed to be a closer feint to the main thrust out of the bridgehead. This was the attack on Lone Pine that would be spearheaded by Australian troops on the evening of August 6th in advance of the main attacks up the Sari Bair ridge during the night and morning of the 7th. There was a lot of coordination and an awful lot of night time manouevering over very difficult terrain. Fortunately, unlike the troops at Suvla Bay, nearly all those participating in these attacks were experienced troops who were acclimatised to the conditions and had commanders who were familiar with the type of warfare likely to be encountered.
The feint at Lone Pine got the attacks off to a promising start. Desperate to go back on to the offensive, Australian troops were literally queuing up and offering money to earmarked soldiers to be allowed to participate in the attacks. The attack was launched at 1730 hours across a narrow front of just over 220 yards and in broad daylight. A preliminary bombardment prepared the way but also warned the Turks of an impending attack. The resultant charge was a desperate affair that saw wave after wave of Australians fighting hand to hand against a well entrenched enemy. Despite the formidable defences, the Australians reached the Turkish lines. Some 7 Victoria Crosses were earned here and casualties were in excess of over 4,000. However, the Australians succeeded in capturing this line of trenches and withheld repeated attempts by the Turks to recapture them. The first part of the plan had worked. The feint certainly distracted the Turks and ensured that no troops from this part of the line could help reinforce the real attack going on further to the North.
The night time attack Northwards similarly started hopefully. The New Zealanders were given the task of advancing up the Sazlidere ravine towards the heights of Chunuk Bair. They had actually designed a ruse with the Royal Navy whereby at 2100 hours every night they bombarded a particular Turkish post for half an hour. This had been happening for some time and the Turks had taken to withdrawing from Old Post 3, as it was known, at that time of day and then reoccupying it after the shelling stopped. On the night of August 6th though, the New Zealanders were ready to rush the empty section as soon as the Royal Navy's bombardment stopped. This caused a disruption to the Turkish defensive line right from the outset and desperate fighting saw the New Zealanders advance through the Turkish defences out into relatively undefended land behind. Unfortunately, the risks of a night time advance began to make themselves apparent as the troops began to lose their way and guides became hopelessly confused. Some troops made it to a line known as Rhodendron Spur but waited in vain for other reinforcements to arrive. Indeed, one unit spent the entire unit lost in the ravines only to find itself pretty much where it had begun.
A second British/Australian and Indian attack Northwards became similarly confused. This particular column had been given a longer route to try and move to outflank Turkish defenders yet further North up Hill Q and Koja Chemen Tepe. The night march was proving difficult in the terrain and some of the guides felt that they were being helpful by suggesting a short cut towards their objectives and headed up a ravine at Aghyldere that happened to be perfect for the Turks to enfilade fire upon the hapless troops. The Allied Commander was wounded and chaos soon spread throughout the confused and lost troops. On the morning of the 7th they were well and truly wedded to bottoms of ravines searching for frantic cover and were no where near the heights they were supposed to have already captured by daylight.
The night attacks had not worked and worse was about to unfold for Hamilton's forces. The attack out of Cape Helles was duly launched. Although a feint, the dangers were still very real for those engaged. Unfortunately for them, their timing could hardly have been worse for the Turks were themselves completely coincidentally preparing their own assault on the Allied defences for precisely the same time. They therefore had extra troops, ammunition and were all prepared for battle when the British and French troops launched their own attacks. Back at ANZAC a completely unnecessary sacrifice was about to play itself out below Battleship Hill. The Australian Light Horse, although on foot, had been given orders to attack the trenches in front of them in order to prevent the Turks from enfilading the newly captured heights at Sari Bair. But of course, these heights had not been captured as the original plan had envisioned and yet the Light Horse were ordered to attack regardless. The bravery of the Light Horse saw them press home attacks despite desperate casualties in the process. A handful made it across to the Turkish trenches but there was literally nobody left to follow up on their forlorn attacks.
The plan seemed to be stalling from the ANZAC beachhead every bit as much as it had on the Suvla Bay one. New plans were formulated to attack the main peaks on Sari Bair once more for the dawn of August 8th. Once again, coordinating troops to be in the right place at the right time during the night proved problematic and most of the attacks petered out rapidly. However, there was not just one but two distinct exceptions that came tantalisingly close to making the all important breakthrough of seizing the heights. Major Allanson and a battalion of Gurkhas happened to break through the Turkish defences and used his initiative to push on to Hill Q. He came within 100 yards of the crest of that hill before being fired upon. He quickly rushed back to find reinforcements to help him push through and gathered up some British forces to support his Gurkhas. They fought in positions that mountain goats may have been more accustomed to but were still making steady if slow progress upwards towards Hill Q's summit. This was not the only opportunity on August 8th. At Chunuk Bair, New Zealanders seized an undefended gap very close to the summit. However, these were very exposed positions indeed and Turkish artillery poured fire on the advancing troops. Attempts by the Gloucestershire Regiment to reinforce them came to nothing as Lt Colonel Malone and his New Zealanders were eliminated as a fighting force.
The night of August 9th saw yet another attempt by the British to seize both Chunuk Bair and Hill Q. The Generals were simplifying their previously elaborate plans as complexity was clearly not working on the terrain around them nor against the enemy before them. Generals Birdwood and Godley concentrated on gaining the heights where Allanson still had his tentative foothold and the New Zealanders had come so close to holding. Four fresh British battalions attacked at 0515 after a Royal Naval and artillery barrage. This time Lancashire troops reached Major Allanson and waited for the barrage to finish before rushing the Turkish troops on the heights of the ridgeline. Desperate hand to hand fighting ensued and for the first time an Allied Commander could look down on Turkish formations below him and see the Straits ahead. Disaster nearly befell the victorious Allanson as shellfire landed on them whilst they were still exposed. They were not sure if the shells were a mistaken barrage from Allied ships or Turkish gunners aware of the threat. Either way, it forced Major Allanson to halt any breakthrough manouevre and seek what protection they could from the captured Turkish positions. Nevertheless, this was the potential breakthrough that the Allied Commanders had hoped for!
Although the Allied forces were undergoing serious challenges and setbacks, the Ottoman forces under Liman von Sanders were facing difficulties of their own. First and foremost was that the multiple attacks had indeed confused the Turkish defenders and also had shown that von Sanders' idea that the Allies would land at Bulair was clearly wrong. He had two divisions far away from the fighting raging to the South. Orders had to be sent to get the Turkish Commander there, Feizi Beg, to rush his troops as fast as possible to the Suvla sector. The German Commander at Cape Helles was convinced that his sector was the principle thrust and although he had had extra troops for his own offensive still suffered terrible casualties and asked that his forces be evacuated before they were cut off from above whilst being pressed from below. There was also the sheer scale of losses sustained since the attacks started on August 6th. The Turks may well have stopped most of the incursions but had been thrown into chaos and confusion nonetheless and had lost countless local commanders with precious local knowledge and understanding of the conditions and realities of the battlefields.
Feizi Beg promised von Sanders more than he could deliver. He claimed that his troops would be ready to attack the troops at Suvla Bay, some 35 miles away, by August 8th. Indeed von Sanders rode out to watch the attack personally only for him to discover that Feizi Beg's troops were nowhere to be seen. Hurried messages from Feizi Beg promised that the attack would begin at dawn on August 9th after his troops had been able to recuperate and reorganise after the long forced march. Liman von Sanders was indeed experiencing some of the same exasperations of command as his counterpart Hamilton. However, von Sanders took a far more ruthless course in his impatience and need for better leadership from his subordinates. He dismissed the German commander at Cape Helles with immediate effect and replaced him with an officer with strict orders not to lose a yard of ground to the enemy. He also relieved Feizi Beg of command on the spot. He then took the more important decision of giving command of the entire central sector, including Feizi Beg's two new divisions under a unified single command. Clearly, he felt that the most aggressive defender was Kemal Ataturk of the 19th Division. Ataturk had indeed been in the thick of fighting against the ANZACs but had been politically sidelined due to his clashes with Enver Pasha. Given the gravity of the situation, von Sanders felt that a vigorous proven leader needed to be thrust into the defence immediately.
Ataturk's first order was to the fresh troops arriving from the North. Despite their exhaustion he ordered them to immediately assault the heights of Tekke Tepe with a view to sweeping on down to the Suvla Plain. The orders arrived at 0400 for an 0430 offensive. The speed of reaction was indeed essential as the British 32nd Brigade under its lackadaisical leadership from the very top down had been scrambling around the slopes without urgency with orders to take the crucial and undefended heights. The Turks beat them to the summit and swooped on down taking the 32nd totally by surprise and in totally inappropriate formations for defence. Morale soon collapsed around the untried British troops who fled headlong down towards the plain. Hamilton could personally see the calamity unfolding before his eyes from the deck of his ship, the Triad. He rushed ashore to beseech General Stopford to react to the disaster. He found Stopford virtually oblivious to the tactical situation and consumed with creating a new shell resistant headquarters with the help of Royal Engineers. The lack of any vigorous response by Stopford and his troops convinced Ataturk that he could now turn his attention to the Sari Bair problem where Allanson had made his crucial breakthrough to the heights.
Ataturk ordered a similar attack for the following morning of the 10th at 0430 hours. By this time Allanson had personally withdrawn to rest and recuperate although other troops and commanders had replaced his troops. The Turkish massing of troops had to be done in the utmost secrecy lest British artillery and naval guns rain down on them in their exposed positions. Kemal Ataturk personally led the first wave as the Turks charged across the barely 30 yards of No Man's Land to assault the Allied defenders. The Turks took undeniably fearful casualties, but with the leadership imploring them to press home the attack they spent the next four hours fighting hand to hand and eventually and bloodily regaining the heights. By midday on August 10th, Kemal Ataturk's vigorous and single minded offensiveness had turned the tide of battle decisively back towards the Turks. von Sanders and Ataturk had shown the necessary ruthlessness to regain the initiative. Hamilton's decency as a human being failed him and his troops. His lack of decisiveness in replacing incompetent commanders and in forcing others to stick to his plans were his ultimate undoing. He did indeed have the troops and the material to win at Gallipoli, he just did not have the leadership qualities to ensure it!
|
|
Evacuation or Renewed Attack?
|
|
Fighting continued fitfully throughout the remainder of August. There had been one last possibility for a breakthrough for the British when Irish troops attacked along the Kiretch Tepe ridgeline. Unbeknownst to them, but very much known to the Axis commanders, they were coming very close to breaking through by the main Turkish ammunition depot. Von Sanders wrote in his diary of how the August 15th/16th British attacks had come close to seizing the dumps and outflanking the entire Turkish 5th Army. However, just as before, nearly was not good enough and the Irish soldiers were entirely ignorant of just how close they were to unravelling the Turkish defenses. Indeed, they had so little ammunition provided to them by Stopford, that there were points in the battle that they ran out of bullets and were reduced to throwing rocks at the Turks. Had they the ability to have pushed on, they would have had more ammunition than they would have known what to do with.
The 21st of August saw another assualt on Scimitar Hill and Hill 60 on the Suvla Plain. The 29th Division was ordered to Suvla from Cape Helles by Hamilton and launched their offensive on a day of unseasonably thick fog that was compounded by brush fires started by the artillery barrages. The battle was actually substantial in size and it forced the Turks to commit the last of their reserves in the area. However, once again, the attritional battle had little focus and less dynamism. Ignorance of the Turkish plight meant that the attack was not reinforced and was effectively contained by their own strategy and lack of ambition. Having captured the heights on August 10th, the Turks dominated the battlefield which allowed them to react to British forays accordingly.
General Stopford's less than imaginative offensive actions gradually shuddered to a halt. To the end, he complained about lack of experience of his troops, of lack of artillery, lack of supplies. He blamed virtually every aspect of the battlefield except the most important determinant of all, himself. Stopford was mired in the thinking of the Western Front and could not conceive of more imaginative, dynamic tactics such as switching points of attack, lightning strikes without artillery pre-bombardment giving away where the attack was to fall, following up successes rapidly to exploit local successes and so on. Hamilton himself soon came to realise the failings of his commander on the spot at Suvla. However, his own unwillingness to take the necessary decisive action, meant that more precious days were wasted as Kitchener himself intervened from afar to request Stopford be relieved of command. Hamilton soon saw an exodus of the elderly yet inexperienced and inadequate generals as the remaining senior officers braced themselves against Hamilton's reorganisation of command in the wake of Stopford's loss of command. General Mahon of the 10th Division refused to serve under the commander of the 29th who he regarded as an inferior. He was recalled to Lemnos. Hammersley was removed on August 23rd. Other commanders returned to Britain with Stopford. As August came to an end, so did offensive action by the Allied forces. Both sides seemed content to lick their wounds, exhausted after August's travails. General Godley perhaps summed up their achievements when he compared the loss of 45,000 allied soldiers that month to gaining what amounted to "five hundred acres of bad grazing ground."
Throughout September and in to October, the state of ennui perpetuated itself. Few reinforcements were provided to Hamilton as concerns about Senoussi attacks from Libya into Egypt worried the authorities there. An absence of purpose for the troops saw their cynicism rise and their living conditions deteriorate as respect for authority floundered amongst the disillusioned troops and turmoil at the top.
Hamilton's hopes for reinforcements were raised in September when the French hinted that they would send 4 fresh divisions to the Dardanelles, mainly as a domestic political solution to placate an influential General Sarrail who had been relieved of command in Verdun. However, before these French troops were committed fully, Bulgaria entered the war and a new front was opened in Salonika. Instead of the French troops landing in the Dardanelles, they were hurriedly diverted to Greece. Worse was to follow for Hamilton who not only was not receiving his hoped for reinforcements but was himself ordered to divert troops from Gallipoli to the Salonika Front.
Amidst this setback, Hamilton was also asked how he felt about evacuating the Dardanelles completely and how many soldiers might be lost in the operation. London was concerned about the widening of the war in the Balkans and real doubts were raised about the wisdom of sending yet more troops to the quagmire of Gallipoli. Hamilton was somewhat taken aback and even horrified at the suggestion of evacuation. He believed that it would be a very dangerous undertaking. Besides, he hoped with fresh troops and better commanders, he might yet find victory. His reply to London was that they might lose up to half of their troops in an evacuation. This unduly pessimistic prediction was intended to help justify continuing the operation, in reality it seemed to confirm to London that Hamilton was not up to the job of commander. Failure after failure had been endured. London had constantly been informed that he had very nearly succeeded but needed more of this, that and the other if another opportunity is to be pursued. Unbeknownst to Hamilton, two influential journalists were giving withering testimony against the state of affairs in the Gallipoli campaign. Ellis Ashmead-Bartlett had been an official War Correspondent since the very beginning of the campaign and Keith Murdoch was a junior Australian journalist en route to Europe who had happened to divert to Gallipoli but was well connected to the Australian political establishment. Between the two of them, they caught the ears of the British and Australian Prime-Ministers and fed a grim story about the failings at all levels of the campaign. The fall of Hamilton was largely due to his own failures as a commander, but it was also caught up in the political battles back at home. Lloyd-George was using the failing as a way of embellishing his own credentials at the expense of PM Asquith. Churchill's authority was on the wane as the instigator of the enterprise. Even the great Kitchener's reputation was taking a beating with the failure to break through on any front anywhere. Hamilton had simply run out of influential friends willing to stand up for him.
Hamilton was informed that he was to be replaced on October 15th. His replacement was to be Lt-General Sir Charles Monro from the Western Front. He was an experienced and methodical commander very different from the polite but almost whimsical Hamilton. Monro was asked to visit the three enclaves and give his honest opinion on whether to persevere or evacuate the peninsula. He visited all three within 6 hours and made a quick decision. He reported that only the ANZAC corps was fit to fight on. The other formations were woefully led and in poor shape. However, he also believed that an evacuation would be costly in human terms, with perhaps 40,000 casualties. This was unwelcome news back in London where a decision had to be made. Churchill would later, perhaps unfairly, criticise Monro by the unkind words. 'He came, he saw, he capitulated!'
The decision to evacuate was complicated by a renewed optimism amongst some in the Royal Navy that another attempt to force the Dardanelles might be successful. The prime advocate for this was Commodore Keyes. He believed that with the success of the various submarines breaking through to the Sea of Marmara and with excellent knowledge of the layout of the Turkish defences gained over the 8 months, then another attempt using older battleships and supporting vessels that they could break through and land marines and soldiers to intercept and interrupt the only supply road leading to the Turkish defenders on the peninsula. Keyes also made the point that the Turkish morale was every bit as shattered as that of the Allied forces and with winter approaching it would only deteriorate further. Vigorous lobbying by Keyes in London came close to convincing decision makers that one last roll of the dice might well be worth it. Unfortunately, Monro remained implacably opposed and the strategic situation in Salonika and Serbia deteriorated yet further. Kitchener made one last attempt to assess for himself the wisdom of this last gasp attack. Any enthusiasm he had had for Keyes' plan soon evaporated when he saw once more the state of the troops and the terrain. To make matters worse, a few days after he left, an unexpected storm and blizzard seemed to heap new concerns on the forlorn and exposed soldiers. Monro was implacable in his opposition but the final decision was really made by Britain's allies of France and Russia who were both concerned at events in Greece and Bulgaria. They both encouraged London to sacrifice the Dardanelles to save the Salonika Front. Churchill was removed from the War Cabinet by Asquith as London finally threw in its lot to evacuate the Dardanelles. Churchill resigned as an MP altogether and went to France as a humble infantry officer as something of a penance. The priority now was trying to save as much of the army as possible so that it could continue to fight on in Salonika, Egypt or back on the Western Front.
|
|
Evacuation
|
|
With minds made up to evacuate, the dilemma was how to undertake such a perilous endeavour under the noses of the Turks and from both the ANZAC/Suvla enclae and the Cape Helles one too. There were not the assets to do both simultaneously so it seemed difficult to pull off the same miracle twice! Fortunately both sides had been exhausted by the summer of fighting and the natural lull continued for Ally and Turk alike. Apathy ruled with only occasional shots and artillery being exchanged. Both sides appeared to content themselves with the busy process of merely surviving in the increasingly cooler and stormier weather.
Colonel Aspinall was made responsible for planning the initial evacuation of the Suvla-Anzac bridgehead. This was not going to be an easy process to do. Secrecy was imperative. Had the Turks got the slightest whiff of what was happening, they would be able to swoop down and cause carnage amongst any remaining soldiers not yet evacuated. Weather was another serious consideration. The seas needed to be calm to allow for the extensive ferrying that would be required. Basically there were some 83,000 soldiers ashore along with at least 5,000 animals, 2,000 vehicles, 200 artillery pieces and countless stores. All of these would have to be evacuated or rendered useless to the enemy.
The plan was revealed to the soldiers on December 12th whilst the entire project was supposed to be completed within a week of that date. This did not leave long to undertake all the necessary preparations. Given that in some places, the Turkish and Australian trenches could be as close as 10 foot away from one another, it seemed a tall order to remove so many people without a single Turk noticing! Basically, there was a phased withdrawal largely undertaken under the cover of darkness. The sick and the wounded were the first to be removed, followed by prisoners of war. When the soldiers themselves got the orders to evacuate, they did so with feet all wrapped up in cloths to muffle the sound of movement and copious blankets to cover the piers and walkways. Not all those who were marched down to the ships were escorted away. Every morning, a small contingent was asked to loudly get off ships and march back up to positions to make it appear that soldiers were merely being replaced as normal. Mules were seen to be regularly carrying stores up the paths to soldiers, but their boxes were empty on the way up, filled with stores and brought back down to the waterline. Planes were flown vigorously above the enclaves to deter any Turkish planes from reconnoitering from above. Artillery pieces stopped firing at night to get the Turks used to them being silent. Naval guns filled in some of the bombardment load, whilst the artillery pieces and crews were progressively thinned out.
The longer the evacuation continued, the harder it was to convince the Turks that the Allies were there to stay. Remaining formations were marched around repeatedly. all tents and awnings were kept in place. abandoned trenches still had their firepits lit each and every mealtime to convince the Turks that life was going on as normal. On December 15th, stores that could not be recovered began to be destroyed in earnest. A mine under a Turkish trench system was filled with explosives as a parting gift. A self-firing rifle was developed using two kerosene cans slowing releasing water to fire rifles after the soldiers had left. By the 18th December 40,000 men had already been evacuated. The next two nights were hoped to evacuate 20,000 a night as long as the weather held out.
Saturday's evacuation went as planned, leaving the very last tranche to be removed on Sunday 20th. This would be the trickiest day of all, especially given that some of the soldiers had over a mile to march in order to get to the piers and jetties below. Booby traps and mines had been laid during the day marked off with flour and salt to allow the retreating soldiers to avoid them as they descended from their dugouts. The very last soldiers primed their self-firing rifles, set any fuses, pulled barbed wire behind them as they gingerly set off for the waiting boats below. The Anzac beaches were largely evacuated by 4am. The mine exploded shortly after. Some Turks at least seemed to be aware that something was occurring but no commanders ordered a determined attack to find out for sure. Suvla Bay, which had longer distances to endure, was emptied by 5:10am. By 7am, enough curious Turks had gingerly probed to realise that their foe had fled. Royal Naval guns opened up to greet any Turks enthusiastic enough to get to the waterline. In truth, these Turks were more interested in exploring the remaining stores and food than in chasing after any enemy. Just 16 hours later, a massive storm hit the area, had they delayed their departure just one more night, the whole enterprise may well have ended in tragedy.
The operation was a resounding success without a single evacuation related casualty. Liman von Sanders confessed later that he had no idea that the Allies were willing to depart so comprehensively and so quickly. Of course, Cape Helles had not yet been evacuated and some 35,000 British and French troops found out for themselves that their near neighbours had deserted their sectors leaving the full weight of the Turkish army before them. There were 21 Turkish divisions facing just 4 Allied ones on the tip of the peninsula. It seemed impossible to think that the British might be able to pull off a second evacuation without the Turks realising. Liman von Sanders was convinced that the British were consolidating their position at Cape Helles and although he did not think they would attack from there, he believed that they intended to remain there for the time being and effectively deny the Dardanelles to the Turkish Navy from their side of the Straits.
The final decision to evacuate was not made in London until December 27th, a week after the Suvla/Anzac evacuation. They had the benefit of experience this time and the Navy was free to start moving troops once more. The French were the first to be removed. By January 7th, less than 20,000 troops were remaining in Cape Helles. This time though, the reinforced Turks did not just sit idly by and wait. On the 7th, under orders from Enver Pasha, the Turks launched an offensive against the remaining British. The largest artillery barrage of the entire campaign was unleashed followed by infantry assaults across no man's land. This entailed desperate defence for the British who were massively outnumbered. Fortunately, they had ample supplies of ammunition, Royal Naval support and knowledge that they were in desperate straits and any setbacks would be fatal for all of them. A ferocious defence convinced the Turks not to push home their assaults. Indeed, the Turkish soldiers perhaps baulked at needlessly throwing away their lives when victory seemed so imminent anyway. Not a single Turk made it through to the British lines. Turkish commanders convinced themselves that the British were not evacuating on the basis of the defence offered and the lull in confrontation soon reasserted itself.
January 8th saw stores destroyed and preparations for an evacuation that night. However, the Cape Helles final evacuation was not going to be as benign in terms of weather as the Suvla/Anzac one had been. A weather front brought stormy seas during the night and waiting soldiers found knew complications as boats and lighters collided into piers and jetties. Engineers frantically worked to get everyone off the shoreline. The frontline had been abandoned by midnight with just the self-firing rifles, barbed wire and booby traps to act as any deterrent to the Turks. However, the bad weather was working both ways in that it induced most Turks to stay safely in their own dugouts with few venturing out to see what was going on under their noses. By 2am over 3,000 British soldiers were still ashore. 200 of these were particularly hard pressed when the lighter sent to extract them from Gully Beach ran ashore. A frantic march to W beach ensued as these soldiers feared being left behind. They made it with just minutes to spare as the last boats were preparing to leave and the ammunition dumps were set to explode at just before 4am. This roar alerted the Turks to send artillery shells over but they were still diffident in sending actual soldiers to investigate. Amazingly, the Allies had pulled off a second full evacuation without casualties under the noses of the Turks. This was a remarkable double success for a campaign that had been littered with mistakes, setbacks and ineptitude. A little restored pride was returned despite the fact that they had indeed been defeated and a quarter of a million casualties had been endured across 1915 for no discernible gain whatsoever.
|
|
Aftermath
|
|
Monro had recommended evacuation partly because he thought it was a waste of troops who might otherwise be useful to the Western Front. Indeed, he himself was sent straight back to France. However, most of the troops did not make it back to France. The Near East and Balkans had certainly not stopped being a front in the war. Many of these Allied troops were shipped back to Egypt where they rejoined the war against the Turks, just further down the coastline. Ironically, many of these were the same Turks who had themselves been relieved from the Gallipoli Campaign and had been redeployed accordingly. A quarter of a million largely British and Imperial soldiers would fight across Egypt and into Palestine, Lebanon and Syria. Others were sent to Mesopotamia also to continue the war against the Turks. Even more troops were tied up fighting in Salonika. Some three quarters of a million British and French troops would be consistently kept in that theatre, largely to fight the Bulgarians who had felt emboldened to join the Central Powers due to the Allied failure in the Dardanelles.
The main strategic damage of the retreat though was that the Allied powers of Russia and Rumania were isolated from their main allies and providers of supplies in the West. Russia did have ports in the Northern Arctic circle but crucially they had no rail link to the rest of Russia rendering them largely useless to transfer supplies to the Russian army. Revolution in Russia in 1917 was certainly not due to the failure of the Dardanelles operation, but its failure did not help Imperial Russia avoid that revolution. Likewise, Rumania's capitulation to the Central Powers in 1918 may well have been avoidable had a secure supply link been established through the Straits.
One threat that did not really materialise due to the withdrawal from the Straits was the concern that the Turkish Navy would emerge to harass and raid Allied shipping in the Mediterranean. The Royal Navy kept a flotilla including battleships on station to try and deter any such incursion. For all of 1916 and 1917, the Turks dared not send their ships out of the safety of the Straits. In January 1918 though, they did finally try their luck when the old German ships Goeben and Breslau emerged whilst the British battleships had temporarily been diverted to help in Salonika. The small British ships remaining on station had little hope of slowing down the now Turkish ships. Two British ships were sunk and a disaster loomed large for the Royal Navy. However, both Turkish ships struck mines off the island of Imbros. In many ways it must have felt like some kind of divine justice to the Royal Navy given that it had been mines that had scuppered their own attempt to force the Dardanelles back in 1915. The Breslau was sunk immediately, whilst the Goeben limped back to the Straits with a gaping hole in her side. She never emerged again for the rest of the war.
Had the war continued into 1919, the Royal Navy would likely have launched another attempt to force the narrows. It was certainly planned for and ships were assembled by Wemyss and Keyes. Keyes in particular was still convinced that they had gained enough knowledge and expertise to force it from the sea. Later in 1925 he would steam through the Straits at the head of the Mediterranean Fleet and could not help but appreciate how close they had been to their breakthrough and how the second attempt in December 1915 had it been tried, would almost certainly have succeeded according to him.
Perhaps the relative fates of the main men in charge reveals the extent of the defeat and victory to the respective sides. Hamilton's military reputation would never fully recover. He would never be given a command again. Churchill's political career took a serious knock and it was doubtful for many years that he would be able to recover and the affair very much followed him around for years to come. Kitchener also lost some of his lustre thanks to his determination to back the plan. His own virtual supreme power for waging war was replaced by a War Council in which his voice was just one of many. The fact that he died in 1916 (ironically travelling to Russia the long way round due to the failure of the Dardanelles Campaign) meant that his fall from grace was not noticed by the public at large. The real winner was Mustafa Kemal on the Turkish side. He would become identified as the key Turkish soldier responsible for the success at Gallipoli. The German Liman von Sanders retired back to Germany as the Central Powers overall defeat played itself out in 1918. Talaat and Enver Pasha were both associated with the political mistake of joining the Central Powers in the first place. Neither survived the defeat of Turkey. Talaat would himself be assassinated by an aggrieved Armenian seeking justice for the death of his family, whilst Enver fled to the Balkans and became embroiled in the Russian Civil War. He is presumed to have died in a cavalry charge in the caucuses in 1921. Mustafa Kemal alone emerged from credit from amongst the top tier of Turkish leaders. Given that he was a military man carrying out orders insulated him from the political mistakes of Enver and Talaat Pasha and the Young Turks movement. Mustafa would launch a new political career in the aftermath of defeat and do much to restore the confidence of Turkey once it had been stripped of its Ottoman Empire's colonies thanks to the ultimate defeat of the Central Powers.
|
|
Gallipoli: Missed Opportunity or Doomed to Failure?
|
|
From start to finish the entire Gallipoli Campaign was a curious combination of opposing attributes throughout the 259 days of the ill-fated campaign. In some ways the commanders were too hesitant and reticent and yet at critical times they were too hasty and rushed into areas that only fools would tread. The operation was a curious mix of professionalism and amateurism - the Royal Navy and French Naval crews fought with distinction and yet their success was undermined by relying on civilians on fishing trawlers to clear their minefields for them. There was a sense of urgency at times and yet a fatal lackadaisicalness at other, more critical, points. A gung ho bravery combined with sluggish conservatism. Time and again opportunities were missed for failing to press home attacks or due to a sudden switch in strategy. Steadfast preparation was felt to be more important than seizing the initiative and taking unnecessary risks for far too many of the Allied commanders involved. There was too much meddling at times and deferring too much to the man on the spot at others. There was overconfidence in their own troops' abilities, and a serious underestimation of their enemies' abilities. All of these combined into an increasingly fateful level of desperation accentuated yet further by the dust, heat and futility of the attacks hitherto launched. It would prove a toxic mix.
Perhaps most fatally of all was the slow but sure mission creep and lack of clarity that characterised the campaign. Hesitancy combined with lurching from one plan to another undermined the chances of success time and again. The element of surprise was thrown away by continued piecemeal approaches to the task of seizing the Straits. Should the attack be born fully by thel Royal Navy? Use Marines? Use the army? Where to land the troops? When to use reinforcements? Which troops to use? All of these issues and more bedevilled the decision making process and cumulatively made it harder to achieve their goals whilst giving their adversaries chances to recover, regroup and gather their own resources for defence.
One cannot help but feel that a more decisive and clear cut plan from the very outset could well have worked. The Young Turks themselves were preparing for oblivion and assumed the worse. And yet, all the problems of the Western Front were transferred to the Eastern Mediterranean. Paralysis of command for the attacker combined with the innate advantages of the defender thanks notably to the machine gun, trenches, higher ground and artillery. Credit must also be given to the Turkish defenders, their own inspired leadership from Mustafa Kemal as well as the professional and material help that was provided to them by their German advisers. However, the Allies held their own fate in their own hands and I for one believe that they could have succeeded even on the initial assault. Hunter-Weston appeared unwilling to change his plans even when genuine opportunities presented themselves. Furthermore, he was unwilling to adjust those parts of his plan that were patently failing to deliver. He also depended heavily on his Brigade Commanders, 3 of whom were killed during the fateful day with a further 2 replacement commanders also being killed. There was to be paralysis in the British Command that would have its own fateful consequences. Hamilton also had a leadership style that deferred to the expertise and experience of his subordinates. There were a number of occasions where he could, and almost certainly should, have intervened during the operations to overcome hurdles and exploit opportunities - which genuinely did present themselves on the 25th. A more interventionist Commander who was closer to the action and had better intelligence and communications could well have turned the landings into a success.
The Suvla Bay fiasco reinforced the innate command problems that bedevilled the Allied campaign. Commanders who had been expecting to fight on the Western Front brought their preconceptions with them to the Dardanelles and utterly refused to adapt to the unique topography and style of warfare required to unseat a determined defender. The Cape Helles offensives were equally doomed to failure with the tactics employed and troops engaged.
Not all the experience was wasted and some genuine new skills and talent was nurtured in this cruel crucible of war. It should not be forgotten that up until the Second World War, the Gallipoli Campaign was the largest amphibious assault ever attempted. Second World War planners would turn insatiably to the lessons of Gallipoli to design suitable flat bottomed craft, understand the importance of seizing high ground overlooking beaches, of combining naval, land and air forces to ensure local dominance and the importance of training men in the vagaries of amphibious warfare. In many ways, the success of D-Day in 1944 was won at least partially with the lessons from 1915.
It should also be noted that many of the soldiers would go on to have illustrious careers in some form or other after the campaign. Possibly the most important was the officer John Monash. Not only would he become an important Australian General, he would become one of the most important of the war for the Allies and did much to help achieve victory in France in 1918 after the German March offensives. Monash showed a rare talent for exploiting weaknesses and pressing home advantages. It is hard not to conclude that this was partially lessons learned from his time serving with the ANZAC brigade in Gallipoli. An important Second World War Field Marshall Slim also won his spurs at the Dardanelles, as did a future Prime Minister Clement Attlee who was fittingly one of the very last soldiers to leave the Peninsula when it was evacuated.
That final evacuation showed that not all those months of experience had been wasted and that creativity, experience and knowledge of the war zone could be combined, not once but twice to pull off the remarkable feat of evacuating without any further loss of life than had already occurred from under the noses of the Turks. It was small comfort, but enough to provide the briefest of salves to the otherwise disastrous campaign.
|
|
Epilogue: Consequences for Empire
|
|
The Gallipoli Campaign may well have been a failure but it did at least start the dominoes falling that led ultimately to the defeat of the Ottoman Empire and the presence of British and French influence throughout many of her former territories. Indeed the British would become the dominant regional power for the next half century especially after US President Wilson specifically ruled out American involvement in the war against the Ottoman Empire upon American entry into the Great War in 1917. From her dominant position in Egypt and throughout the Gulf, the victorious British and their French allies were able to install sympathetic leaders and take over new League of Nations' Mandates in the former Ottoman colonies. Interestingly, the newly formed Royal Air Force was to take on the role of attempting to police these vast new additions to the British Empire throughout the 1920s and 1930s as it was hoped that air power might deliver a cheap means by which to control these lands. The increasing discoveries of oil further transformed the strategic importance of the region. By the time of the Second World War, even the Axis enemies regarded Britain's pre-eminent position in the Middle East to be a formidable advantage and provided considerable assets and effort to try and disrupt this British presence in the region.
The other long term consequence was less obvious at first, but as time went on it became more and more apparent. The Gallipoli campaign, with all its successes, failures, pain and camaraderie provided an important kernel of both Australian and New Zealand national identities. Hitherto, Australians and New Zealanders were as likely to join the British Armed Forces as serve in their own local militias and yeomanry regiments. Isolated Antipodean formations had served in the Boer War, but Gallipoli was the first time that a substantial formation of ANZACs had fought together in an entire corps with responsibility for their own little corner of the war. The fact that the fighting was done under such forlorn circumstances and with often unclear and misguided leadership only served to heighten their feats on the battlefield. The experience gathered by the ANZACs at Gallipoli would serve them in good stead for the remainder of the war where they were quickly identified as being something akin to storm troops who could be relied upon to fight very hard indeed and showed unusual initiative and bravery on the industrial battlefields of Western Europe. ANZAC commanders were also increasingly promoted to even the most senior positions on the Western Front. Indeed General Monash, who served in Gallipoli, would go on to plan and execute the Battle of Amiens in 1918 which was one of the critical turning points of the war and ultimately provided the platform for the ultimate Allied victory on the Western Front. In short, the Australians and New Zealander armed forces became recognised as formidable military machines in their own right. The experience and reputation that they gathered during the First World War, spearheaded at Gallipoli, did much for them to feel confident in asking for full Dominion status in the post war World. This was granted in 1931 by the Westminster Conference. Such was the recognition of the unique circumstances of the Gallipoli campaign, both New Zealand (1920) and Australia (1921) created ANZAC Day as their memorial day for the sacrifice and suffering of their soldiers during World War One (as opposed to the November 11th Armistice used in Britain). The date of April 25th seemed the appropriate date to commemorate this campaign as it coincided with the anniversary of the ANZAC landings at what is still known as Anzac Cove. So it is not to much of an exaggeration to suggest that the Gallipoli campaign acted as a catalyst to the formation of the independent nations of New Zealand and Australia, although it would still take another World War and yet more military setbacks and endeavours to fully complete this journey.
|
|
|
 |
Approaches to Dardanelles Map
British Empire Operations Map
Dardanelles from Captured Turkish Maps
The Dardanelles Plan
The Approaches to the Dardanelles
Bombardment of February 19th, 1915
Bombardment of February 25th, 1915
Cape Helles Beaches
April 25th Landings
ANZAC Landings April 25th
27th Turkish Regiment Map on April 25th
Torpedoing of HMS Triumph 25th May, 1915
Operations against Suvla
Suvla Landings Map
Sea of Marmara Map
Aegean Sea Map
|
| Duration
|
|
| | 17 February 1915 – 9 January 1916 |
| Significant Individuals
|
|
|
| Timeline of Gallipoli Campaign |
| Jan 13th, 1915 | War Cabinet Approves of Naval Operation to Force Dardanelles Straits |
| Jan 28th | Naval Plans Accepted |
| Jan 29th | Fleet Assembled |
| Feb 3rd | Ottoman Assault on Suez Canal Begins |
| Feb 19th | Naval Bombardment of Forts |
| Feb 25th | Further Bombardment of Forts |
| Feb 26th - Mar 8th | Naval Force Enters Straits and Lands Royal Marines to Destroy Guns in Forts |
| Mar 1st | Greeks Offer 3 Divisions |
| Mar 3rd | Tsar Vetoes Greek Offer of Troops |
| Mar 12th | Ian Hamilton Given Command of Land Troops by Kitchener |
| Mar 15th | Admiral Carden Relieved of Command, Replaced by Admiral De Robeck |
| Mar 17th | Ian Hamilton Arrives in Theatre |
| Mar 18th | Major Naval Assault Towards Narrows |
| Mar 26th | Liman von Sanders arrives in Gallipoli to Organise Turkish Defence |
| April 10th | Hamilton Arrives in Mudros to Discuss Invasion |
| April 23rd | Troops Begin Final Preparation for Assault |
| April 24th | Troops Transferred To Smaller Vessels In Anticipation Of Dawn Assault |
| April 25 | Landings on Gallipoli |
| April 26th | British Beaches Consolidate, Sedd-el-Bahr Falls |
| Apr 26th - 27th | Kemal Launches Offensive Against Anzac Bridgehead |
| Apr 26th - 28th | Anglo-French Offensive To Take Achi Baba Heights |
| May 1st - 4th | Turkish Offensive Against Cape Helles |
| May 5th - 8th | Anglo-French Counter-Offensive From Cape Helles |
| May 12th | HMS Goliath Sunk |
| May 14th | War Council Disagreements Over Dardanelles |
| May 14th | General Bridges Mortally Wounded |
| May 15th |
Admiral Fisher Resigns Over Dardanelles |
| May 18th - 19th | Turkish Offensive Against Anzacs |
| May 22nd | Kemal and Birdwood Conference to Discuss Temporary Armistice |
| May 24th | Truce To Bury Dead |
| May 12th | HMS Triumpth Sunk |
| May 26th | Churchill Forced Out of Admiralty and Cabinet Over Dardanelles |
| May 12th | HMS Majestic Sunk |
| June 4th | Allied Assault from Cape Helles |
| June 7th | War Council Agrees to Reinforcements for Allies and New Landings |
| June 21st | French Assault from Cape Helles |
| June 28th | British Assault from Cape Helles |
| July 5th | Turkish Assault from Achi Baba |
| July 12th/13th | Allied Assault from Cape Helles |
| August 6th - 8th | Suvla Bay Landings and attacks out of ANZAC and Cape Helles. |
| August 9th/10th | Turkish Counter-attacks |
| August 12th | Battle of Lone Pine Endsn |
| August 13th | Battle of Krithia Vineyard ends |
| August 15th | General Stopford is Relieved of Command |
| August 21st | Final Suvla Offensive with assaults on Scimitar Hill from Suvla Bay and Hill 60 from Anzac cove |
| August 29th | Battle of Hill 60 ends. |
| September 12th | Anzac Reinforcements arrive |
| September 19th | Royal Newfoundland Regiment arrives as reinforcements. |
| October 15th | Hamilton is Relieved as Commander |
| October 28th | General Sir Charles Monro Arrives to Take Command |
| November 15th | Kitchener Arrives in Gallipoli to Assess Evacuation |
| November 27th - 30th | Fierce Blizzard afflicts Peninsular |
| December 7th - | Decision to Evacuate Anzac Cove and Suvla Bay Confirmed |
| December 20th | Evacuation of Suvla and Anzac Cove completed |
| December 28th | Decision to Evacuate Cape Helles Confirmed |
| January 7th 1916 | Turkish Offensive Launched Against Reduced British Forces |
| January 9th | Last British troops depart the Gallipoli peninsula. |
|
| Useful Links
|
|
|
|
Suggested Reading
|
Gallipoli Diary
by Sir Ian Hamilton
Gallipoli
by Alan Moorehead
|
|


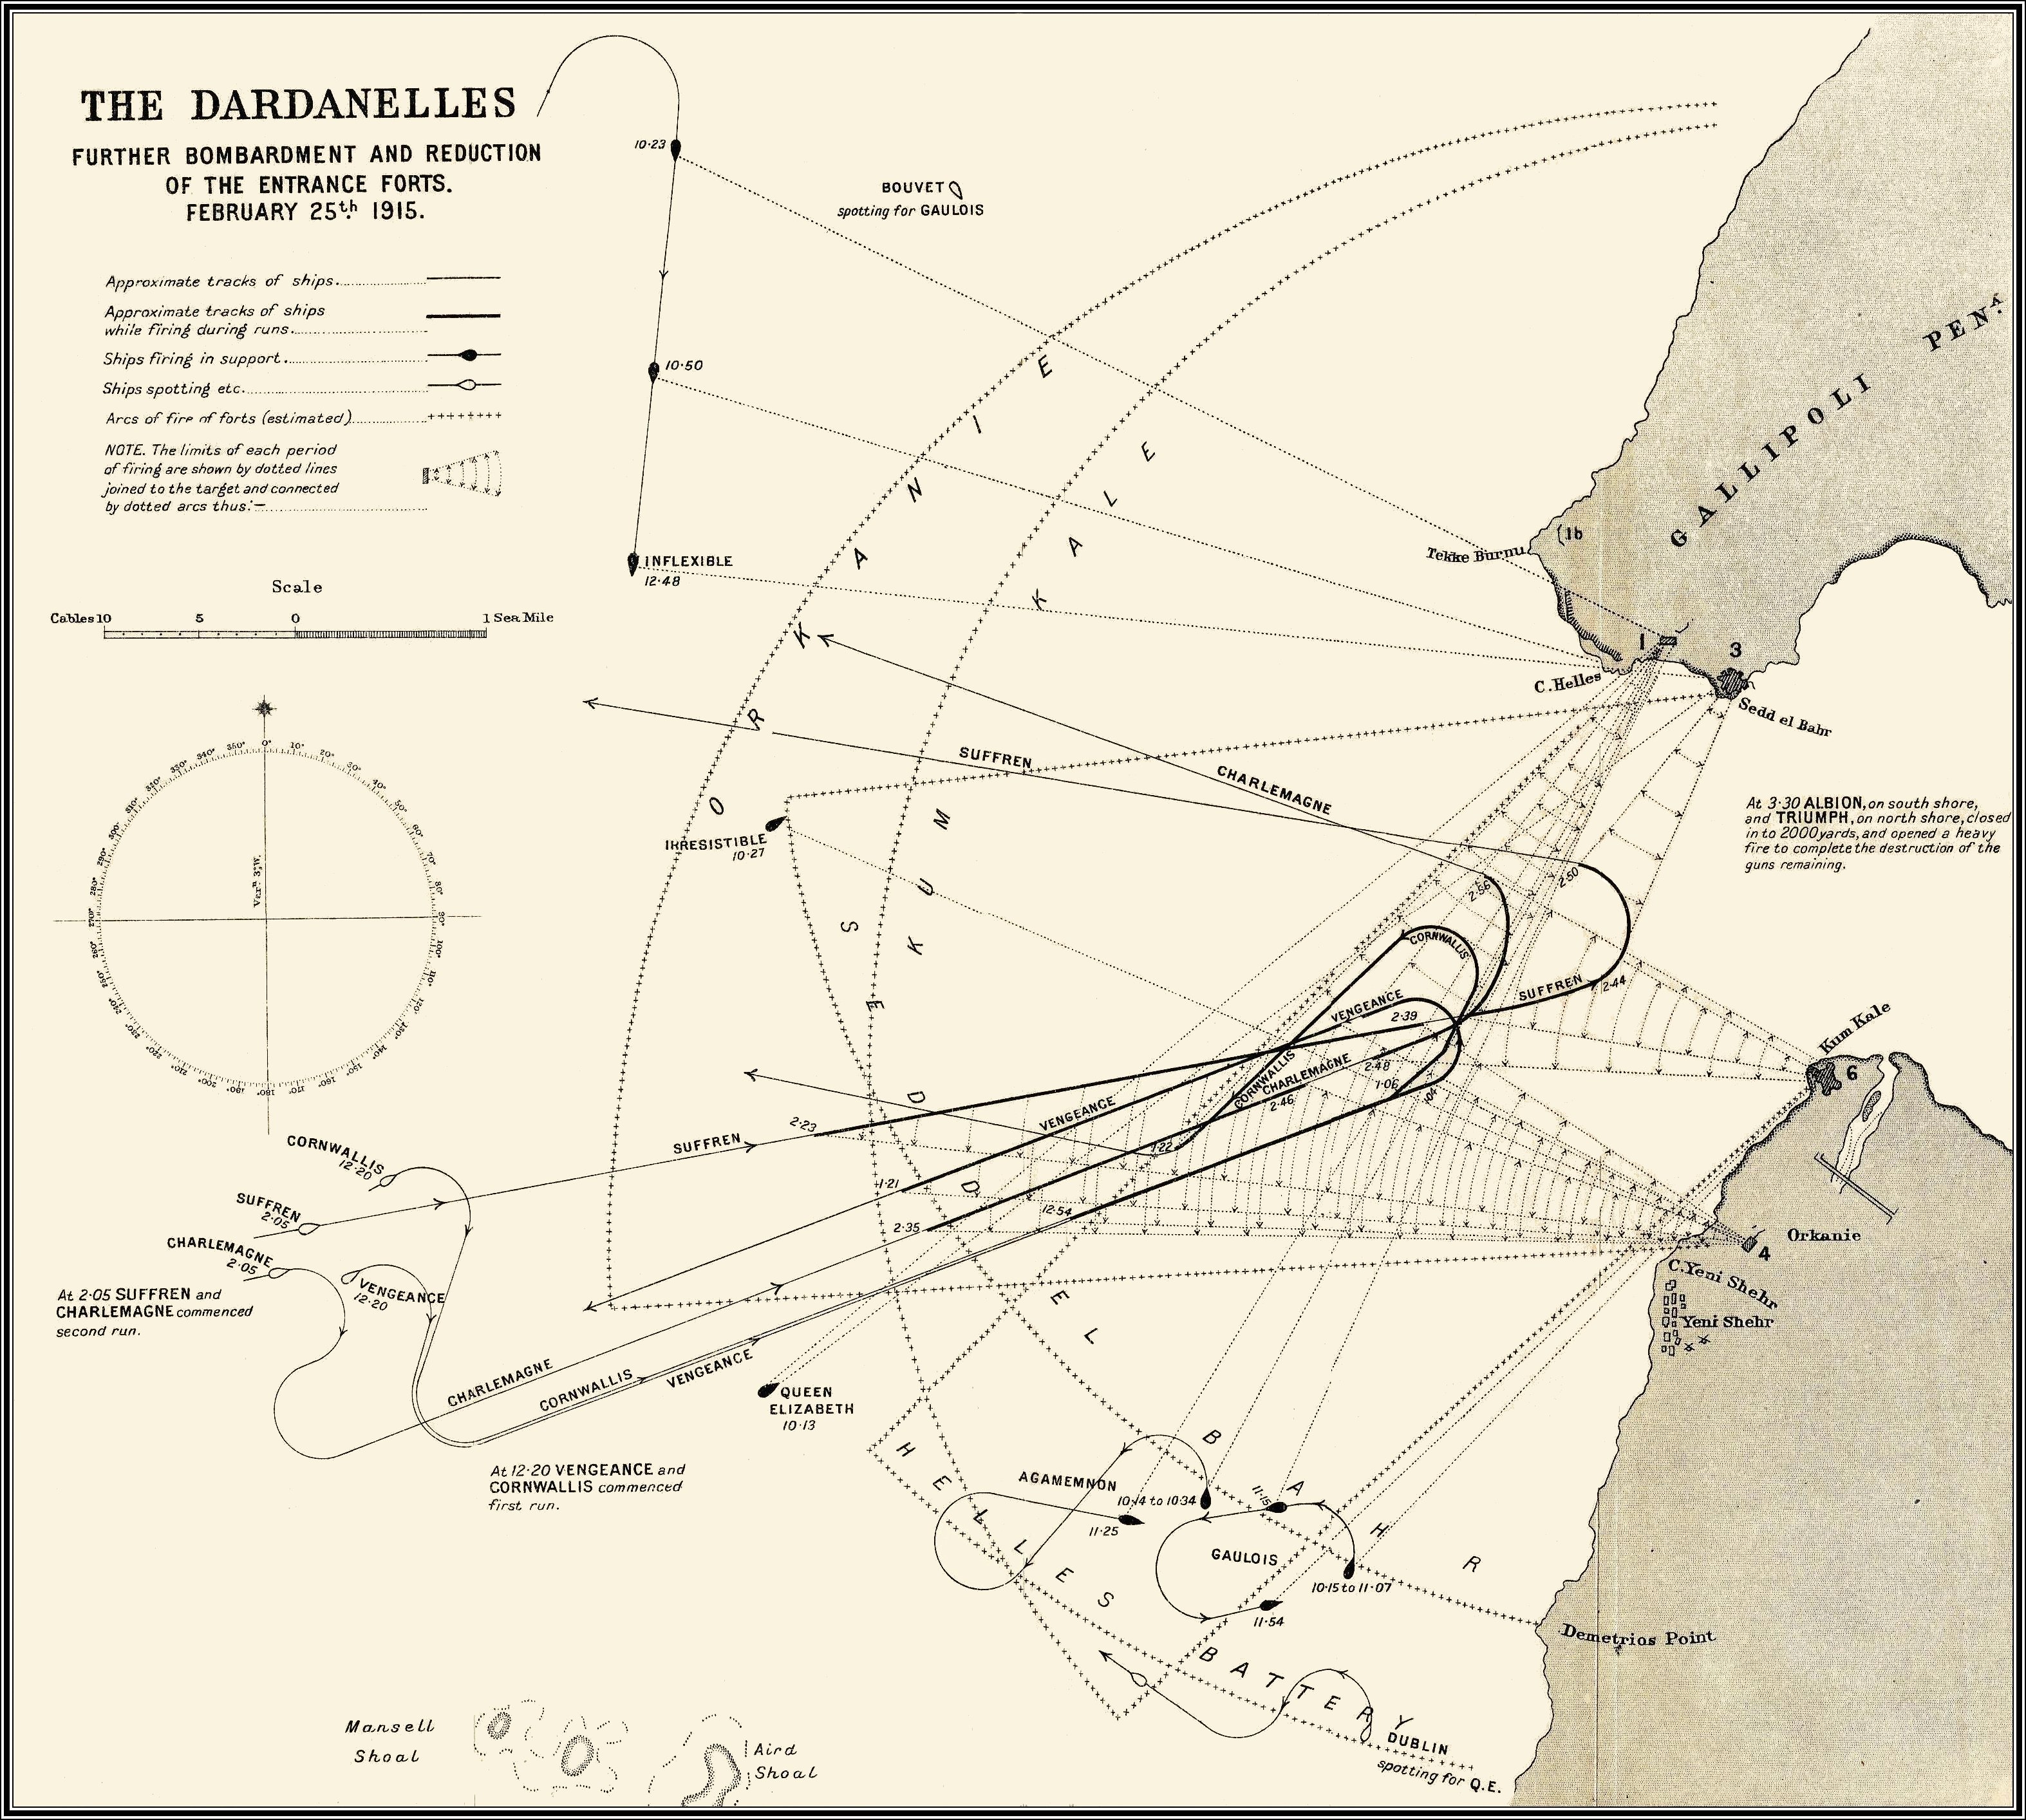
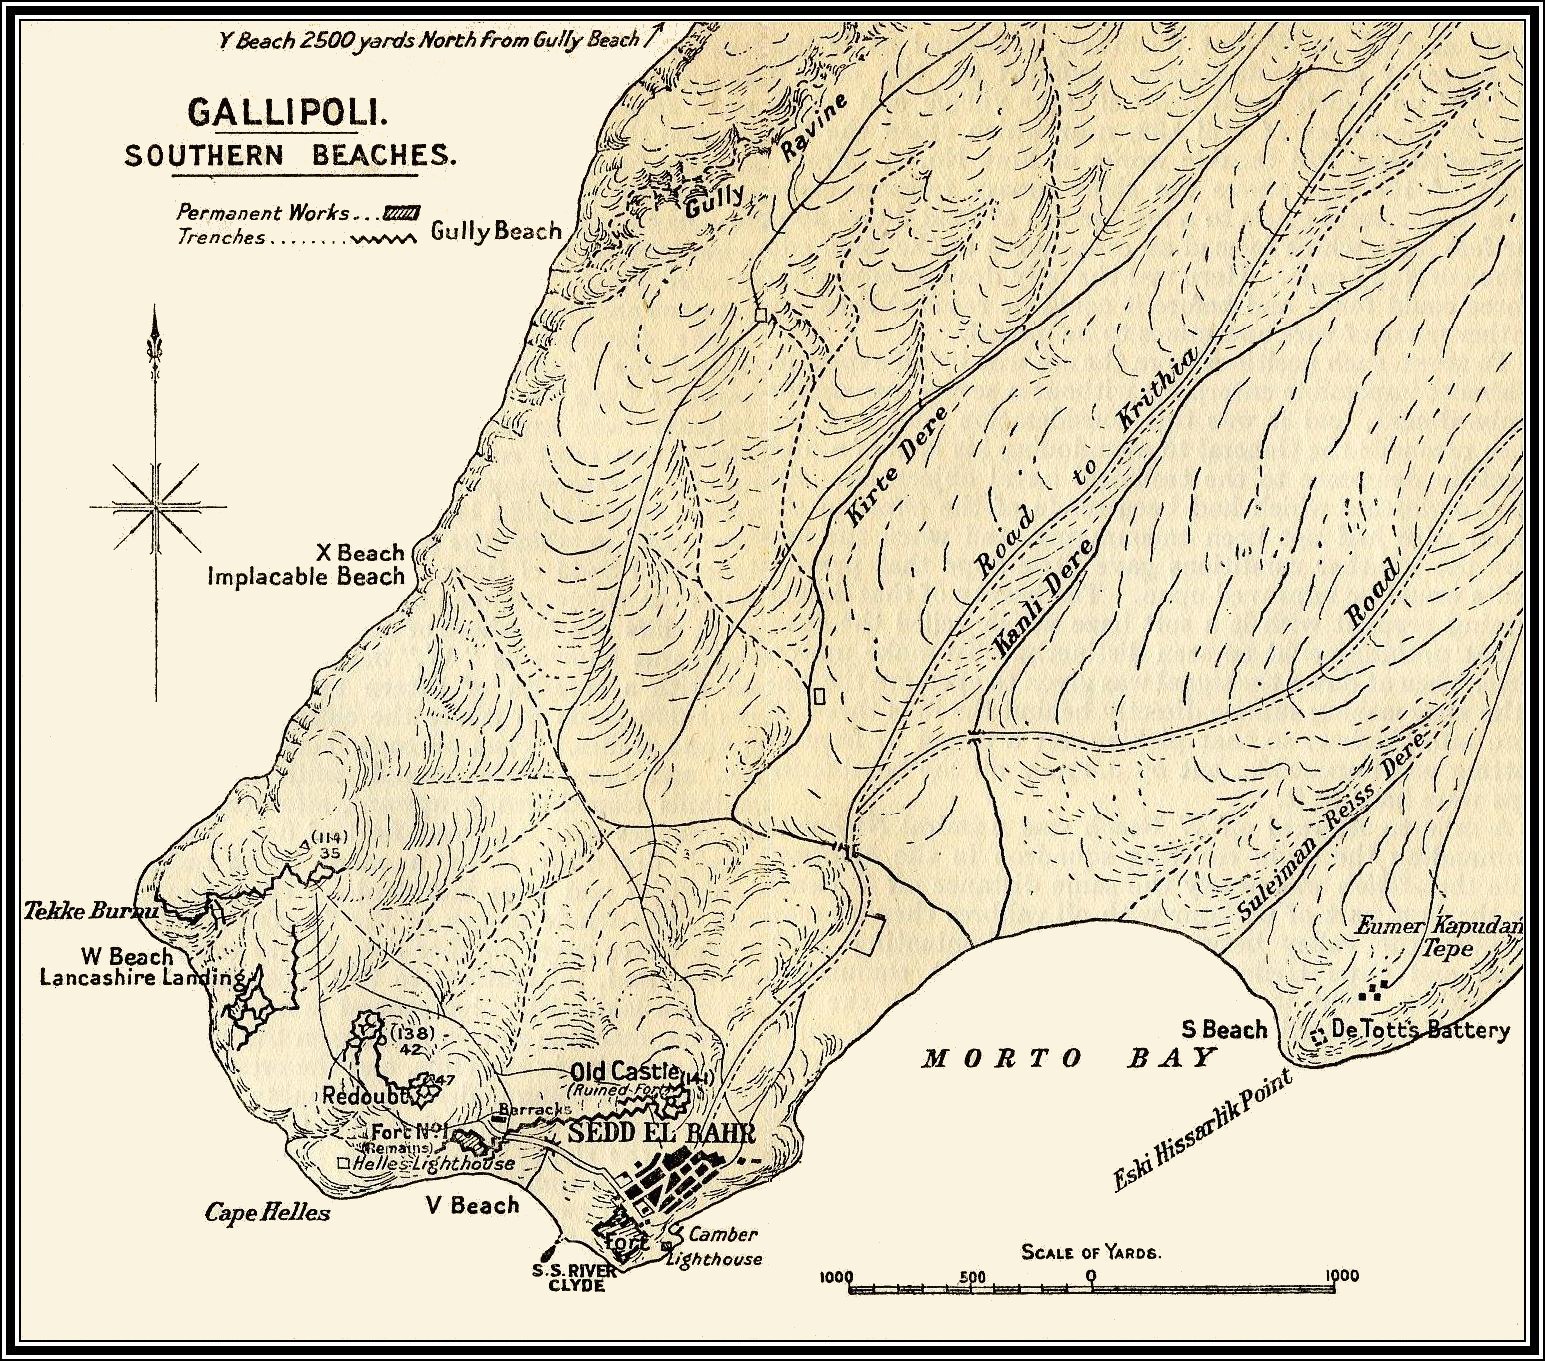
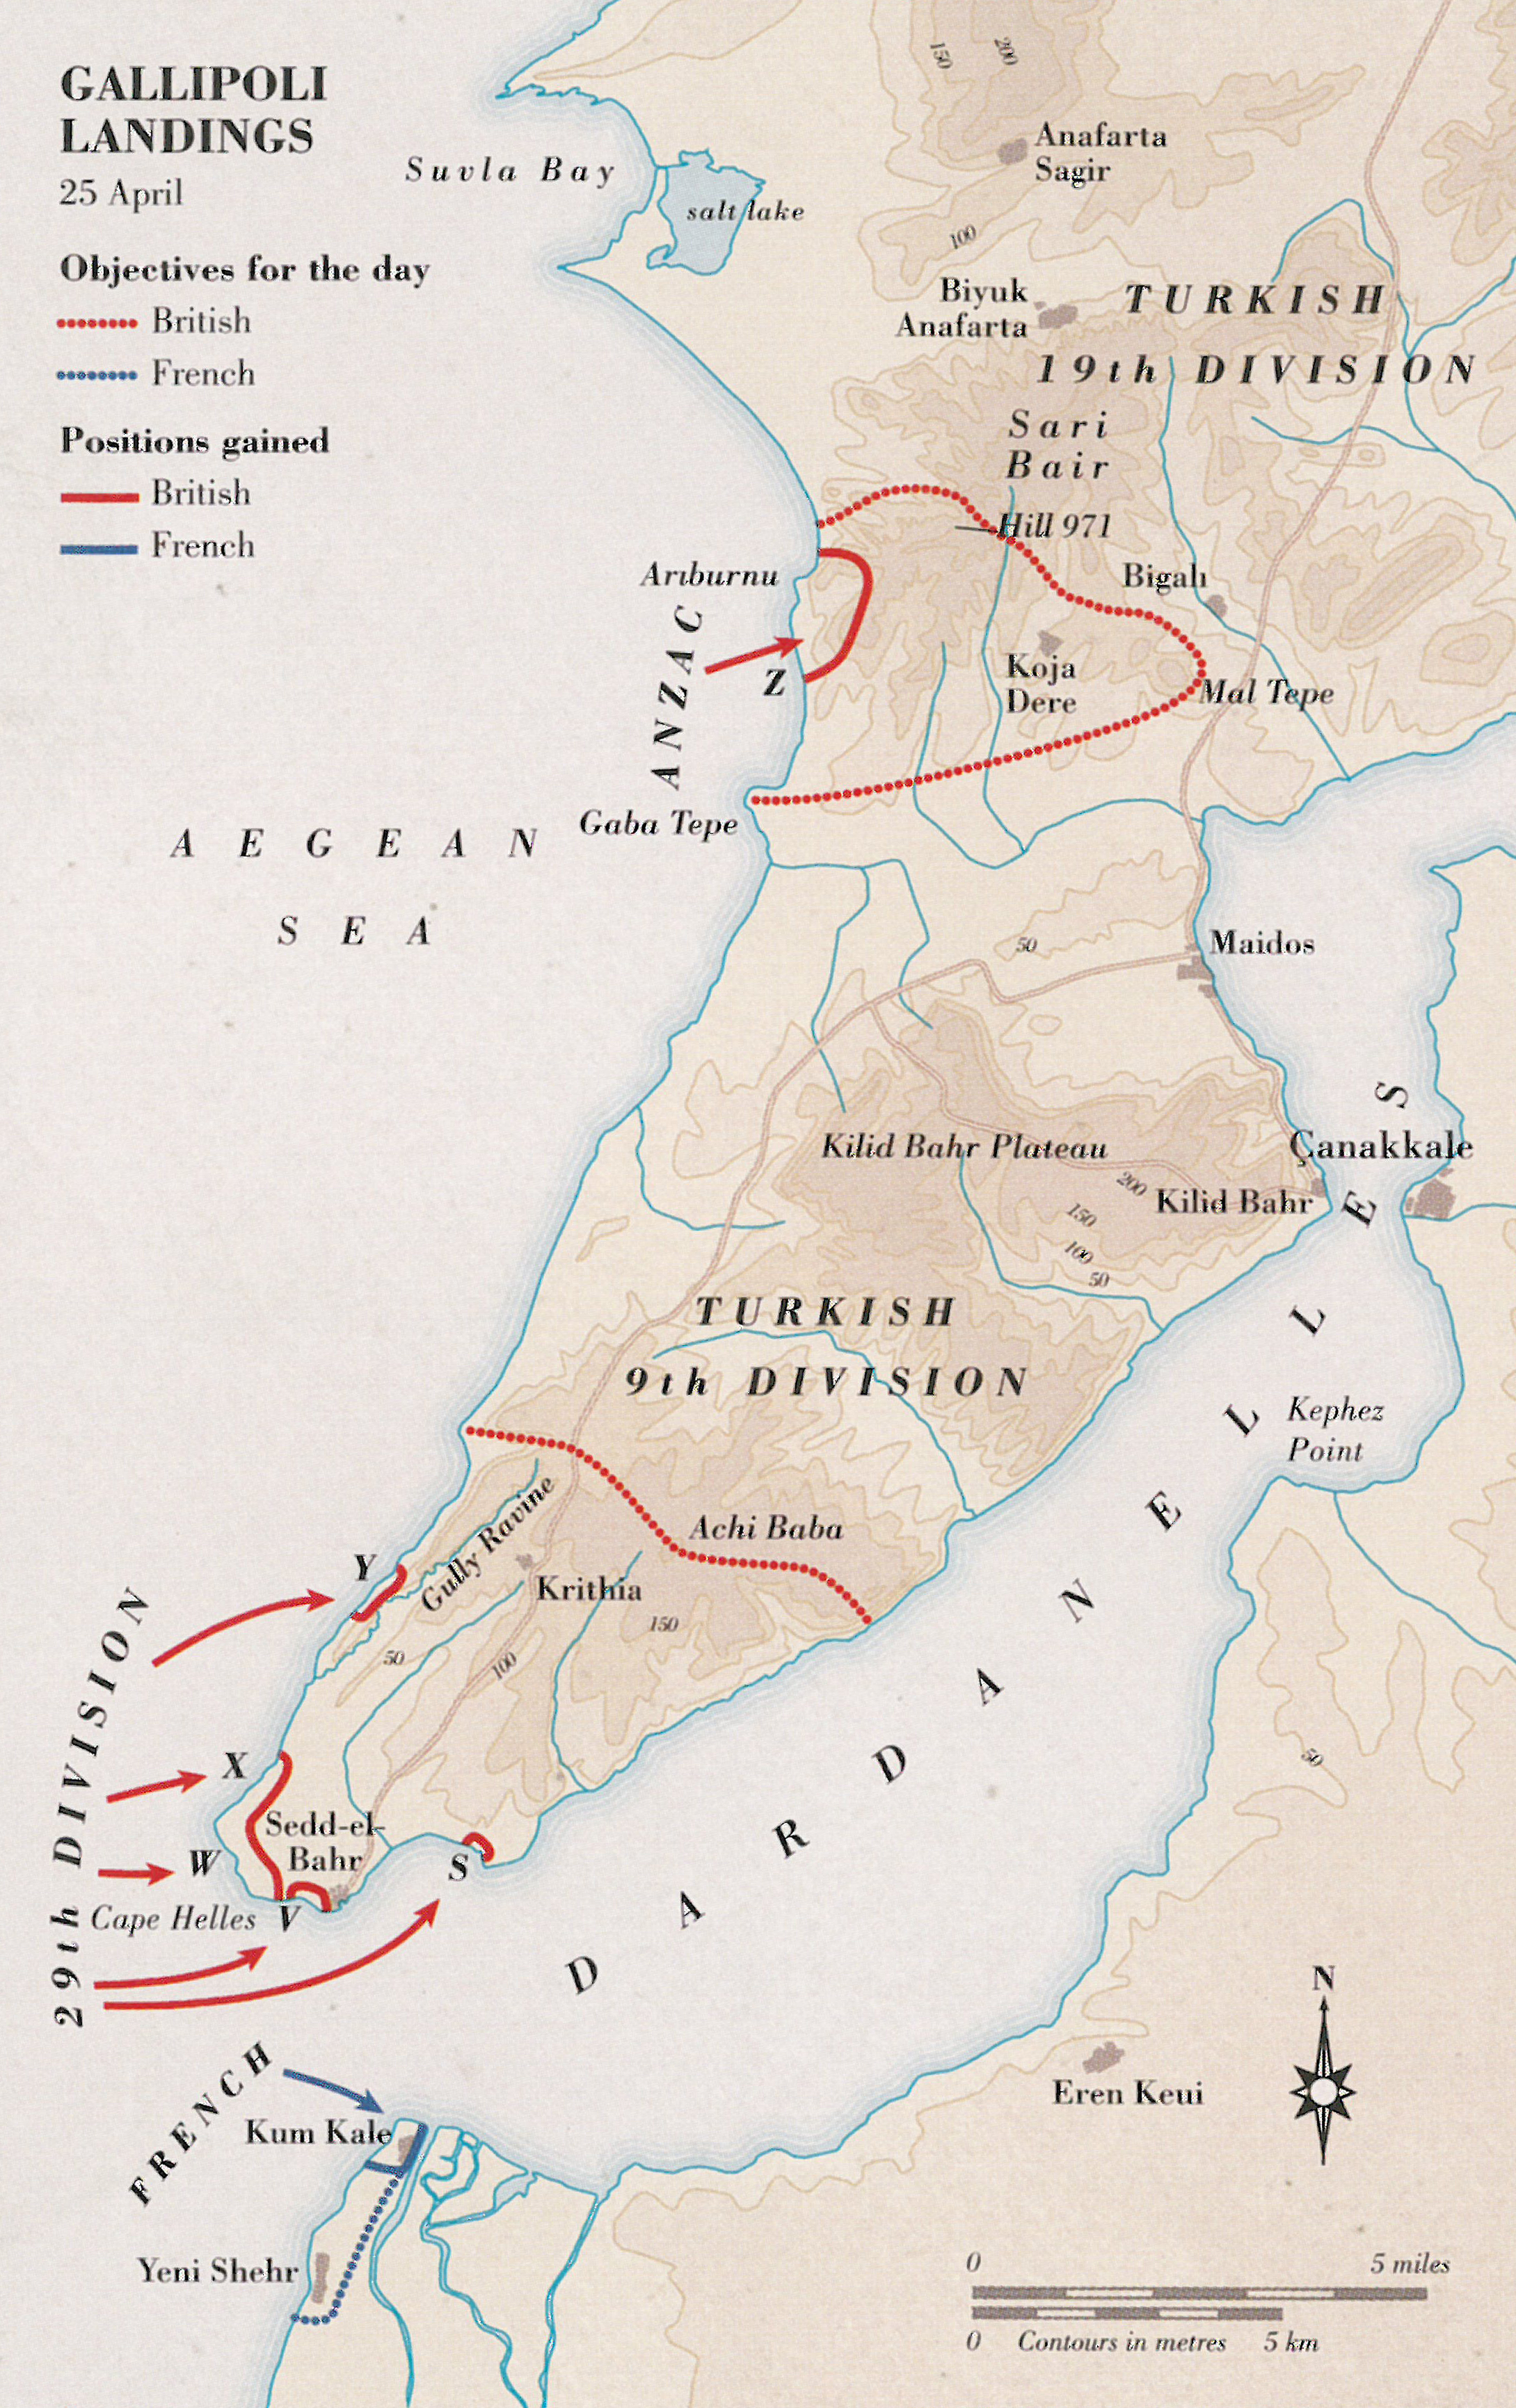
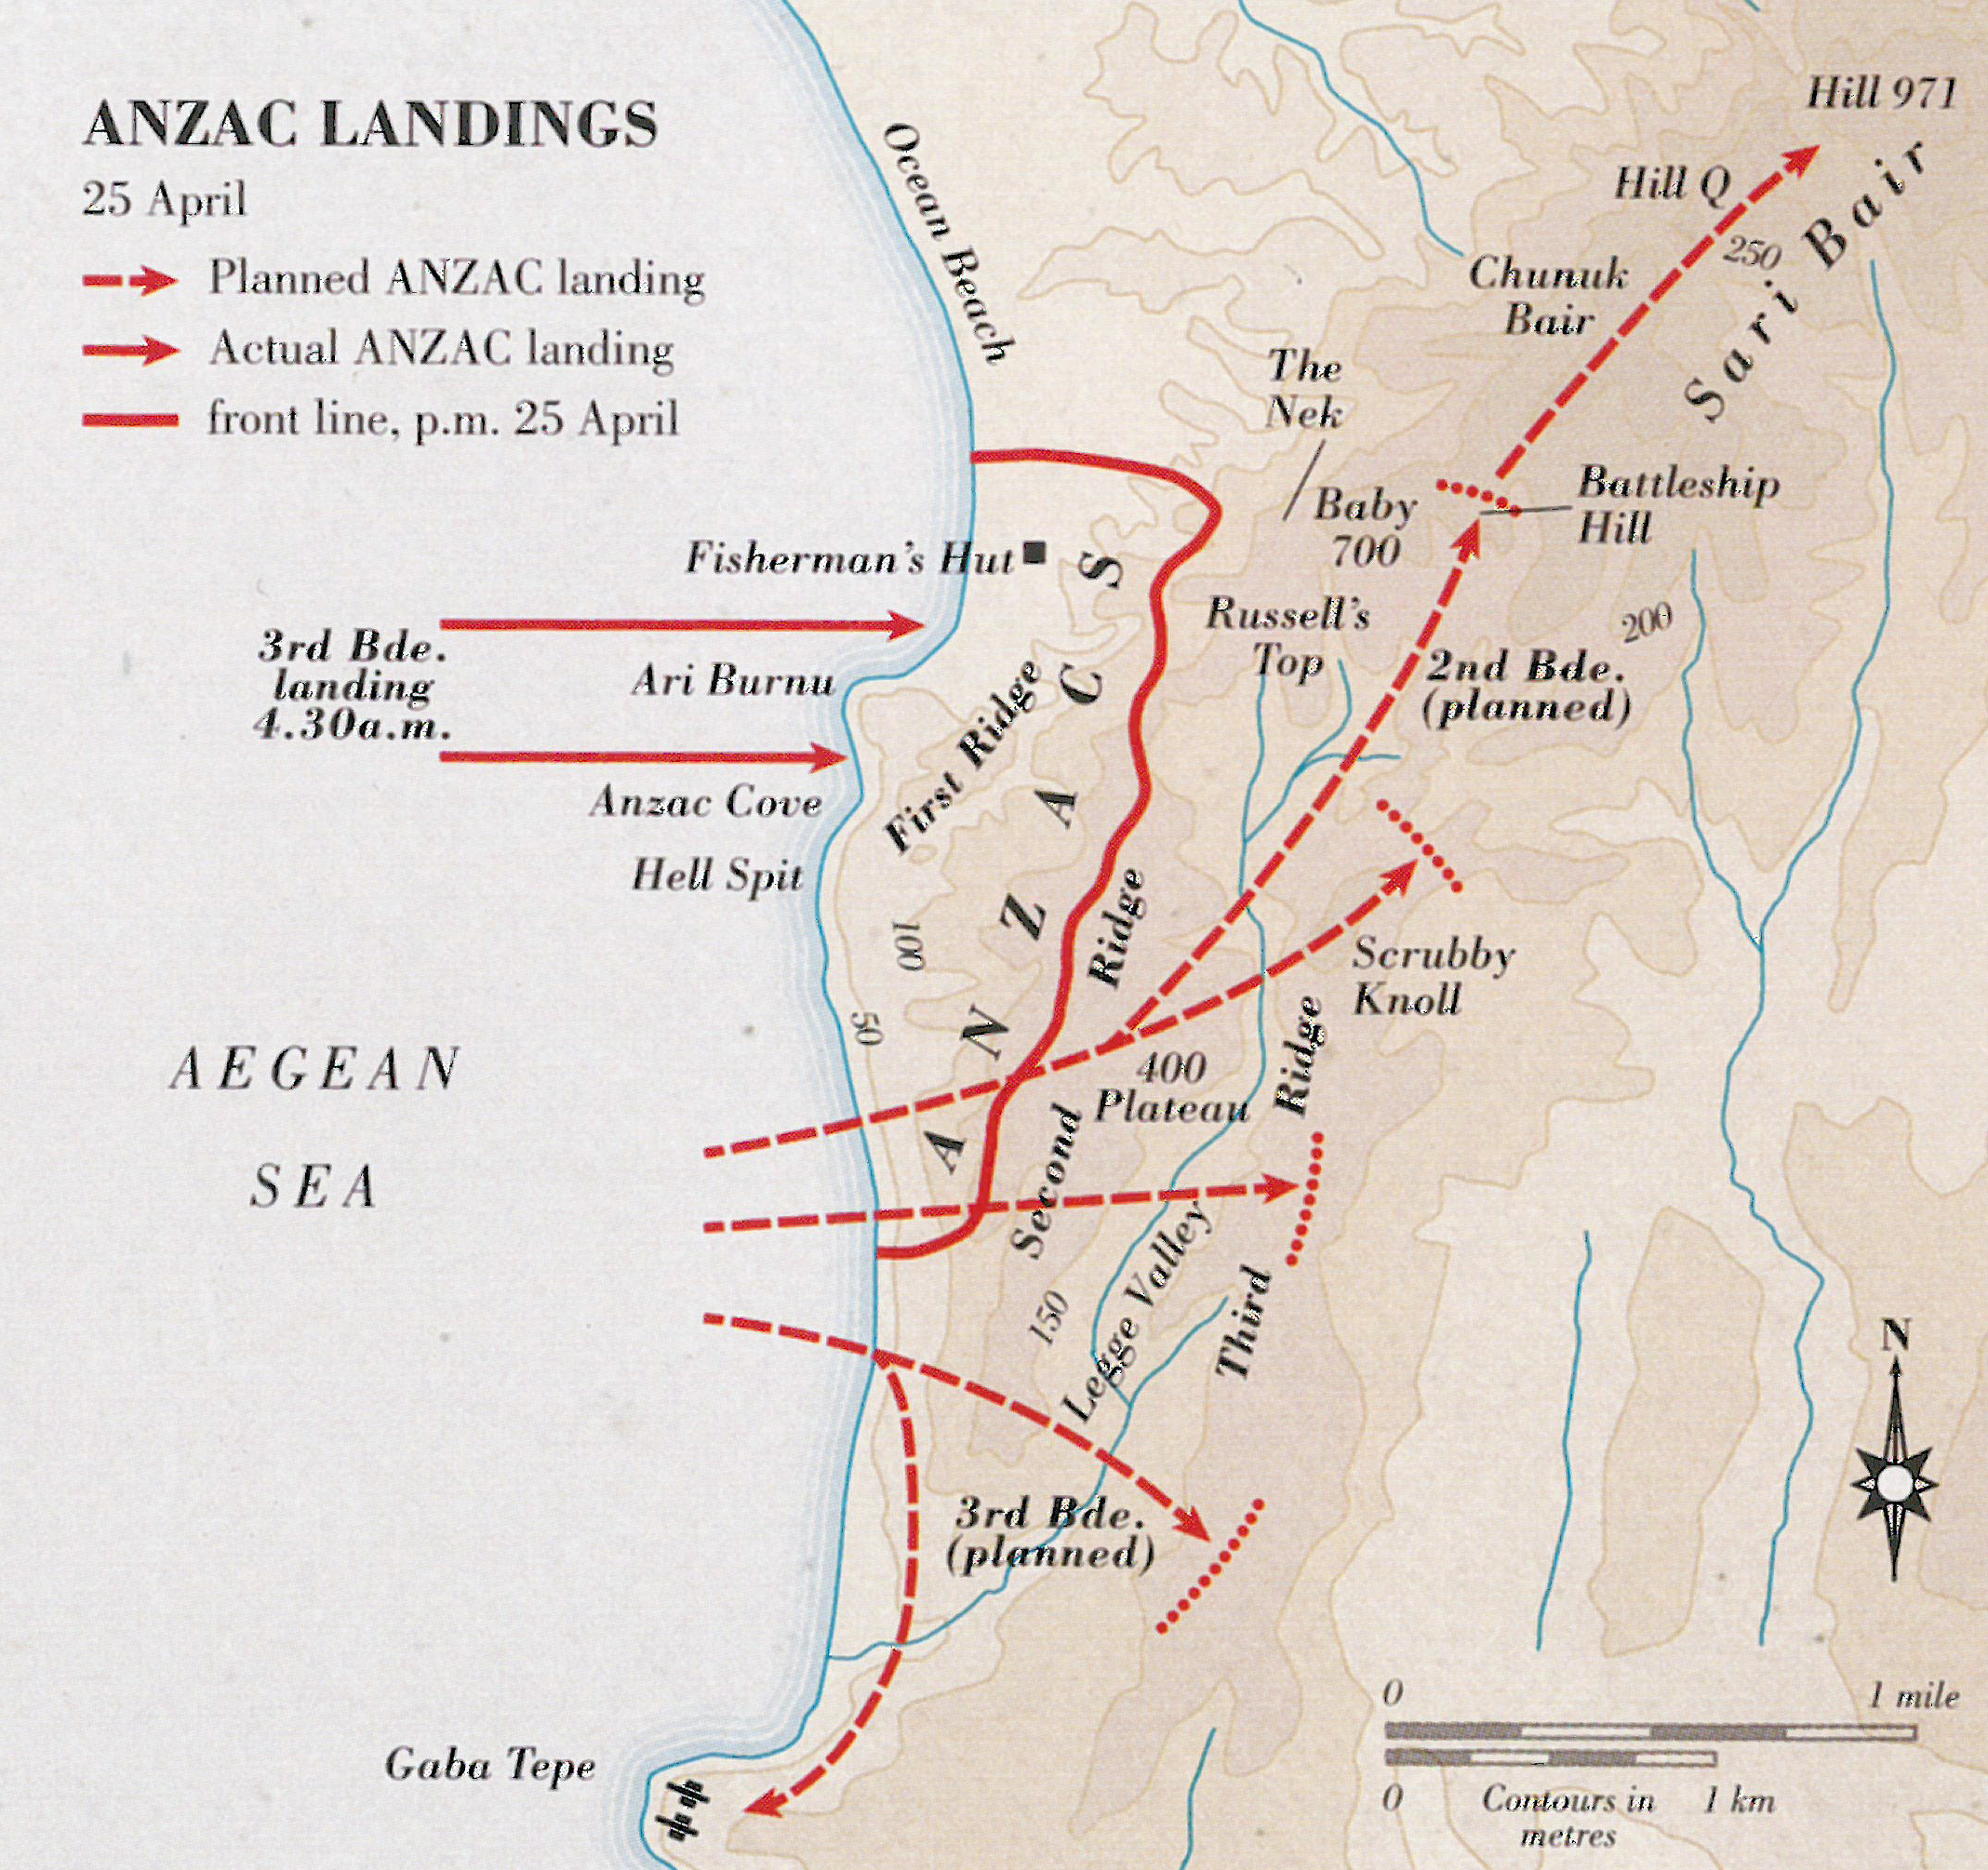
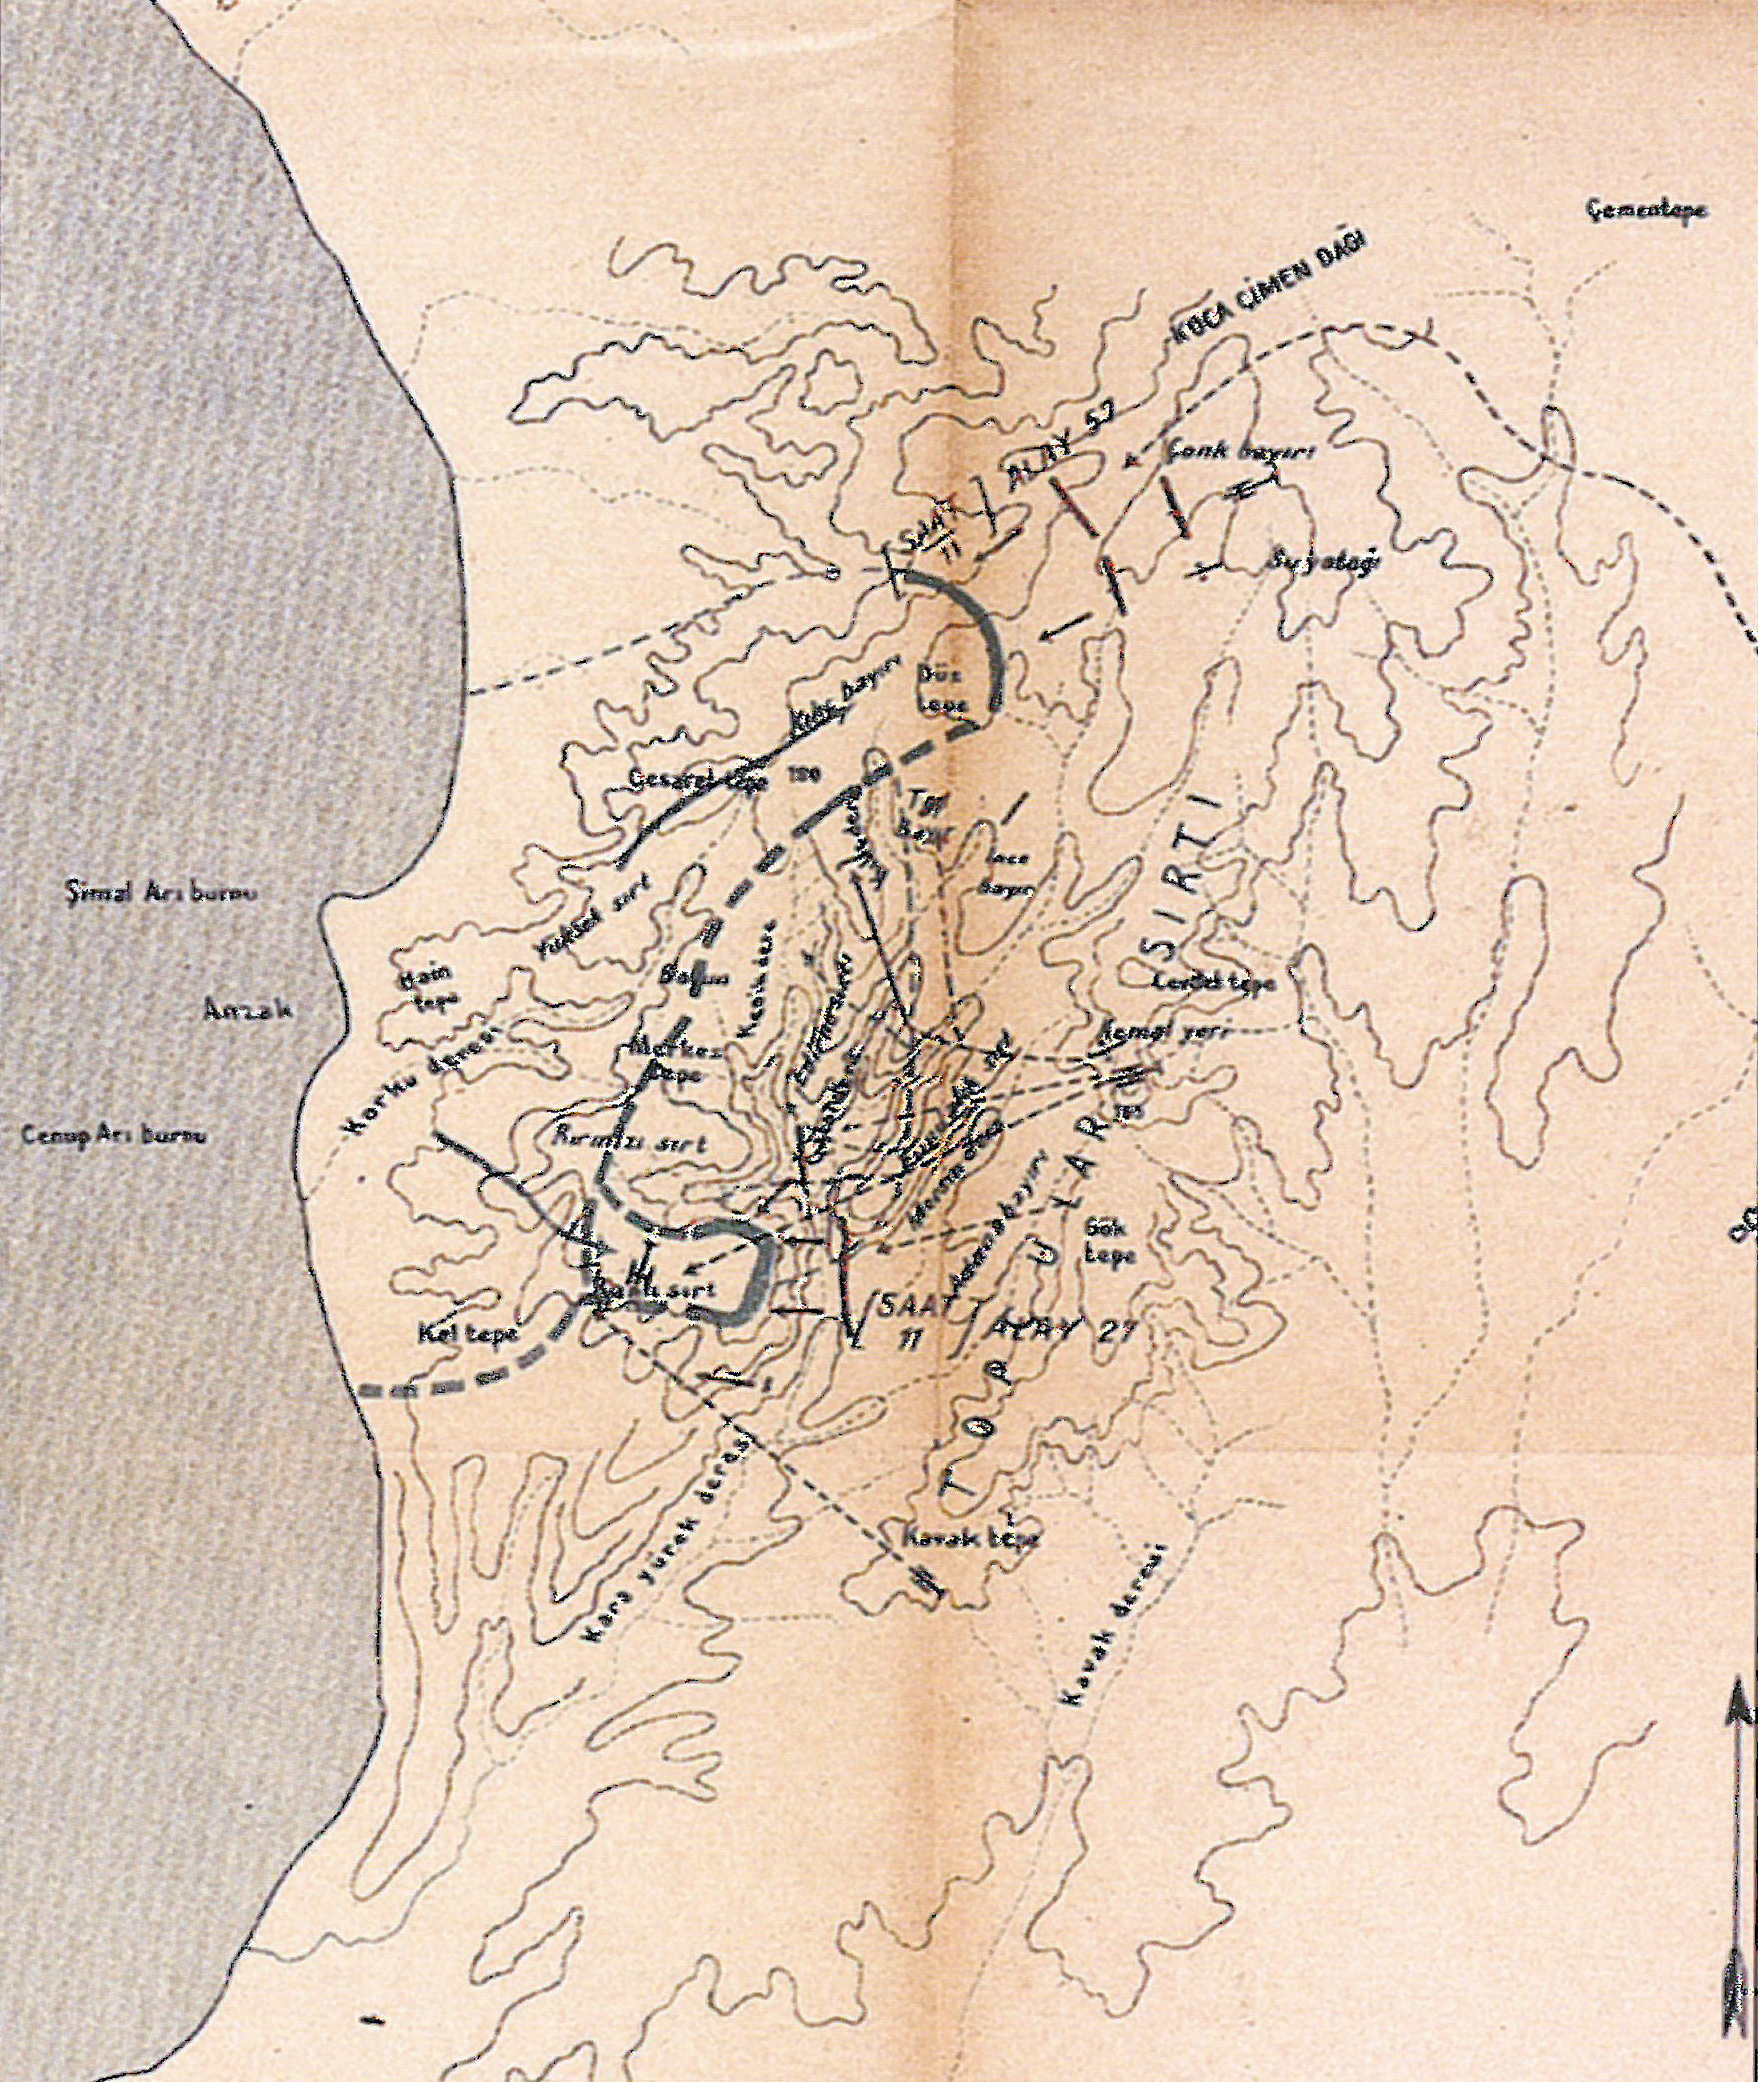
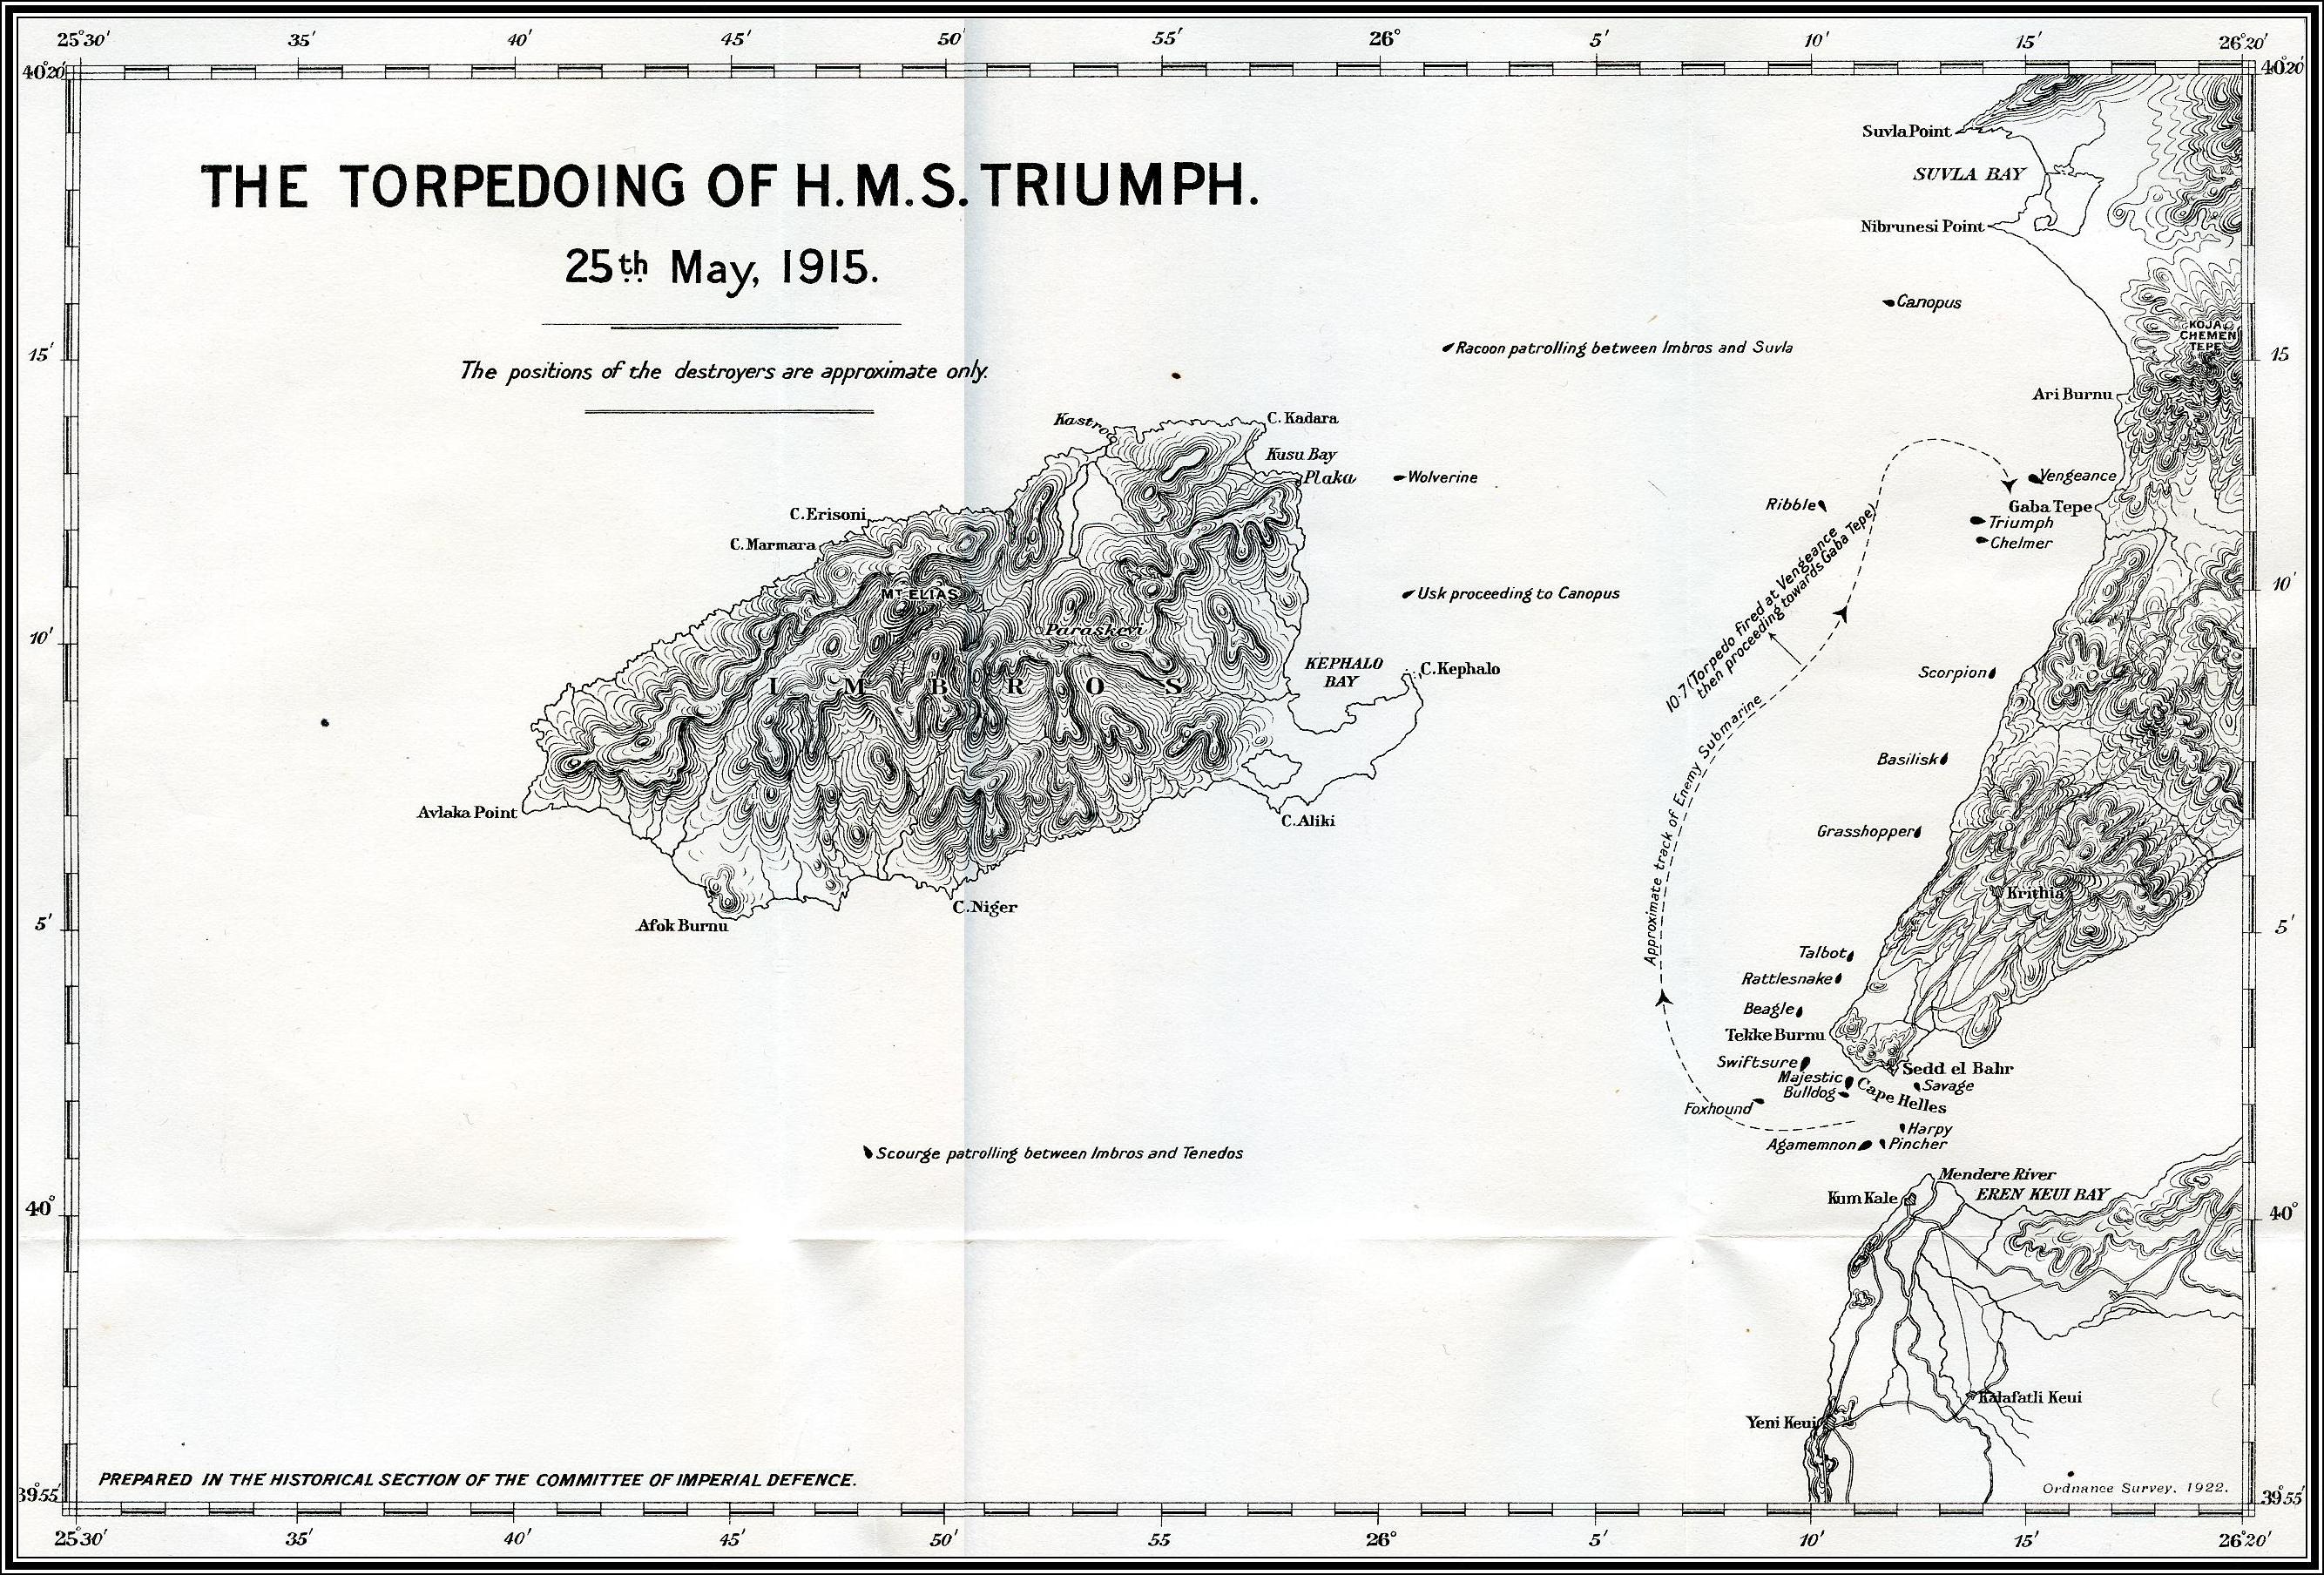
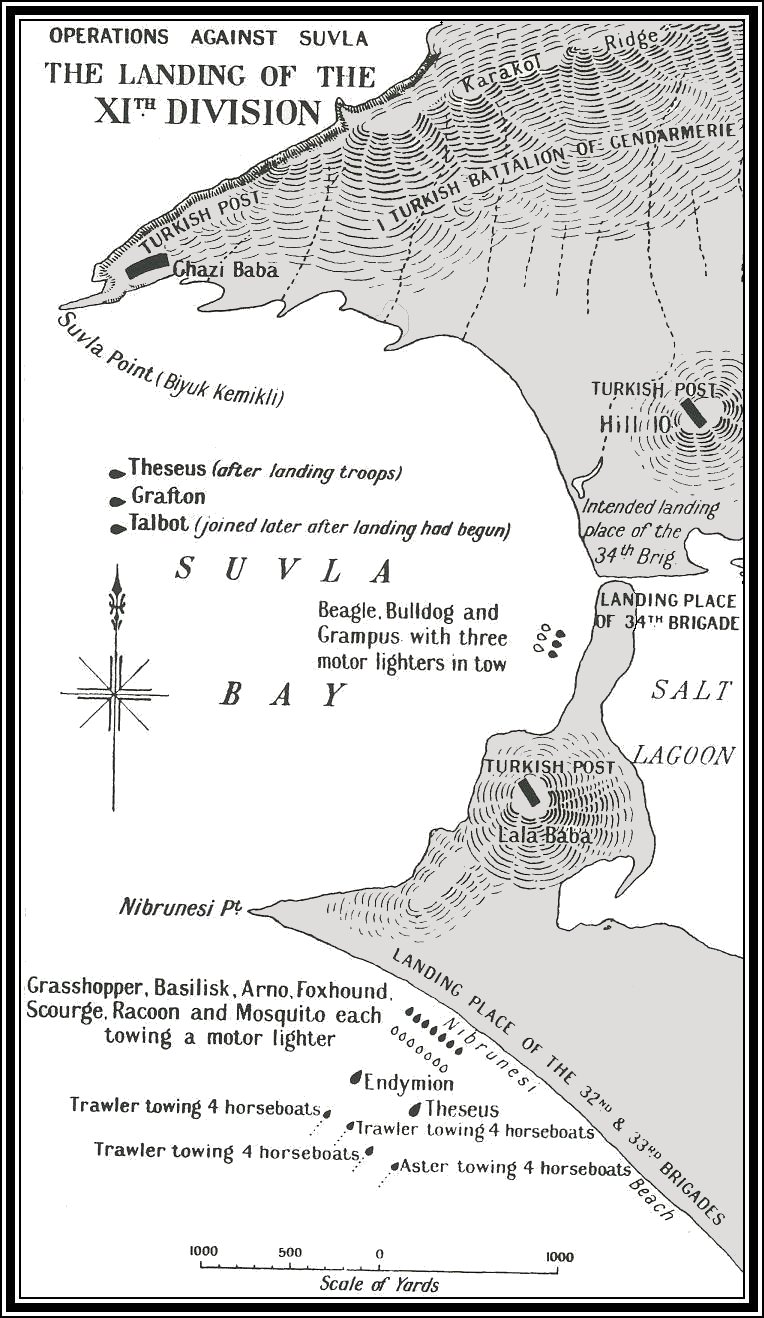
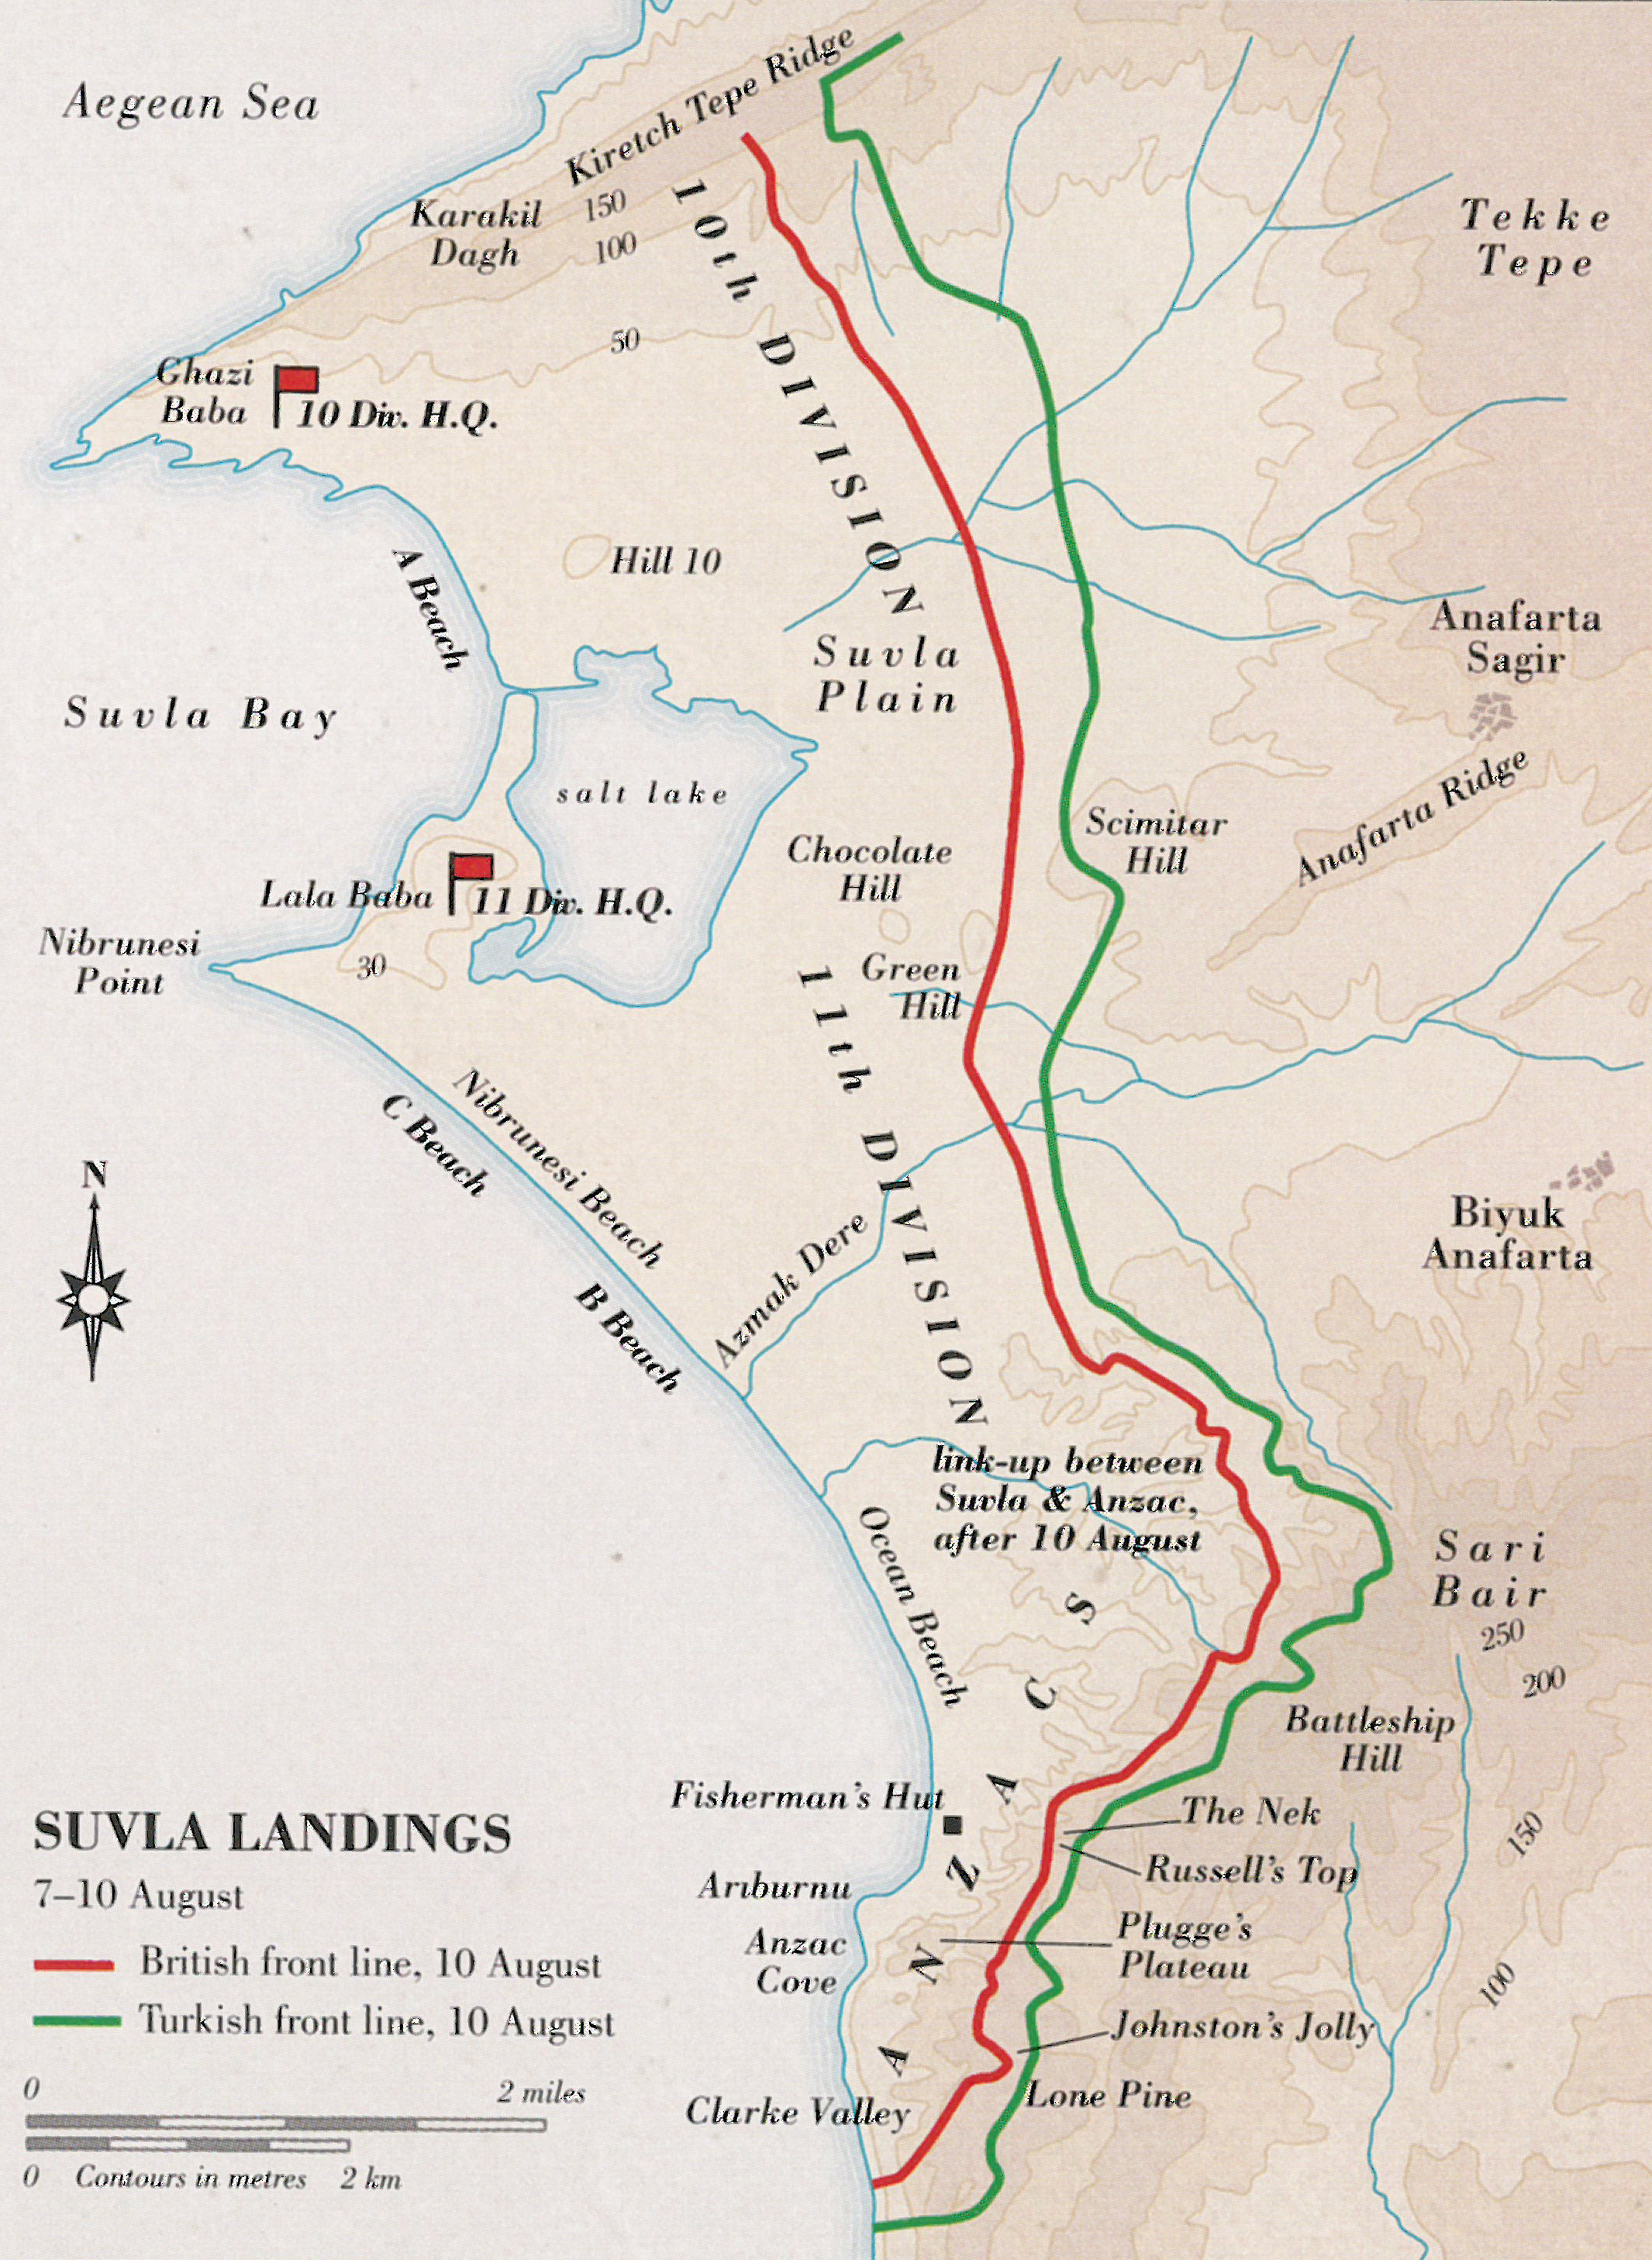
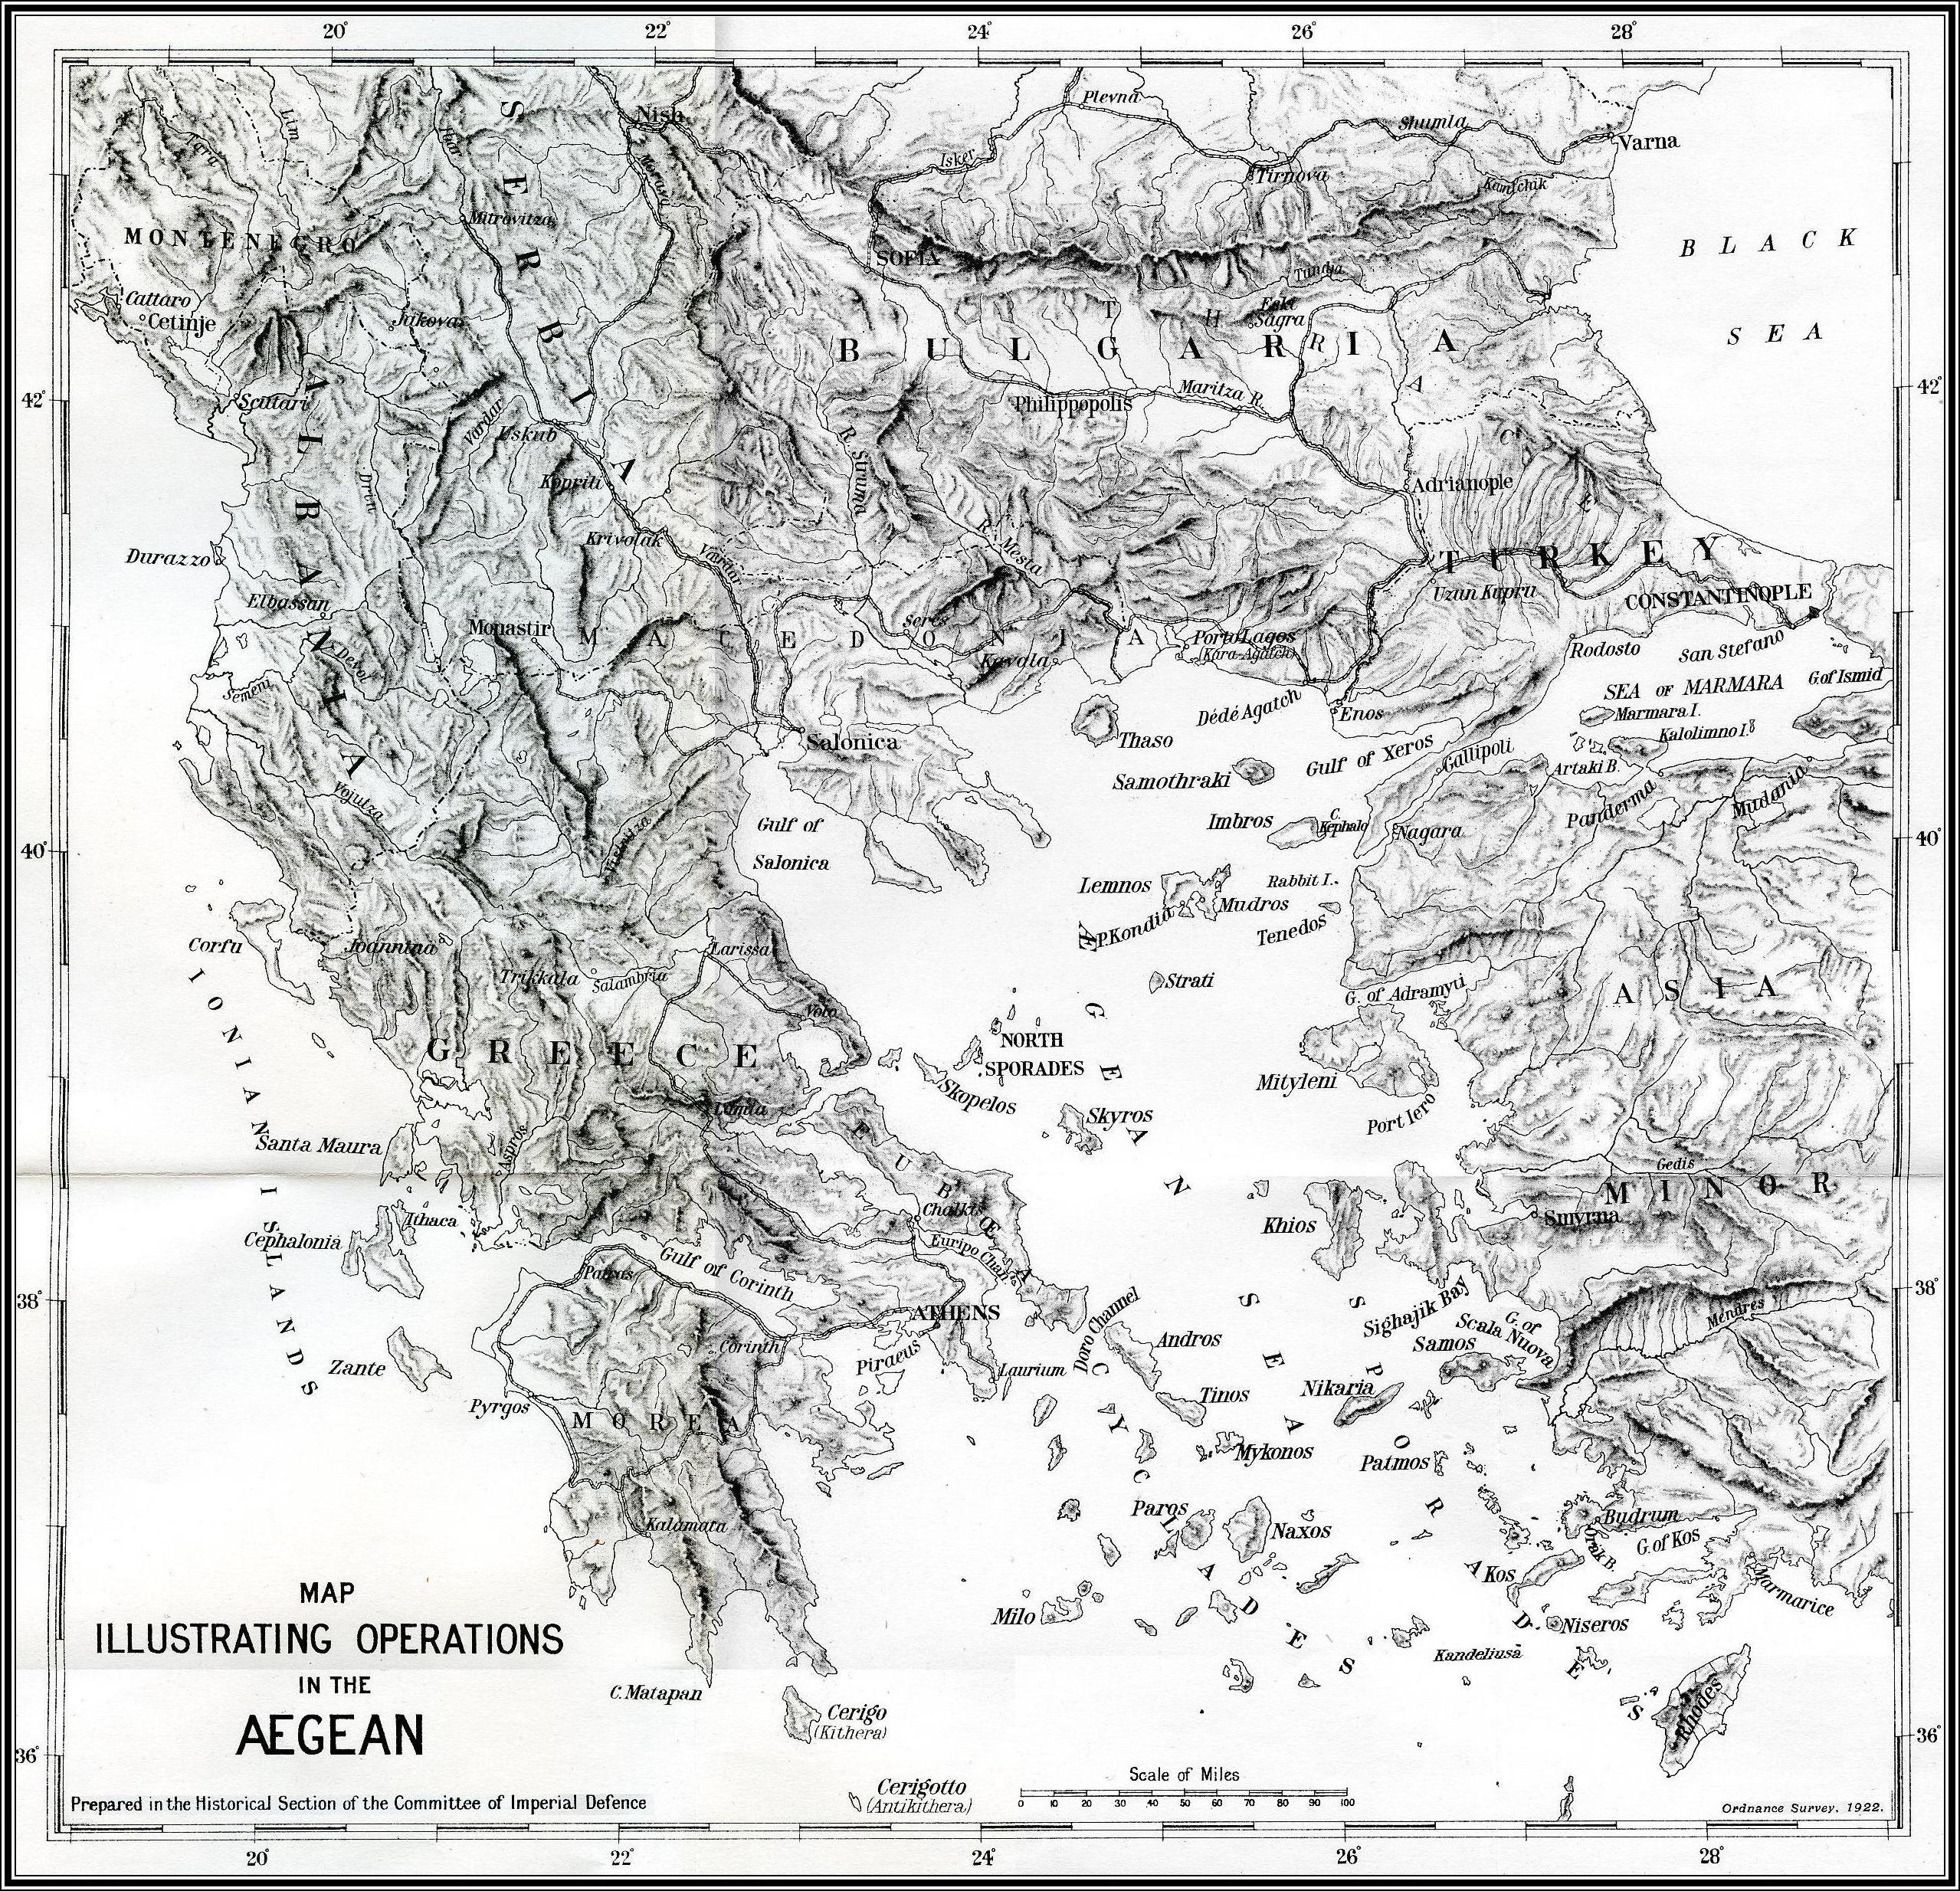